- 21.3.1 Installation of NDB Cluster on Linux
- 21.3.2 Installing NDB Cluster on Windows
- 21.3.3 Initial Configuration of NDB Cluster
- 21.3.4 Initial Startup of NDB Cluster
- 21.3.5 NDB Cluster Example with Tables and Data
- 21.3.6 Safe Shutdown and Restart of NDB Cluster
- 21.3.7 Upgrading and Downgrading NDB Cluster
- 21.3.8 The NDB Cluster Auto-Installer (NDB 7.5) (NO LONGER SUPPORTED)
- 21.3.9 The NDB Cluster Auto-Installer (NO LONGER SUPPORTED)
This section describes the basics for planning, installing, configuring, and running an NDB Cluster. Whereas the examples in Section 21.4, “Configuration of NDB Cluster” provide more in-depth information on a variety of clustering options and configuration, the result of following the guidelines and procedures outlined here should be a usable NDB Cluster which meets the minimum requirements for availability and safeguarding of data.
For information about upgrading or downgrading an NDB Cluster between release versions, see Section 21.3.7, “Upgrading and Downgrading NDB Cluster”.
This section covers hardware and software requirements; networking issues; installation of NDB Cluster; basic configuration issues; starting, stopping, and restarting the cluster; loading of a sample database; and performing queries.
Assumptions. The following sections make a number of assumptions regarding the cluster's physical and network configuration. These assumptions are discussed in the next few paragraphs.
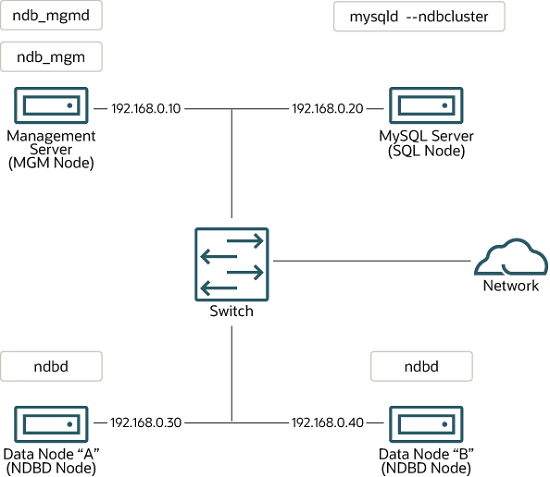
Cluster nodes and host computers. The cluster consists of four nodes, each on a separate host computer, and each with a fixed network address on a typical Ethernet network as shown here:
This setup is also shown in the following diagram:
Network addressing.
In the interest of simplicity (and reliability), this
How-To uses only numeric IP addresses.
However, if DNS resolution is available on your network, it is
possible to use host names in lieu of IP addresses in configuring
Cluster. Alternatively, you can use the hosts
file (typically /etc/hosts for Linux and
other Unix-like operating systems,
C:\WINDOWS\system32\drivers\etc\hosts on
Windows, or your operating system's equivalent) for providing
a means to do host lookup if such is available.
Potential hosts file issues.
A common problem when trying to use host names for Cluster nodes
arises because of the way in which some operating systems
(including some Linux distributions) set up the system's own
host name in the /etc/hosts during
installation. Consider two machines with the host names
ndb1 and ndb2, both in the
cluster network domain. Red Hat Linux
(including some derivatives such as CentOS and Fedora) places the
following entries in these machines'
/etc/hosts files:
#  ndb1 /etc/hosts:
127.0.0.1   ndb1.cluster ndb1 localhost.localdomain localhost
# ndb2 /etc/hosts:
127.0.0.1 ndb2.cluster ndb2 localhost.localdomain localhost
SUSE Linux (including OpenSUSE) places these entries in the
machines' /etc/hosts files:
#  ndb1 /etc/hosts:
127.0.0.1       localhost
127.0.0.2       ndb1.cluster ndb1
# ndb2 /etc/hosts:
127.0.0.1 localhost
127.0.0.2 ndb2.cluster ndb2
In both instances, ndb1 routes
ndb1.cluster to a loopback IP address, but gets a
public IP address from DNS for ndb2.cluster,
while ndb2 routes ndb2.cluster
to a loopback address and obtains a public address for
ndb1.cluster. The result is that each data node
connects to the management server, but cannot tell when any other
data nodes have connected, and so the data nodes appear to hang
while starting.
You cannot mix localhost and other host names
or IP addresses in config.ini. For these
reasons, the solution in such cases (other than to use IP
addresses for all
config.ini HostName
entries) is to remove the fully qualified host names from
/etc/hosts and use these in
config.ini for all cluster hosts.
Host computer type. Each host computer in our installation scenario is an Intel-based desktop PC running a supported operating system installed to disk in a standard configuration, and running no unnecessary services. The core operating system with standard TCP/IP networking capabilities should be sufficient. Also for the sake of simplicity, we also assume that the file systems on all hosts are set up identically. In the event that they are not, you should adapt these instructions accordingly.
Network hardware. Standard 100 Mbps or 1 gigabit Ethernet cards are installed on each machine, along with the proper drivers for the cards, and that all four hosts are connected through a standard-issue Ethernet networking appliance such as a switch. (All machines should use network cards with the same throughput. That is, all four machines in the cluster should have 100 Mbps cards or all four machines should have 1 Gbps cards.) NDB Cluster works in a 100 Mbps network; however, gigabit Ethernet provides better performance.
NDB Cluster is not intended for use in a network for which throughput is less than 100 Mbps or which experiences a high degree of latency. For this reason (among others), attempting to run an NDB Cluster over a wide area network such as the Internet is not likely to be successful, and is not supported in production.
Sample data.
We use the world database which is available
for download from the MySQL website (see
https://dev.mysql.com/doc/index-other.html). We assume that each
machine has sufficient memory for running the operating system,
required NDB Cluster processes, and (on the data nodes) storing
the database.
For general information about installing MySQL, see Chapter 2, Installing and Upgrading MySQL. For information about installation of NDB Cluster on Linux and other Unix-like operating systems, see Section 21.3.1, “Installation of NDB Cluster on Linux”. For information about installation of NDB Cluster on Windows operating systems, see Section 21.3.2, “Installing NDB Cluster on Windows”.
For general information about NDB Cluster hardware, software, and networking requirements, see Section 21.2.3, “NDB Cluster Hardware, Software, and Networking Requirements”.
