MySQL 5.7 Release Notes
MySQL Installer provides a wizard-like tool to install and configure new MySQL products for Windows. Unlike the initial setup, which runs only once, MySQL Installer invokes the wizard each time you download or install a new product. For first-time installations, the steps of the initial setup proceed directly into the steps of the installation. For assistance with product selection, see Locating Products to Install.
Note
Full permissions are granted to the user executing MySQL Installer to all
generated files, such as my.ini. This does
not apply to files and directories for specific products, such
as the MySQL server data directory in
%ProgramData% that is owned by
SYSTEM.
Products installed and configured on a host follow a general pattern that might require your input during the various steps. If you attempt to install a product that is incompatible with the existing MySQL server version (or a version selected for upgrade), you are alerted about the possible mismatch.
MySQL Installer provides the following sequence of actions that apply to different workflows:
Select Products. If you selected the
Customsetup type during the initial setup or clicked Add from the MySQL Installer dashboard, MySQL Installer includes this action in the sidebar. From this page, you can apply a filter to modify the Available Products list and then select one or more products to move (using arrow keys) to the Products To Be Installed list.Select the check box on this page to activate the Select Features action where you can customize the products features after the product is downloaded.
Download. If you installed the full (not web) MySQL Installer package, all
.msifiles were loaded to theProduct Cachefolder during the initial setup and are not downloaded again. Otherwise, click to begin the download. The status of each product changes fromReady to Download, toDownloading, and then toDownloaded.To retry a single unsuccessful download, click the Try Again link.
To retry all unsuccessful downloads, click .
Select Features To Install (disabled by default). After MySQL Installer downloads a product's
.msifile, you can customize the features if you enabled the optional check box previously during the Select Products action.To customize product features after the installation, click Modify in the MySQL Installer dashboard.
Installation. The status of each product in the list changes from
Ready to Install, toInstalling, and lastly toComplete. During the process, click Show Details to view the installation actions.If you cancel the installation at this point, the products are installed, but the server (if installed) is not yet configured. To restart the server configuration, open MySQL Installer from the Start menu and click Reconfigure next to the appropriate server in the dashboard.
Product configuration. This step applies to MySQL Server, MySQL Router, and samples only. The status for each item in the list should indicate
Ready to Configure. Click to start the configuration wizard for all items in the list. The configuration options presented during this step are specific to the version of database or router that you selected to install.Click to begin applying the configuration options or click (repeatedly) to return to each configuration page.
Installation complete. This step finalizes the installation for products that do not require configuration. It enables you to copy the log to a clipboard and to start certain applications, such as MySQL Workbench and MySQL Shell. Click to open the MySQL Installer dashboard.
MySQL Installer performs the initial configuration of the MySQL server. For example:
It creates the configuration file (
my.ini) that is used to configure the MySQL server. The values written to this file are influenced by choices you make during the installation process. Some definitions are host dependent.By default, a Windows service for the MySQL server is added.
Provides default installation and data paths for MySQL server. For instructions on how to change the default paths, see Section 2.3.3.2, “Setting Alternative Server Paths with MySQL Installer”.
It can optionally create MySQL server user accounts with configurable permissions based on general roles, such as DB Administrator, DB Designer, and Backup Admin. It optionally creates a Windows user named
MysqlSyswith limited privileges, which would then run the MySQL Server.User accounts may also be added and configured in MySQL Workbench.
Checking Show Advanced Options enables additional Logging Options to be set. This includes defining custom file paths for the error log, general log, slow query log (including the configuration of seconds it requires to execute a query), and the binary log.
During the configuration process, click to proceed to the next step or to return to the previous step. Click at the final step to apply the server configuration.
The sections that follow describe the server configuration options that apply to MySQL server on Windows. The server version you installed will determine which steps and options you can configure. Configuring MySQL server may include some or all of the steps.
Server Configuration Type
Choose the MySQL server configuration type that describes your setup. This setting defines the amount of system resources (memory) to assign to your MySQL server instance.
Development: A computer that hosts many other applications, and typically this is your personal workstation. This setting configures MySQL to use the least amount of memory.
Server: Several other applications are expected to run on this computer, such as a web server. The Server setting configures MySQL to use a medium amount of memory.
Dedicated: A computer that is dedicated to running the MySQL server. Because no other major applications run on this server, this setting configures MySQL to use the majority of available memory.
Manual
Prevents MySQL Installer from attempting to optimize the server installation, and instead, sets the default values to the server variables included in the
my.iniconfiguration file. With theManualtype selected, MySQL Installer uses the default value of 16M for thetmp_table_sizevariable assignment.
Connectivity
Connectivity options control how the connection to MySQL is made. Options include:
TCP/IP: This option is selected by default. You may disable TCP/IP Networking to permit local host connections only. With the TCP/IP connection option selected, you can modify the following items:
Port for classic MySQL protocol connections. The default value is
3306.X Protocol Port shown when configuring MySQL 8.0 server only. The default value is
33060Open Windows Firewall port for network access, which is selected by default for TCP/IP connections.
If a port number is in use already, you will see the information icon (
 ) next to the default value and
is disabled until you
provide a new port number.
) next to the default value and
is disabled until you
provide a new port number.
Named Pipe: Enable and define the pipe name, similar to setting the
named_pipesystem variable. The default name isMySQL.When you select Named Pipe connectivity, and then proceed to the next step, you are prompted to set the level of access control granted to client software on named-pipe connections. Some clients require only minimum access control for communication, while other clients require full access to the named pipe.
You can set the level of access control based on the Windows user (or users) running the client as follows:
Minimum access to all users (RECOMMENDED). This level is enabled by default because it is the most secure.
Full access to members of a local group. If the minimum-access option is too restrictive for the client software, use this option to reduce the number of users who have full access on the named pipe. The group must be established on Windows before you can select it from the list. Membership in this group should be limited and managed. Windows requires a newly added member to first log out and then log in again to join a local group.
Full access to all users (NOT RECOMMENDED). This option is less secure and should be set only when other safeguards are implemented.
Shared Memory: Enable and define the memory name, similar to setting the
shared_memorysystem variable. The default name isMySQL.
Advanced Configuration
Check Show Advanced and Logging Options to set custom logging and advanced options in later steps. The Logging Options step enables you to define custom file paths for the error log, general log, slow query log (including the configuration of seconds it requires to execute a query), and the binary log. The Advanced Options step enables you to set the unique server ID required when binary logging is enabled in a replication topology.
MySQL Enterprise Firewall (Enterprise Edition only)
The Enable MySQL Enterprise Firewall check box is deselected by default. Select this option to enable a security list that offers protection against certain types of attacks. Additional post-installation configuration is required (see Section 6.4.6, “MySQL Enterprise Firewall”).
The Authentication Method step is visible only during the installation or upgrade of MySQL 8.0.4 or higher. It introduces a choice between two server-side authentication options. The MySQL user accounts that you create in the next step will use the authentication method that you select in this step.
MySQL 8.0 connectors and community drivers that use
libmysqlclient 8.0 now support the
caching_sha2_password default
authentication plugin. However, if you are unable to update
your clients and applications to support this new
authentication method, you can configure the MySQL server to
use mysql_native_password for legacy
authentication. For more information about the implications of
this change, see
caching_sha2_password as the Preferred Authentication Plugin.
If you are installing or upgrading to MySQL 8.0.4 or higher, select one of the following authentication methods:
Use Strong Password Encryption for Authentication (RECOMMENDED)
MySQL 8.0 supports a new authentication based on improved, stronger SHA256-based password methods. It is recommended that all new MySQL server installations use this method going forward.
ImportantThe
caching_sha2_passwordauthentication plugin on the server requires new versions of connectors and clients, which add support for the new MySQL 8.0 default authentication.Use Legacy Authentication Method (Retain MySQL 5.x Compatibility)
Using the old MySQL 5.x legacy authentication method should be considered only in the following cases:
Applications cannot be updated to use MySQL 8.0 connectors and drivers.
Recompilation of an existing application is not feasible.
An updated, language-specific connector or driver is not available yet.
Root Account Password
Assigning a root password is required and you will be asked for it when performing other MySQL Installer operations. Password strength is evaluated when you repeat the password in the box provided. For descriptive information regarding password requirements or status, move your mouse pointer over the information icon (
) when it appears.
MySQL User Accounts (Optional)
Click or to create or modify MySQL user accounts with predefined roles. Next, enter the required account credentials:
User Name: MySQL user names can be up to 32 characters long.
Host: Select
localhostfor local connections only or<All Hosts (%)>when remote connections to the server are required.Role: Each predefined role, such as
DB Admin, is configured with its own set of privileges. For example, theDB Adminrole has more privileges than theDB Designerrole. The Role drop-down list contains a description of each role.Password: Password strength assessment is performed while you type the password. Passwords must be confirmed. MySQL permits a blank or empty password (considered to be insecure).
MySQL Installer Commercial Release Only: MySQL Enterprise Edition for Windows, a commercial product, also supports an authentication method that performs external authentication on Windows. Accounts authenticated by the Windows operating system can access the MySQL server without providing an additional password.
To create a new MySQL account that uses Windows authentication, enter the user name and then select a value for Host and Role. Click Windows authentication to enable the
authentication_windowsplugin. In the Windows Security Tokens area, enter a token for each Windows user (or group) who can authenticate with the MySQL user name. MySQL accounts can include security tokens for both local Windows users and Windows users that belong to a domain. Multiple security tokens are separated by the semicolon character (;) and use the following format for local and domain accounts:Local account
Enter the simple Windows user name as the security token for each local user or group; for example,
finley;jeffrey;admin.Domain account
Use standard Windows syntax (
domain\domainuser) or MySQL syntax (domain\\domainuser) to enter Windows domain users and groups.For domain accounts, you may need to use the credentials of an administrator within the domain if the account running MySQL Installer lacks the permissions to query the Active Directory. If this is the case, select Validate Active Directory users with to activate the domain administrator credentials.
Windows authentication permits you to test all of the security tokens each time you add or modify a token. Click to validate (or revalidate) each token. Invalid tokens generate a descriptive error message along with a red
Xicon and red token text. When all tokens resolve as valid (green text without anXicon), you can click to save the changes.
On the Windows platform, MySQL server can run as a named service managed by the operating system and be configured to start up automatically when Windows starts. Alternatively, you can configure MySQL server to run as an executable program that requires manual configuration.
Configure MySQL server as a Windows service (Selected by default.)
When the default configuration option is selected, you can also select the following:
Start the MySQL Server at System Startup
When selected (default), the service startup type is set to Automatic; otherwise, the startup type is set to Manual.
Run Windows Service as
When Standard System Account is selected (default), the service logs on as Network Service.
The Custom User option must have privileges to log on to Microsoft Windows as a service. The button will be disabled until this user is configured with the required privileges.
A custom user account is configured in Windows by searching for "local security policy" in the Start menu. In the Local Security Policy window, select Local Policies, User Rights Assignment, and then Log On As A Service to open the property dialog. Click to add the custom user and then click in each dialog to save the changes.
Deselect the Windows Service option.
Optionally, permissions set on the folders and files located
at C:\ProgramData\MySQL\MySQL Server
8.0\Data can be managed during the server
configuration operation. You have the following options:
MySQL Installer can configure the folders and files with full control granted exclusively to the user running the Windows service, if applicable, and to the Administrators group.
All other groups and users are denied access. This is the default option.
Have MySQL Installer use a configuration option similar to the one just described, but also have MySQL Installer show which users could have full control.
You are then able to decide if a group or user should be given full control. If not, you can move the qualified members from this list to a second list that restricts all access.
Have MySQL Installer skip making file-permission changes during the configuration operation.
If you select this option, you are responsible for securing the
Datafolder and its related files manually after the server configuration finishes.
This step is available if the Show Advanced Configuration check box was selected during the Type and Networking step. To enable this step now, click to return to the Type and Networking step and select the check box.
Advanced configuration options are related to the following MySQL log files:
Note
The binary log is enabled by default.
This step is available if the Show Advanced Configuration check box was selected during the Type and Networking step. To enable this step now, click to return to the Type and Networking step and select the check box.
The advanced-configuration options include:
Server ID
Set the unique identifier used in a replication topology. If binary logging is enabled, you must specify a server ID. The default ID value depends on the server version. For more information, see the description of the
server_idsystem variable.Table Names Case
You can set the following options during the initial and subsequent configuration the server. For the MySQL 8.0 release series, these options apply only to the initial configuration of the server.
Lower Case
Sets the
lower_case_table_namesoption value to 1 (default), in which table names are stored in lowercase on disk and comparisons are not case-sensitive.Preserve Given Case
Sets the
lower_case_table_namesoption value to 2, in which table names are stored as given but compared in lowercase.
All configuration settings are applied to the MySQL server when you click . Use the Configuration Steps tab to follow the progress of each action; the icon for each toggles from white to green (with a check mark) on success. Otherwise, the process stops and displays an error message if an individual action times out. Click the Log tab to view the log.
When the installation completes successfully and you click
, MySQL Installer and the installed MySQL
products are added to the Microsoft Windows Start menu under
the MySQL group. Opening MySQL Installer loads the
dashboard
where installed MySQL products are listed and other MySQL Installer
operations are available.
During the initial
setup, choose any predetermined setup type, except
Server only, to install the latest GA version
of the tools. Use the Custom setup type to
install an individual tool or specific version. If MySQL Installer is
installed on the host already, use the Add
operation to select and install tools from the MySQL Installer dashboard.
MySQL Installer provides a configuration wizard that can bootstrap an installed instance of MySQL Router 8.0 to direct traffic between MySQL applications and an InnoDB Cluster. When configured, MySQL Router runs as a local Windows service.
Note
You are prompted to configure MySQL Router after the initial installation and when you reconfigure an installed router explicitly. In contrast, the upgrade operation does not require or prompt you to configure the upgraded product.
To configure MySQL Router, do the following:
Set up InnoDB Cluster.
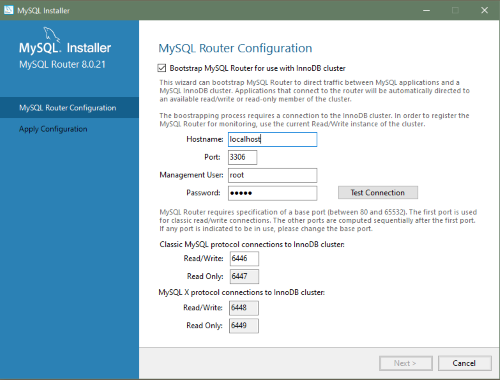
Using MySQL Installer, download and install the MySQL Router application. After the installation finishes, the configuration wizard prompts you for information. Select the Configure MySQL Router for InnoDB Cluster check box to begin the configuration and provide the following configuration values:
Hostname: Host name of the primary (seed) server in the InnoDB Cluster (
localhostby default).Port: The port number of the primary (seed) server in the InnoDB Cluster (
3306by default).Management User: An administrative user with root-level privileges.
Password: The password for the management user.
Classic MySQL protocol connections to InnoDB Cluster
Read/Write: Set the first base port number to one that is unused (between 80 and 65532) and the wizard will select the remaining ports for you.
The figure that follows shows an example of the MySQL Router configuration page, with the first base port number specified as 6446 and the remaining ports set by the wizard to 6447, 6448, and 6449.
Click and then to apply the configuration. Click to close MySQL Installer or return to the MySQL Installer dashboard.
After configuring MySQL Router, the root account exists in the
user table as root@localhost (local) only,
instead of root@% (remote). Regardless of
where the router and client are located, even if both are
located on the same host as the seed server, any connection
that passes through the router is viewed by server as being
remote, not local. As a result, a connection made to the
server using the local host (see the example that follows),
does not authenticate.
$> \c root@localhost:6446