MySQL 5.7 Release Notes
The Section 2.1.4.2, “Signature Checking Using GnuPG” section describes
how to verify MySQL downloads using GPG. That guide also applies
to Microsoft Windows, but another option is to use a GUI tool
like Gpg4win. You
may use a different tool but our examples are based on Gpg4win,
and utilize its bundled Kleopatra GUI.
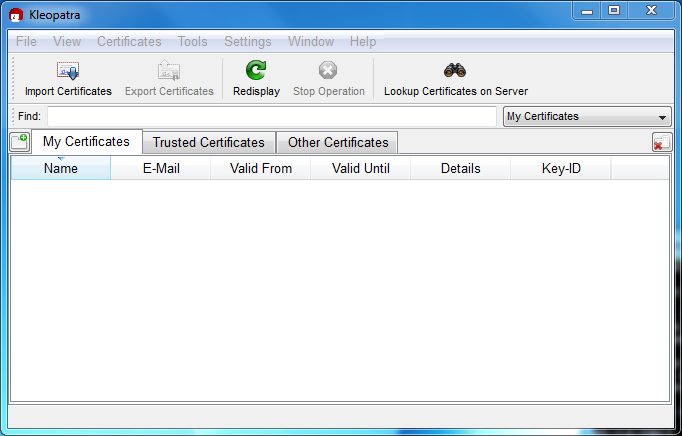
Download and install Gpg4win, and then load Kleopatra. The dialog should look similar to:
Next, add the MySQL Release Engineering certificate. Do this by clicking , . Type "Mysql Release Engineering" into the search box and press .

Select the "MySQL Release Engineering" certificate. The Fingerprint and Key-ID must be "3A79BD29" for MySQL 5.7.37 and higher or "5072E1F5" for MySQL 5.7.36 and earlier, or choose to confirm the certificate is valid. Now, import it by clicking . An import dialog is displayed; choose , and this certificate should now be listed under the Imported Certificates tab.
Next, configure the trust level for our certificate. Select our certificate, then from the main menu select , . We suggest choosing I believe checks are very accurate for our certificate, as otherwise you might not be able to verify our signature. Select I believe checks are very accurate to enable "full trust" and then press .

Next, verify the downloaded MySQL package file. This requires
files for both the packaged file, and the signature. The
signature file must have the same name as the packaged file but
with an appended .asc extension, as shown
by the example in the following table. The signature is linked
to on the downloads page for each MySQL product. You must create
the .asc file with this signature.
Table 2.2 MySQL Package and Signature Files for MySQL Installer for Microsoft Windows
| File Type | File Name |
|---|---|
| Distribution file | mysql-installer-community-5.7.44.msi |
| Signature file | mysql-installer-community-5.7.44.msi.asc |
Make sure that both files are stored in the same directory and
then run the following command to verify the signature for the
distribution file. Either drag and drop the signature
(.asc) file into Kleopatra, or load the
dialog from , , and then choose either the
.msi or .asc file.
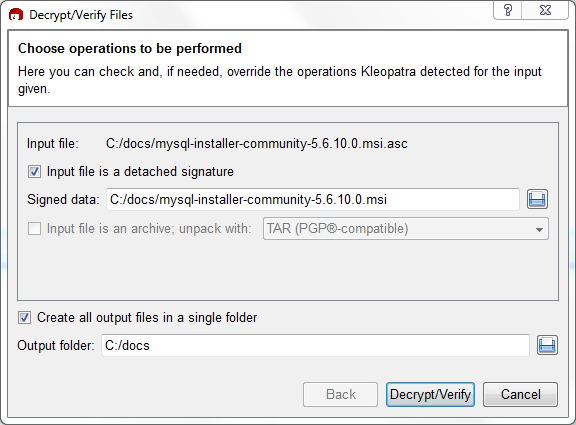
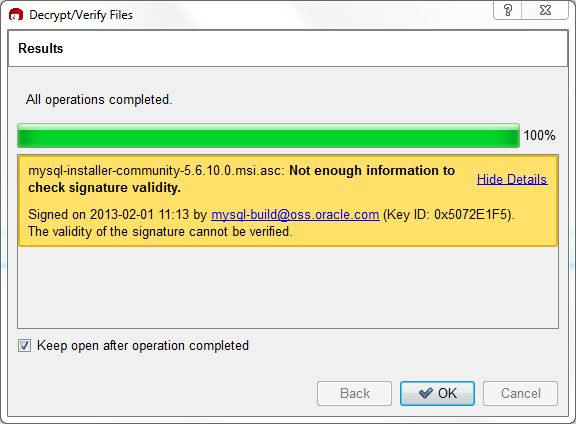
Click to check the file. The two most common results look like the following, and although the yellow warning looks problematic, the following means that the file check passed with success. You may now run this installer.
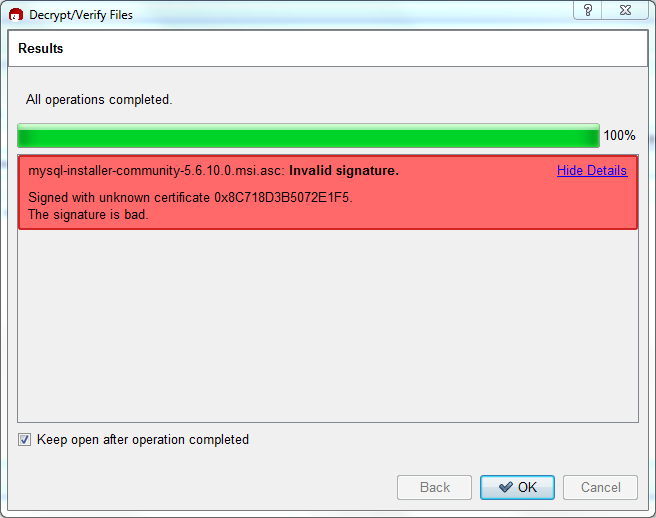
Seeing a red "The signature is bad" error means the file is invalid. Do not execute the MSI file if you see this error.
The Section 2.1.4.2, “Signature Checking Using GnuPG” section explains
why you probably don't see a green Good
signature result.