MySQL Workbench Release Notes
The visual SQL editor consists of a set of specialized editors (query, schema, table, and so on) and three panels: sidebar, secondary sidebar, and output area. Each editor opens in a separate secondary tab within an active MySQL connection tab. Each panel can be hidden or shown. Together the editors and panels enable you to:
Build, edit, and run queries
Create and edit data
View and export results
Perform basic RDBMS administrative tasks
Color syntax highlighting, context help, and code completion assist you in writing and debugging SQL statements. The integrated EXPLAIN plans provide data to help optimize the your queries. The following figure shows the main elements of the visual editor.
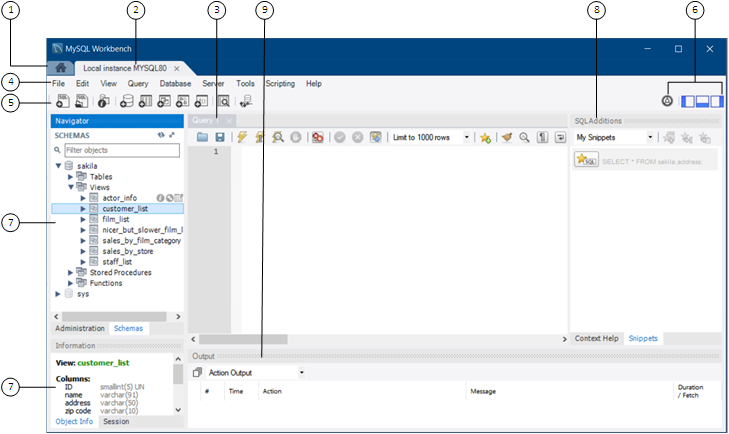
Description of the Visual SQL Editor Elements
Home screen tab. The Home screen tab provides quick access to connections, models, and the MySQL Migration wizard. Unlike the other main tabs, the Home screen tab does not close. For additional information, see Chapter 4, Home Screen Tab.
Connection tab. Each connection made to the MySQL server is represented by a separate connection tab. A server can be active or inactive when the connection tab for it is opened. For assistance in creating and managing MySQL connections, see Chapter 5, Connections in MySQL Workbench.
-
SQL query tab. The SQL query tab is a secondary tab that opens by default when you make a connection to a MySQL server. Each query tab is uniquely identified by an incrementing number:
query 1,query 2, and so on. To close an open tab, click thexon the tab. For a closer look at query editing in MySQL Workbench, (see Section 8.1.1, “SQL Query Tab”).All SQL query tabs provide an area to edit queries. You can open other specialized editors within tabs in this same central area. For example, you can edit schemas, tables, columns, and so on. Administration tabs also open in this area.
Main menu bar. The menu bar has the following menus: , , , , , , , , and . The actions available to you depend on which tab is selected when you click a menu. For a description of frequently used menus, see Section 8.1.3, “Query and Edit Menus”.
-
Main toolbar. The quick actions in this toolbar are (ordered from left to right):
Create a new SQL tab for executing queries
Open an SQL script file in a new query tab
Open Inspector for the selected object
Create a new schema in the connected server
Create a new table in the active schema in connected server
Create a new view in the active schema in the connected server
Create a new stored procedure in the active schema in the connected server
Create a new function in the active schema in the connected server
Search table data for text in objects selected in the sidebar schema tree
Reconnect to DBMS
-
Shortcut actions. Provides the following shortcuts (ordered from left to right):
Show preferences dialog (see Section 3.2, “Workbench Preferences”)
Hide or show the sidebar panel
Hide or show the output area panel
Hide or show the secondary sidebar panel
-
Sidebar panel. The sidebar has two main labels: Navigator and Information. The labels are omitted on some hosts.
The Navigator has two subtabs: Administration (previously named Management) and Schemas. You can merge (or separate) the content of the two tabs into a single list by clicking merge (
 ).
).
The Information area provides the Object Info and Session subtabs, which include read-only information about a selected object and about the active connection.
-
Secondary sidebar panel (SQL Additions). The SQL Additions area provides the following subtabs:
Context Help (see Section 8.1.6, “SQL Additions - Context Help Tab”)
Snippets (see Section 8.1.5, “SQL Additions - Snippets Tab”)
Output area panel. The output panel can display a summary of the executed queries in the following forms: Action Output, Text Output, or History Output. For additional information, see Section 8.1.7, “Output Panel”.
The next sections describe how to use the visual SQL editor.