MySQL Workbench Release Notes
The Navigator area of the sidebar contains options to manage the active MySQL connection. It also lists the schemas on the server for that connection. To access the Navigator area, open an existing connection (or create a new connection) from the home screen. If the panel is not visible, click , , and then .
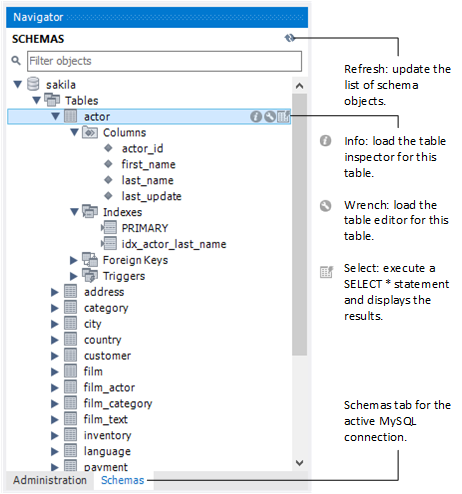
Navigator Schemas Tab
The Schemas tab shows available schema on the currently connected server. These items can be explored to show tables, views, and routines within the schema as the following figure shows.
Note
Internal schemas, such as
performance_schema,
information_schema, and
mysql, are hidden by default. Select the
Show Metadata and Internal Schemas
preference (see
Preferences: SQL Editor: Main) to list them
in the object browser. Schemas beginning with the period
character (.) are also controlled by this
setting.
Schema context menu. Right-click any schema object to show the context menu. Right-clicking on a schema provides similar options to the table context menu (see Table, view, and column context menus), but the operations refer to the schema. For example, the Table Maintenance item in the table context menu opens the Schema Inspector, which is a schema context menu item, but it is populated with information about the selected table.
: Imports a shapefile (
.shp) containing spatial data to load into MySQL. A new table with the imported fields is created in the selected schema, unless you select the append or update (overwrite) option. Another option creates a spatial index. If enabled, the import operation makes a spatial index around the geometry column. You can import spatial data with or without an EPSG format conversion.-
: Sets the selected schema as the default schema. This executes a
USEstatement so that subsequent statements without schema qualifiers are executed against this schema. This setting applies only to the query session. To set a default schema for multiple MySQL Workbench sessions, you must set the default schema for the stored connection. From the home screen, right-click on a MySQL connection, choose , and set the desired default schema on the Default Schema box.schema_nameNoteThe selected schema is displayed as bold in the schema navigator.
: Enables you to target specific schemas in the list.
: Displays information about the selected schema. For additional information, see Schema Inspector.
: Opens the wizard.
: Copies the schema name or a
CREATEstatement to the clipboard.: Provides functionality similar to . However, this item inserts the SQL code directly into the SQL Query panel, where it can be edited further as required.
: Launches a dialog to enable you to create a new schema.
: Launches a dialog to enable you to change the name or character/collation of an existing schema.
: Drops the schema. All data is lost if this operation is carried out.
: Opens a new tab for performing table searches. It performs a search on all columns, and offers additional options to limit the search.
: Refreshes all objects in the schema tree by resynchronizing with the server.
Double-clicking a table, view, or column name in the schema explorer inserts the name into the SQL Query area. This reduces typing significantly when entering SQL statements containing references to several tables, views, or columns.
Table, view, and column context menus. The schema navigator also features a context menu, which can be displayed by right-clicking a table, view, or column object. For example, right-clicking a table displays the following menu items:
: Pulls up to 200 rows of table data from the live server into a Results tab, and enables editing. Data can be saved directly to the live server.
: Displays table information, similar to the
Schema
            Inspector
. This also has a simpler and easier to use interface for analyzing and creating indexes for tables.-
: There are various submenus, each of which copies information to the clipboard.
: Copies the table name.
: Copies the qualified table name in the form
`schema`.`table`.-
: Copies a statement to select all columns in this form.
SELECT `table`.`column1`, `table`.`column2`, ... FROM `schema`.`table`; : Copies an
INSERTstatement to insert all columns.: Copies an
UPDATEstatement to update all columns.: Copies a
DELETEstatement in the formDELETE FROM `world`.`country` WHERE <{where_condition}>;.: Copies a
CREATEstatement in the formDELETE FROM `world`.`country` WHERE <{where_condition}>;.: Joins the selected tables.
-
: Copies a
DELETEstatement, in the form of a transaction, that deletes all objects that reference the row (directly or indirectly).Use first to preview this operation.
-
: Copies a
SELECTstatement that selects all objects that reference the row (directly or indirectly).Use to generate a DELETE statement for this operation.
: Opens the table export wizard to export the table's data to JSON or customized CSV.
: Opens the table import wizard to import JSON or CSV formatted data to the selected or new table.
: Provides functionality similar to Copy to Clipboard. However, this item inserts the SQL code directly into the SQL Query panel, where it can be edited further as required.
: Launches a dialog to enable you to create a new table.
: Launches a dialog to enable you to create a new table, and to also apply predefined templates. For additional information, see Section 9.6, “Table Templates”.
: Displays the table editor loaded with the details of the table.
: Opens a new tab for performing table maintenance operations. Operations include "Analyze Table", "Optimize Table", "Check Table", and "Checksum Table". Additional information about the table may also be viewed from this tab. For additional information, see Schema Inspector.
: Drops the table. All data in the table will be lost if this operation is carried out.
: Truncates the table.
: Opens a new tab for performing table searches. It performs a search on all columns, and offers additional options to limit the search.
: Refreshes all objects in the schema tree by resynchronizing with the server.