PDF (US Ltr)
- 4.5Mb
PDF (A4)
- 4.5Mb
The ODBC Data Source Administrator on
Windows lets you create DSNs, check driver installation, and
configure ODBC functions such as tracing (used for debugging)
and connection pooling. The following are steps for creating
and configuring a DSN with the ODBC Data Source
Administrator:
Open the
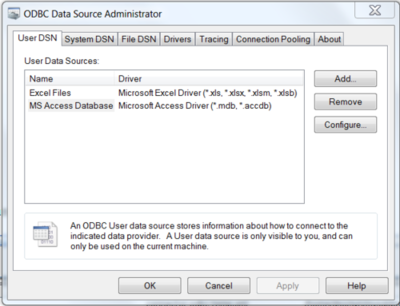
ODBC Data Source Administrator.Different editions and versions of Windows store the
ODBC Data Source Administratorin different locations. For instructions on opening theODBC Data Source Administrator, see the documentation for you Windows version; these instructions from Microsoft cover some popuar Windows platforms. You should see a window similar to the following when you open theODBC Data Source Administrator:To create a System DSN (which will be available to all users), select the System DSN tab. To create a User DSN, which will be available only to the current user, click the button to open the "Create New Data Source" dialog.
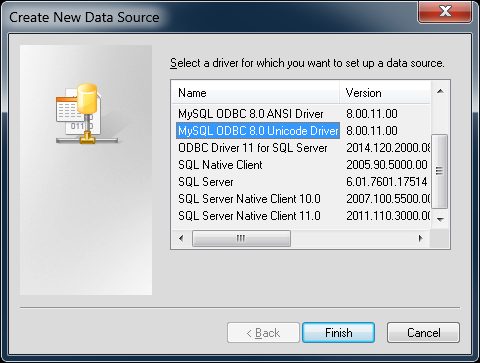
From the "Create New Data Source" dialog, select the MySQL ODBC 5.
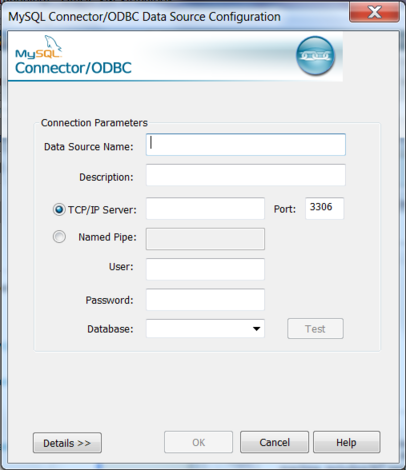
xANSI or Unicode Driver, then click to open its connection parameters dialog.You now need to configure the specific fields for the DSN you are creating through the
Connection Parametersdialog.In the Data Source Name box, enter the name of the data source to access. It can be any valid name that you choose.
TipTo identify whether a DSN was created using the 32-bit or the 64-bit driver, include the driver being used within the DSN identifier. This will help you to identify the right DSN to use with applications such as Excel that are only compatible with the 32-bit driver. For example, you might add
Using32bitCODBCto the DSN identifier for the 32-bit interface andUsing64bitCODBCfor those using the 64-bit Connector/ODBC driver.In the Description box, enter some text to help identify the connection.
In the Server field, enter the name of the MySQL server host to access. By default, it is
localhost.In the User field, enter the user name to use for this connection.
In the Password field, enter the corresponding password for this connection.
The Database pop-up should be automatically populated with the list of databases that the user has permissions to access.
To communicate over a different TCP/IP port than the default (3306), change the value of the Port.
Click to save the DSN.
To verify the connection using the parameters you have
entered, click the button. If the
connection can be made successfully, you will be notified with
a Connection Successful dialog; otherwise,
you will be notified with a Connection
Failed dialog.
You can configure a number of options for a specific DSN by clicking the button.
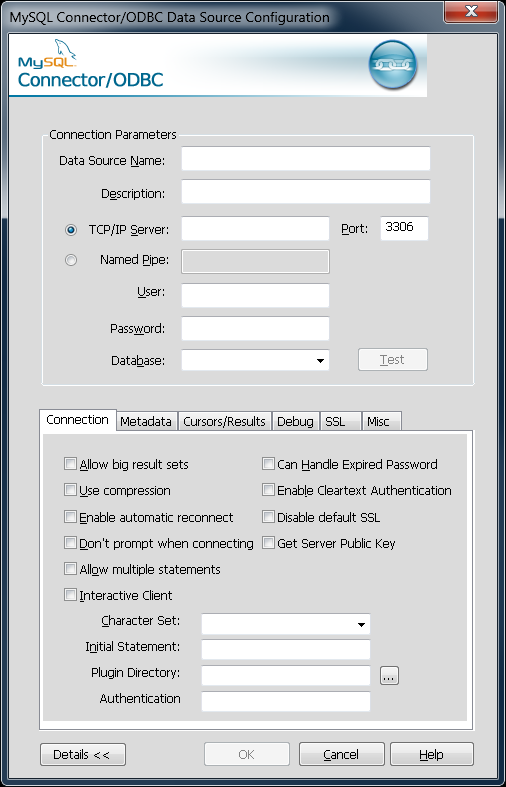
Toggling the Details button opens (or closes) an additional tabbed display where you set additional options that include the following:
Connections, Metadata, and Cursors/Results enable you to select the additional flags for the DSN connection. For more information on these flags, see Section 5.5.2, “Connector/ODBC Connection Parameters”.
NoteFor the Unicode version of Connector/ODBC, due to its native Unicode support, you do not need to specify the initial character set to be used with your connection. However, for the ANSI version, if you want to use a multibyte character set such as UTF-16 or UTF-32 initially, specify it in Character Set box; however, that is not necessary for using UTF-8 or UTF-8-MB4 initially, because they do not contain
\0bytes in any characters, and therefore the ANSI driver will not truncate the strings by accident when finding\0bytes.Debug lets you turn on ODBC debugging to record the queries you execute through the DSN to the
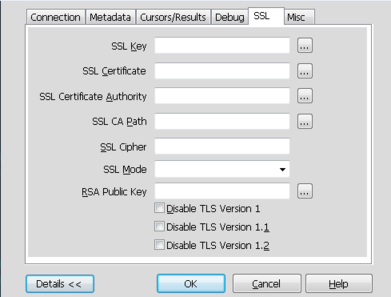
myodbc.sqlfile. For more information, see Section 5.5.10, “Getting an ODBC Trace File”.SSL configures the additional options required for using the Secure Sockets Layer (SSL) when communicating with MySQL server.
You must also enable and configure SSL on the MySQL server with suitable certificates to communicate using it using SSL.