MySQL Connector/NET Release Notes
MySQL Connector/NET provides a web parts personalization provider that allows you to use a MySQL server to store personalization data.
Note
This feature was added in Connector/NET 6.9.0.
This tutorial demonstrates how to configure the web parts personalization provider using Connector/NET.
An ASP.NET website or web application with a membership provider
.NET Framework 3.0
MySQL 5.5
To configure the provider, do the following:
Add References to
MySql.DataandMySql.Webto the website or web application project.Include a Connector/NET personalization provider into the
system.websection in theweb.configfile.<webParts> <personalization defaultProvider="MySQLPersonalizationProvider"> <providers> <clear/> <add name="MySQLPersonalizationProvider" type="MySql.Web.Personalization.MySqlPersonalizationProvider, MySql.Web, Version=6.9.3.0, Culture=neutral, PublicKeyToken=c5687fc88969c44d" connectionStringName="LocalMySqlServer" applicationName="/" /> </providers> <authorization> <allow verbs="modifyState" users="*" /> <allow verbs="enterSharedScope" users="*"/> </authorization> </personalization> </webParts>
To create the web part controls, follow these steps:
Create a web application using Connector/NET ASP.NET Membership. For information about doing this, see Section 6.2.1, “Tutorial: Connector/NET ASP.NET Membership and Role Provider”.
Create a new ASP.NET page and then change to the Design view.
From the Toolbox, drag a WebPartManager control to the page.
Now define an HTML table with three columns and one row.
From the WebParts Toolbox, drag and drop a
WebPartZonecontrol into both the first and second columns.From the WebParts Toolbox, drag and drop a
CatalogZonewithPageCatalogPartandEditorZonecontrols into the third column.Add controls to the
WebPartZone, which should look similar to the following example:<table> <tr> <td> <asp:WebPartZone ID="LeftZone" runat="server" HeaderText="Left Zone"> <ZoneTemplate> <asp:Label ID="Label1" runat="server" title="Left Zone"> <asp:BulletedList ID="BulletedList1" runat="server"> <asp:ListItem Text="Item 1"></asp:ListItem> <asp:ListItem Text="Item 2"></asp:ListItem> <asp:ListItem Text="Item 3"></asp:ListItem> </asp:BulletedList> </asp:Label> </ZoneTemplate> </asp:WebPartZone> </td> <td> <asp:WebPartZone ID="MainZone" runat="server" HeaderText="Main Zone"> <ZoneTemplate> <asp:Label ID="Label11" runat="server" title="Main Zone"> <h2>This is the Main Zone</h2> </asp:Label> </ZoneTemplate> </asp:WebPartZone> </td> <td> <asp:CatalogZone ID="CatalogZone1" runat="server"> <ZoneTemplate> <asp:PageCatalogPart ID="PageCatalogPart1" runat="server" /> </ZoneTemplate> </asp:CatalogZone> <asp:EditorZone ID="EditorZone1" runat="server"> <ZoneTemplate> <asp:LayoutEditorPart ID="LayoutEditorPart1" runat="server" /> <asp:AppearanceEditorPart ID="AppearanceEditorPart1" runat="server" /> </ZoneTemplate> </asp:EditorZone> </td> </tr> </table>Outside of the HTML table, add a drop-down list, two buttons, and a label as follows.
<asp:DropDownList ID="DisplayModes" runat="server" AutoPostBack="True"
   OnSelectedIndexChanged="DisplayModes_SelectedIndexChanged">
</asp:DropDownList>
<asp:Button ID="ResetButton" runat="server" Text="Reset"
   OnClick="ResetButton_Click" />
<asp:Button ID="ToggleButton" runat="server" OnClick="ToggleButton_Click"
   Text="Toggle Scope" />
<asp:Label ID="ScopeLabel" runat="server"></asp:Label>
The following code fills the list for the display modes, shows the current scope, resets the personalization state, toggles the scope (between user and the shared scope), and changes the display mode.
public partial class WebPart : System.Web.UI.Page
{
  protected void Page_Load(object sender, EventArgs e)
  {
    if (!IsPostBack)
    {
      foreach (WebPartDisplayMode mode in WebPartManager1.SupportedDisplayModes)
      {
        if (mode.IsEnabled(WebPartManager1))
        {
          DisplayModes.Items.Add(mode.Name);
        }
      }
    }
    ScopeLabel.Text = WebPartManager1.Personalization.Scope.ToString();
  }

  protected void ResetButton_Click(object sender, EventArgs e)
  {
    if (WebPartManager1.Personalization.IsEnabled &&
      WebPartManager1.Personalization.IsModifiable)
    {
      WebPartManager1.Personalization.ResetPersonalizationState();
    }
  }

  protected void ToggleButton_Click(object sender, EventArgs e)
  {
    WebPartManager1.Personalization.ToggleScope();
  }

  protected void DisplayModes_SelectedIndexChanged(object sender, EventArgs e)
  {
    var mode = WebPartManager1.SupportedDisplayModes[DisplayModes.SelectedValue];
    if (mode != null && mode.IsEnabled(WebPartManager1))
    {
      WebPartManager1.DisplayMode = mode;
    }
  }
}
Use the following steps to validate your changes:
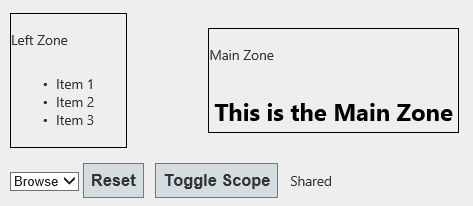
Run the application and open the web part page. The page should look like similar to the example shown in the following figure in which the Toggle Scope button is set to
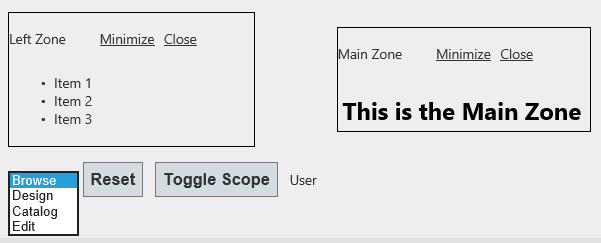
Shared. The page also includes the drop-down list, the Reset button, and the Left Zone and Main Zone controls.Initially when the user account is not authenticated, the scope is Shared by default. The user account must be authenticated to change settings on the web-part controls. The following figure shows an example in which an authenticated user is able to customize the controls by using the Browse drop-down list. The options in the list are
Design,Catalog, andEdit.Click to switch the application back to the shared scope.
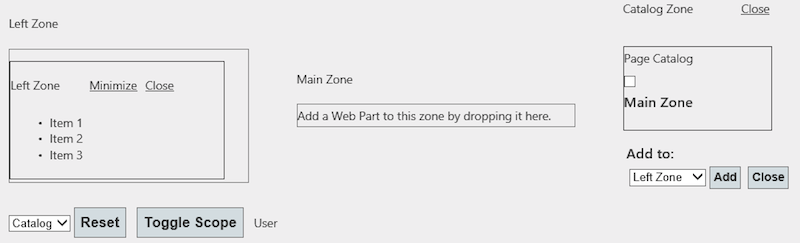
Now you can personalize the zones using the
EditorCatalogdisplay modes at a specific user or all-users level. The next figure showsCatalogselected from the drop-down list, which include the Catalog Zone control that was added previously.