PDF (US Ltr)
- 4.5Mb
PDF (A4)
- 4.5Mb
This tutorial shows you how to use the MySQL Profile Provider to store user profile information in a MySQL database. The tutorial uses MySQL Connector/NET 6.9.9, MySQL Server 5.7.21 and Microsoft Visual Studio 2017 Professional Edition.
Many modern websites allow the user to create a personal profile. This requires a significant amount of code, but ASP.NET reduces this considerable by including the functionality in its Profile classes. The Profile Provider provides an abstraction between these classes and a data source. The MySQL Profile Provider enables profile data to be stored in a MySQL database. This enables the profile properties to be written to a persistent store, and be retrieved when required. The Profile Provider also enables profile data to be managed effectively, for example it enables profiles that have not been accessed since a specific date to be deleted.
The following steps show you how you can select the MySQL Profile Provider:
Create a new ASP.NET web project.
Select the MySQL Application Configuration tool.
In the MySQL Application Configuration tool navigate through the tool to the Profiles page.
Select the Use MySQL to manage my profiles check box.
Select the Autogenerate Schema check box.
Click and then configure a connection string for the database that will be used to store user profile information.
Navigate to the last page of the tool and click to save your changes and exit the tool.
At this point you are now ready to start using the MySQL Profile Provider. With the following steps you can carry out a preliminary test of your installation.
Open your
web.configfile.Add a simple profile such as the following example.
<system.web>
  <anonymousIdentification enabled="true"/>
  <profile defaultProvider="MySQLProfileProvider">
    ...
    <properties>
      <add name="Name" allowAnonymous="true"/>
      <add name="Age" allowAnonymous="true" type="System.UInt16"/>
      <group name="UI">
        <add name="Color" allowAnonymous="true" defaultValue="Blue"/>
        <add name="Style" allowAnonymous="true" defaultValue="Plain"/>
      </group>
    </properties>
  </profile>
  ...
Setting
anonymousIdentificationto true enables unauthenticated users to use profiles. They are identified by a GUID in a cookie rather than by a user name.
Now that the simple profile has been defined in
web.config, the next step is to write some code
to test the profile.
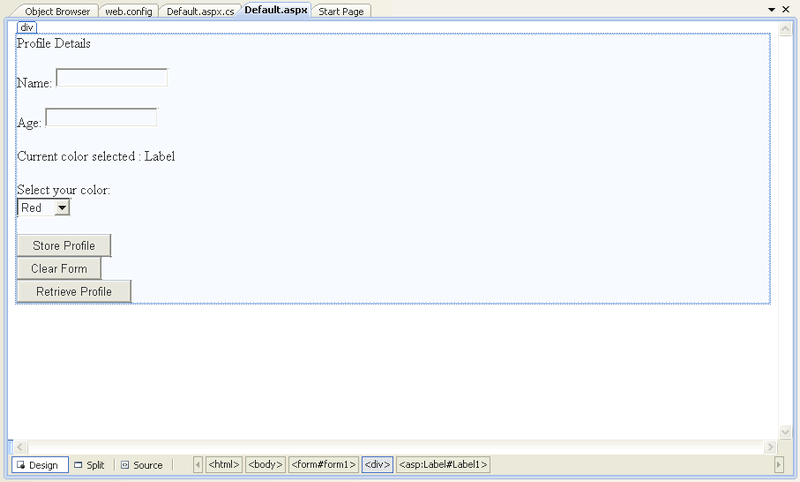
In Design View, design a simple page with the added controls. The following figure shows the Default.aspx tab open with various text box, list, and button controls.
These will allow the user to enter some profile information. The user can also use the buttons to save their profile, clear the page, and restore their profile data.
In the Code View add the following code snippet.
...
protected void Page_Load(object sender, EventArgs e)
{
    if (!IsPostBack)
    {
        TextBox1.Text = Profile.Name;
        TextBox2.Text = Profile.Age.ToString();
        Label1.Text = Profile.UI.Color;
    }
}

// Store Profile
protected void Button1_Click(object sender, EventArgs e)
{
    Profile.Name = TextBox1.Text;
    Profile.Age = UInt16.Parse(TextBox2.Text);
}

// Clear Form
protected void Button2_Click(object sender, EventArgs e)
{
    TextBox1.Text = "";
    TextBox2.Text = "";
    Label1.Text = "";
}

// Retrieve Profile
protected void Button3_Click(object sender, EventArgs e)
{
    TextBox1.Text = Profile.Name;
    TextBox2.Text = Profile.Age.ToString();
    Label1.Text = Profile.UI.Color;
}

protected void DropDownList1_SelectedIndexChanged(object sender, EventArgs e)
{
    Profile.UI.Color = DropDownList1.SelectedValue;
}
...
Save all files and build the solution to check that no errors have been introduced.
Run the application.
Enter your name, age, and select a color from the list. Now store this information in your profile by clicking .
Not selecting a color from the list uses the default color, Blue, that was specified in the
web.configfile.Click to clear text from the text boxes and the label that displays your chosen color.
Now click to restore your profile data from the MySQL database.
Now exit the browser to terminate the application.
Run the application again, which also restores your profile information from the MySQL database.
In this tutorial you have seen how to using the MySQL Profile Provider with Connector/NET.