MySQL Workbench Release Notes
Tables can also be added to an EER Diagram using the
table tool on the vertical toolbar. Make sure
that the EER Diagram tab is selected, then
right-click the table icon on the vertical toolbar. The table icon
is the rectangular tabular icon.
Clicking the mouse on this icon changes the mouse pointer to a table pointer. You can also change the mouse pointer to a table pointer by pressing the T key.
Choosing the table tool changes the contents of
the toolbar that appears immediately below the menu bar. When the
Tables pointer is active, this toolbar contains
a schemas list, an engines list, a collations list, and a color
chart list. Use these lists to select the appropriate schema,
engine, collation, and color accent for the new table. Make sure
that you associate the new table with a database. The engine and
collation of a table can be changed using the table editor. The
color of your table can be changed using the
Properties palette. The Default
Engine and Default Collation values
refer to the database defaults.
Create a table by clicking anywhere on the EER Diagram canvas.
This action creates a new table with the default name
table1. To revert to the default mouse pointer,
click the arrow icon at the top of the vertical toolbar.
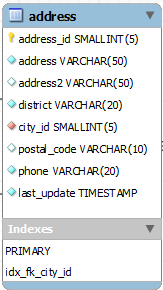
As shown in the preceding figure, the primary key is indicated by a key icon and indexed fields are indicated by a different colored diamond icon. Click the arrow to the right of the table name to toggle the display of the fields. Toggle the display of indexes and triggers in the same way.
Right-clicking a table opens a pop-up menu with the following items:
With the exception of the deletion item, these menu items function as described in Section 9.1.3.1, “Adding Tables to the Physical Schemas”. The behavior of the delete option is determined by your MySQL Workbench options settings. For more information, see Section 3.2.4, “Modeling Preferences”.