MySQL Workbench Release Notes
The Administration - Users and Privileges tab provides a list of all users and privileges that relate to an active MySQL server instance. From this tab, you can add and manage user accounts, adjust privileges, and expire passwords.
To open the Administration - Users and Privileges tab:
Establish a connection to an active MySQL server instance.
-
Within the connection tab, do one of the following:
Click Users and Privileges from the Management list within the Navigator area.
Click and then from the menu.
The Administration - Users and Privileges tab has several task areas, which are described in the following sections:
User Accounts consists of a vertical box that lists each user account associated with the active MySQL connection. The list contains each user name and the host name where the account resides. Use the , , and buttons to manage the list of user accounts. Selecting an account from the list focuses the account details, which appear in set of tabs, onto the selected user account.
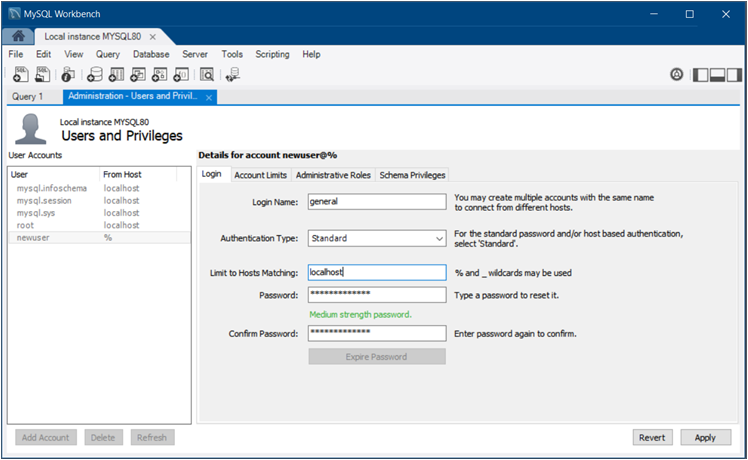
The figure that follows shows the layout of the Administration - Users and Privileges tab with the Login detail tab open to show an example of general account information.
For a description of the Login, Account Limits, Administrative Roles, and Schema Privileges tabs, see the related sections.
The Login tab provides the following information related to the selected user account:
Login Name: You may create multiple accounts with the same name to connect from different hosts.
-
Authentication Type: For standard password or host-based authentication, select
Standard. Thecaching_sha2_passwordandSHA256_Passwordauthentication types provide more secure password encryption than theStandardauthentication type.Starting with MySQL 8.0.4, the
caching_sha2_passwordplugin is the default authentication plugin for the server. An account that authenticates withcaching_sha2_passwordmust use either a secure connection or an unencrypted connection that supports password exchange using an RSA key pair. Limit to Hosts Matching: The
%and_characters may be used as wildcards. The percent sign (%) matches zero or more characters and the underscore (_) matches a single character.-
Password and Confirm Password: To reset a password, type in the new password and then confirm it. Consider using a password of eight or more characters with mixed-case letters, numbers, and punctuation marks.
Use to require a change of password to use the account.
The Account Limits tab defines the following limits on the selected user account:
Max. Queries: The number of queries the account can execute within one hour.
Max. Updates: The number of updates the account can execute within one hour.
Max. Connections: The number of times the account can connect to the server within an hour.
Concurrent Connections: The number of simultaneous connections to the server the account can have.
Roles are a quick way of granting a set of privileges to a user, based on the work the user must carry out on the server. It is also possible to assign multiple roles to a user account or to assign privileges directly to an account without first assigning roles.
After you select a role for a user account, you will see the
accumulated privileges in the Global
Privileges panel. For example, if you select the role
BackupAdmin, the privileges granted include
EVENT, LOCK TABLES,
SELECT, SHOW DATABASES. For
a complete list of privileges, see
Privileges Provided by MySQL
The Administrative Roles tab includes the following roles:
DBA: Grants the rights to perform all tasks.MaintenanceAdmin: Grants rights to maintain the server.ProcessAdmin: Grants rights to assess, monitor, and kill user processes.UserAdmin: Grants rights to create user logins and reset passwords.SecurityAdmin: Grants rights to manage logins and grant and revoke server privileges.MonitorAdmin: Grants the minimum rights to monitor the server.DBManager: Grants full rights on all databases.DBDesigner: Grants rights to create and reverse-engineer any database schema.ReplicationAdmin: Grants rights needed to set up and manage replication.BackupAdmin: Grants minimum rights required to back up any database.Custom: Lists other (custom) privileges that are assigned to the user account. This role is not available for all default accounts, such asroot. If you select a user account and then select one or more privileges directly that are outside of any selected roles, the Custom role is added (and selected) to the list of roles.
To remove all of the rights assigned to the selected user account, click .
The Schema Privileges tab refines the way you assign access rights to one or more schemas by user account. To assign privileges to the selected account by schema, do the following:
-
Add a schema entry (or rule) that specifies which schema or schemas apply the selected user account. Click to open the New Schema Privilege Definition dialog. The dialog provides the following independent options to select:
All Schema (%) - This rule applies to any schema name.
Schemas matching pattern:
pattern_and%as wildcards in the pattern; however, to use the literal value you must escape each wildcard character with a backslash (\) .Selected schema:
schema
              name
- Apply the rule to the specific schema name selected from the list.
Use to remove an entry and the privileges associated with it from the list. When you click , you are prompted remove all privileges assigned to the selected user account.
With an entry selected, mark the individual access rights that apply only to the schema or schemas defined in the entry. The access rights are categorized as Object Rights, DDL Rights, and Other Rights. Each right that you select appears in the Privileges column of the schema entry.