MySQL Workbench Release Notes
This example migrates a Microsoft SQL Server database to MySQL and includes an image for each step.
From MySQL Workbench, choose and then to open the migration wizard and display the migration wizard overview (see the figure that follows).
Overview
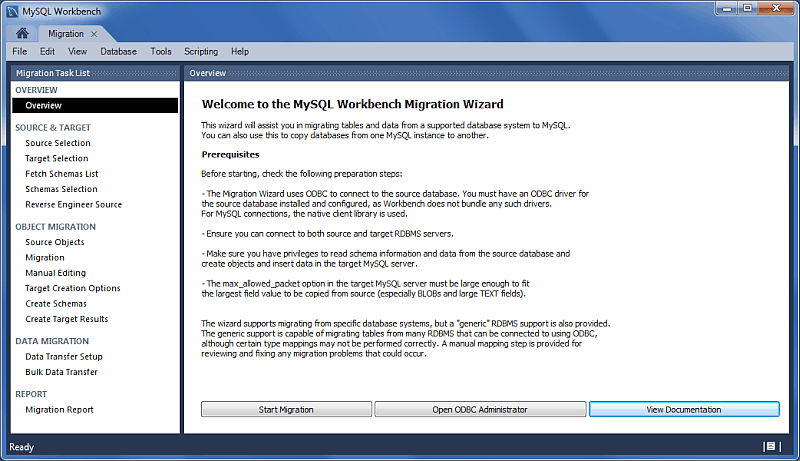
It describes the prerequisites and requirements that should be
understood before proceeding further. The option will load
odbcad32.exe, and is used to confirm that
the ODBC Driver for SQL Server is installed, and to make
configuration changes if needed.
Click to continue.
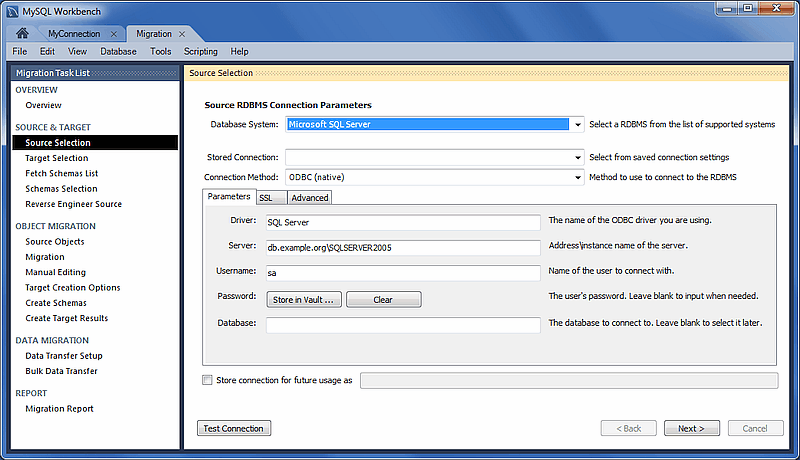
Source Selection
Select the source RDBMS that is migrating to MySQL. Choose the Database System that is being migrated and the other connection parameters will change accordingly. The following figure shows an example of the connection session.
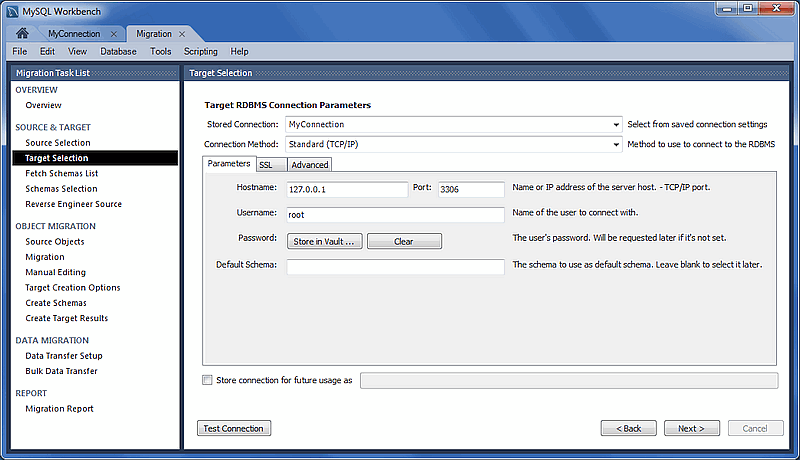
Target Selection
The target is the MySQL database that will contain the newly migrated database (see the figure that follows). The current Workbench MySQL connections will be available here, or you can choose to create a new connection.
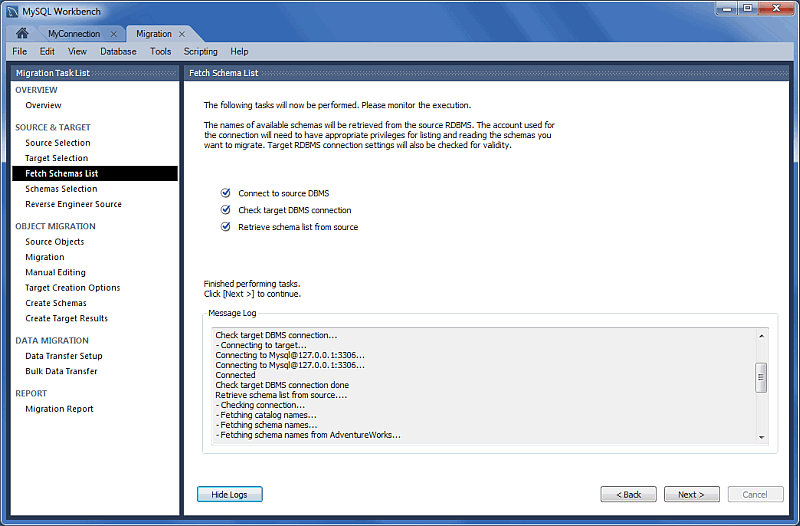
Fetch Schemas List
The Schemas list is retrieved from both the source and target RDBMS (see the figure that follows). This is an automated and informational step that reports connection related errors and/or general log information. Click to continue.
Schemas Selection
Choose the schemas you want to migrate.
"Schema Name Mapping Method" options while migrating Microsoft SQL Server:
Keep schemas as they are: Catalog.Schema.Table -> Schema.Table: This will create multiple databases, one per schema.
Only one schema: Catalog.Schema.Table -> Catalog.Table: Merges each schema into a single database. The following figure shows an example of this mapping method.
Only one schema, keep current schema names as a prefix: Catalog.Schema.Table -> Catalog.Schema_table: Preserves the schema name as a prefix.

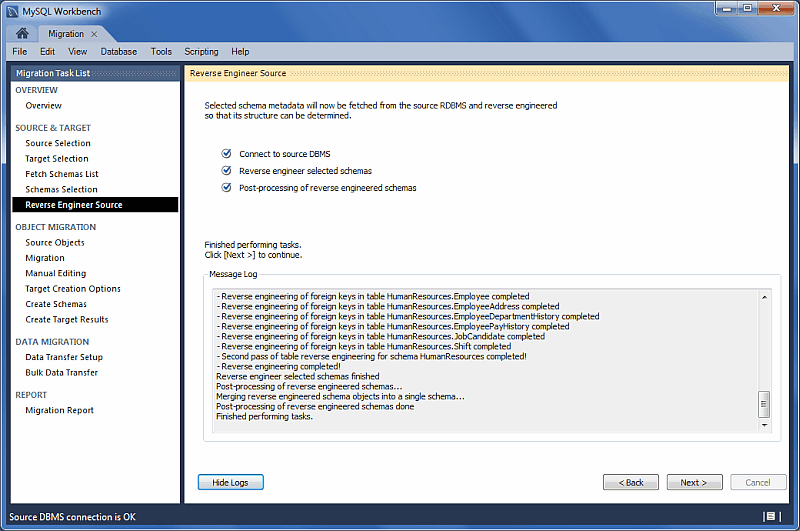
Reverse Engineer Source
The source metadata is fetched from the source RDBMS and then is reverse-engineered. This is an automated and informational step that reports related errors, general log information, or both (see the figure that follows). View the logs and then click to continue.
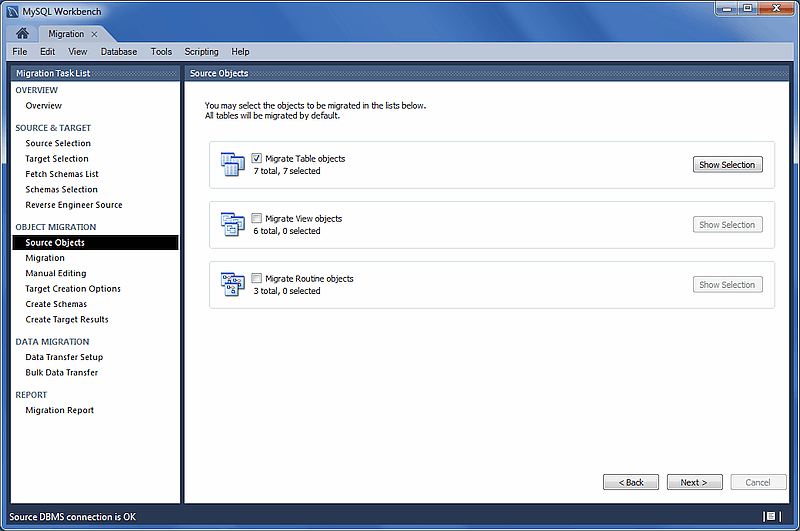
Source Objects
The discovered objects from the Reverse Engineer Source stage are revealed and made available. As the next figure shows, the results include Table, View, and Routine objects, with only the Table objects being selected by default.
Migration
The migration process now converts the selected objects into MySQL compatible objects (see the figure that follows). View the logs and then proceed.

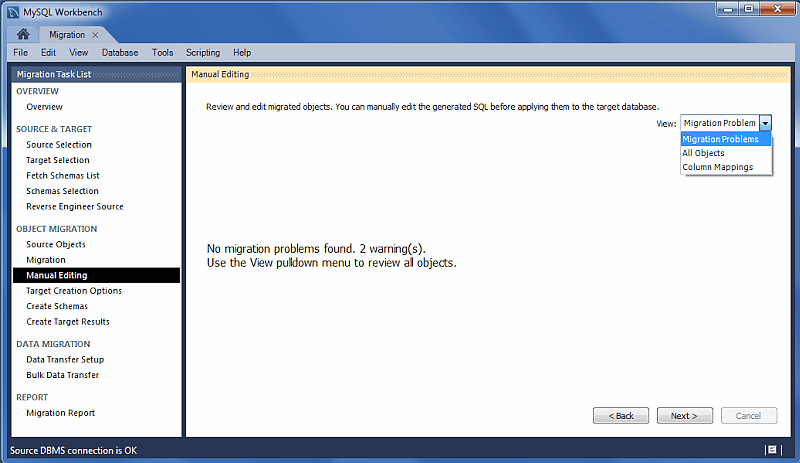
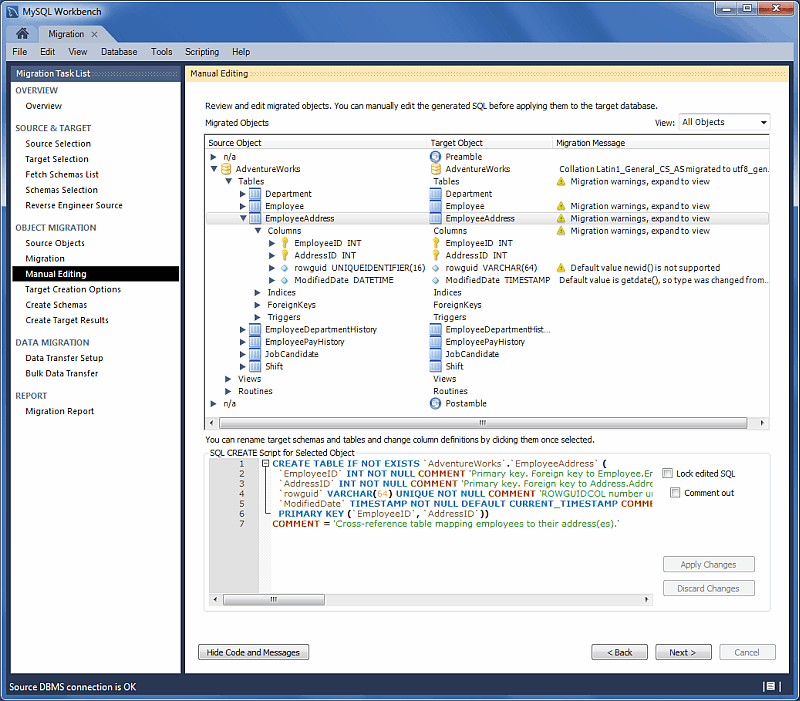
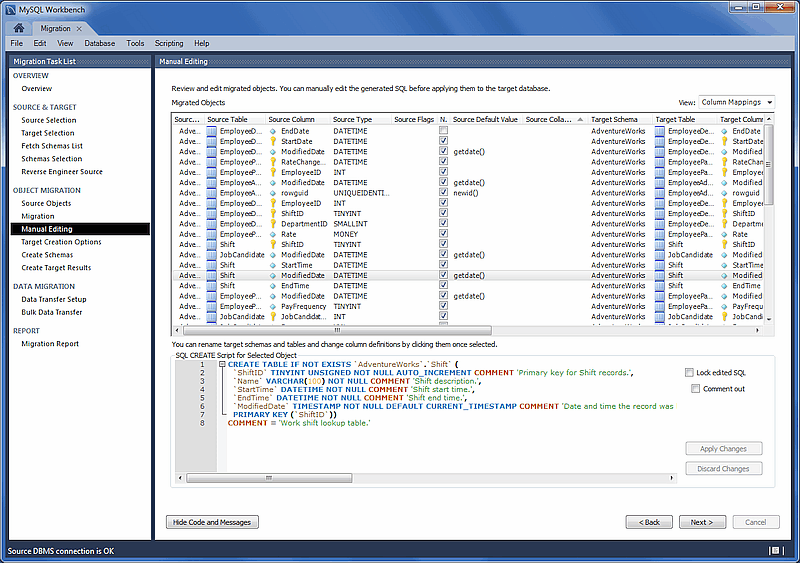
Manual Editing
There are three sections to edit, which are selected by using the View select box on the top right. The button is available with every view and it will show the generated MySQL code that corresponds to the selected object.
-
: This will either report problems or display "No mapping problems found." It is an informational screen. The following figure shows an example of this type of message.
-
: An object view that allows you to view and edit the object definitions. Double-click on a row to modify a target objects name. The following figure shows an example of this type of message.
-
: Shows all of the table column mappings, and allows you to individually review and fix the mapping for all column types, default values, and other attributes. The following figure shows an example of this type of message.
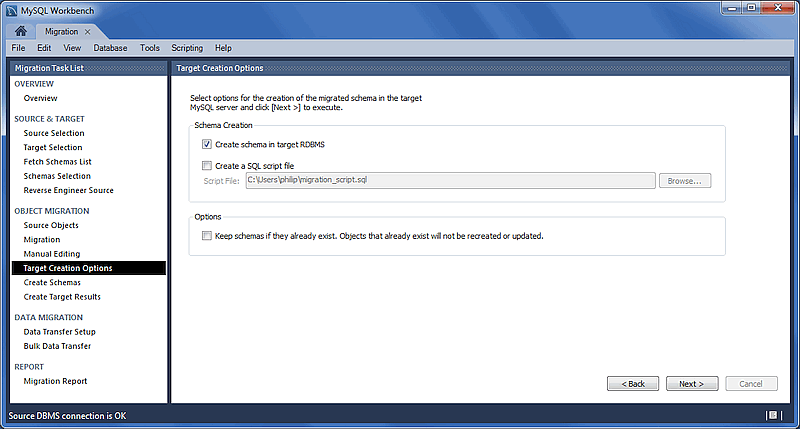
Target Creation Options
The schema may be created by either adding it to the target RDBMS, creating an SQL script file, or both. The following figure shows the target creation options.
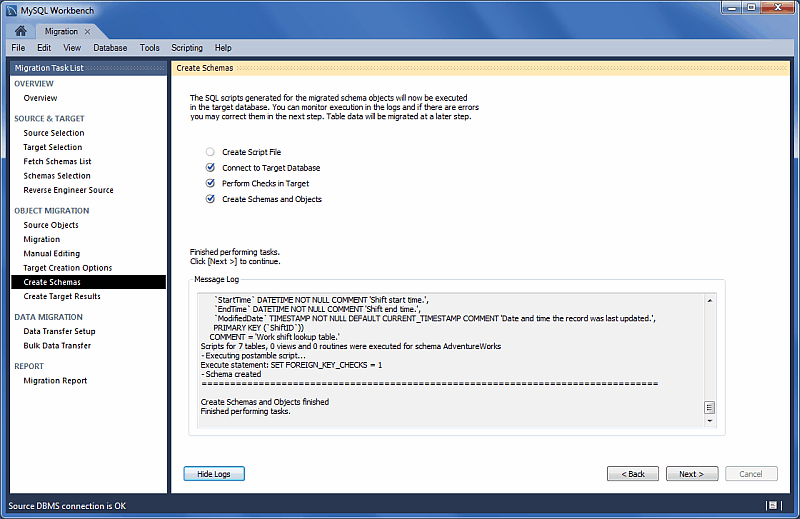
Create Schema
Now the schema is created (see the figure that follows). The complete log is also available here.
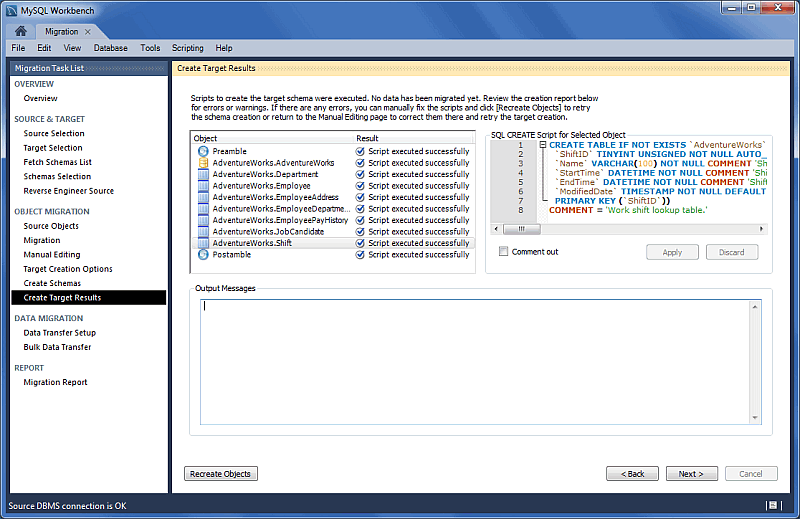
Create Target Results
The generated objects in this example are listed in the figure that follows, along with the error messages if any exist.
The migration code may also be viewed and edited here. To make changes, select an object, edit the query code and then click . Repeat this process for each object that will be edited. Finally, click to save the results.
Note
The operation is required to save any changes here. It will then execute the previous migration step (Create Schema) with the modified code, and then continue the migration process. This also means that the previously saved schema will be dropped.
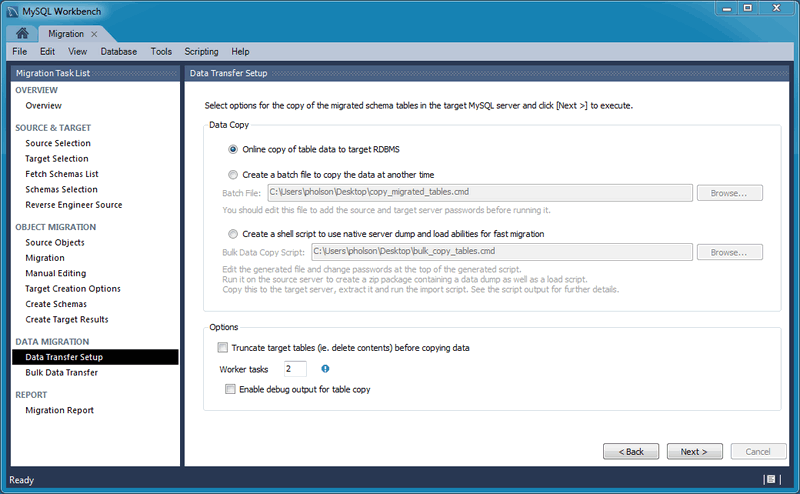
Data Transfer Setup
The next step transfers data from the source RDBMS to the target MySQL database. The setup screen includes the following options:
Data Copy:
Online copy of table data to target RDBMS: This method (default) will copy the data to the target RDBMS.
Create a batch file to copy the data at another time: The data may also be dumped to a file that can be executed at a later time, or be used as a backup. This script uses a MySQL connection to transfer the data.
-
Create a shell script to use native server dump and load abilities for fast migration: Unlike the simple batch file that performs a live online copy, this generates a script to be executed on the source host to then generate a Zip file containing all of the data and information needed to migrate the data locally on the target host. Copy and extract the generated Zip file on the target host and then execute the import script (on the target host) to import the data into MySQL using a LOAD DATA call.
This faster method avoids the need to traffic all data through MySQL Workbench, or to have a permanent network connection between the MySQL servers.
NoteThis option was added in MySQL Workbench 6.3.0.
Options (see the figure that follows for an example):
Truncate target tables before copying data: In case the target database already exists, this will delete said data.
Worker tasks: The default value is
2. This is the number of tasks (database connections) used while copying the data.Enable debug output for table copy: Shows debugging information.
Bulk Data Transfer
Depending on the selected option, this will either transfer the data to the target RDMS (default), generate a simple script for the online data transfer, or generate script to execute on the source host that then generates a Zip file containing both the transfer script and data that will be executed on the target host. Optionally, view the logs to confirm (see the figure that follows).

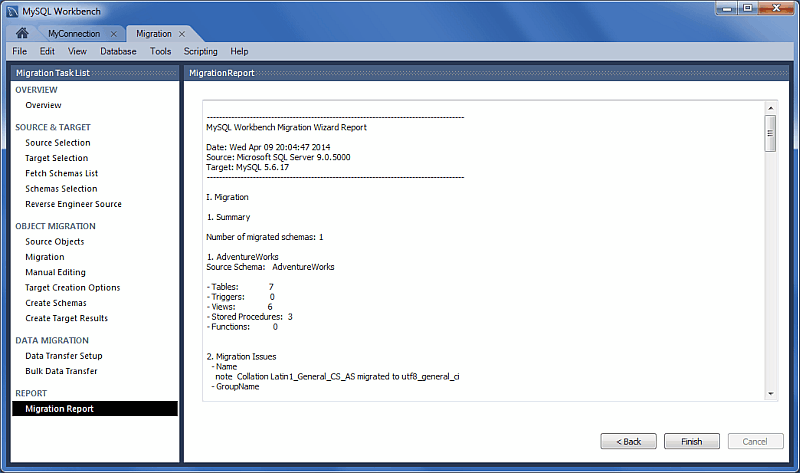
Migration Report
And finally, the migration report is available and summarizes the entire migration process as depicted in the following figure.
Clicking will close the migration window. If you chose the online copy then the database can now be viewed within the MySQL Workbench SQL editor as the following figure shows.

Note
If a MySQL Workbench SQL Editor tab is already opened, then the schema list within the Object Browser must be refreshed in order to view the newly imported schema.