MySQL Workbench Release Notes
Note
This feature was added in MySQL Workbench 6.2.0.
Microsoft Windows is required because Microsoft Access ODBC drivers are only available on Windows. As for the destination MySQL server, you can have it in the same local machine or elsewhere in your network.
Microsoft Access stores relationship/foreign key information in an internal table called MSysRelationships. That table is protected against read access even to the Admin user, so if you try to migrate without opening up access to it, then you will get an error like this:
[42000] [Microsoft][ODBC Microsoft Access Driver] Record(s) cannot be read; no read permission on 'msysobjects'. (-1907) (SQLExecDirectW)The steps to grant read access to the Admin role (using Microsoft Access 2007) are summarized as follows:
Open up database in Microsoft Access
-
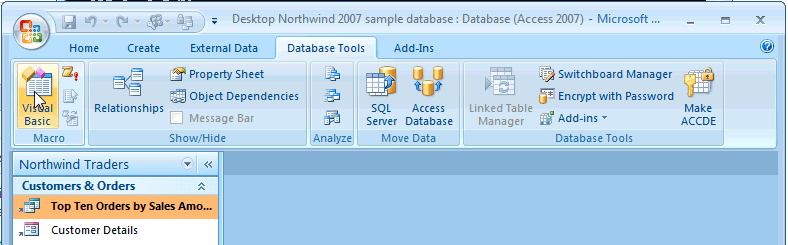
From the ribbon, click the to open the Visual Basic (VB) console. The following figure shows the location of this button in the Macro area.
To confirm that you're logged in as the "Admin" user, locate the Immediate panel and type the "? CurrentUser" and press . This should output "Admin" under "? CurrentUser" in the panel (see the figure that follows).
-
Also in the Immediate panel, type the following command to grant access:
CurrentProject.Connection.Execute "GRANT SELECT ON MSysRelationships TO Admin"
Quit the Microsoft Access application

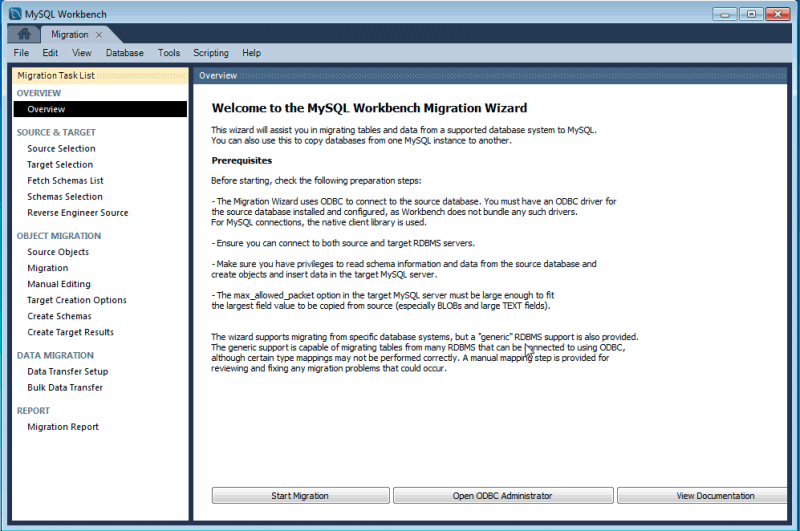
From the main MySQL Workbench screen you can start the Migration
Wizard by clicking the database-migration launcher (
![]() ) in the Workbench side panel or by clicking
and then from the main menu. As the following figure
shows, a new tab showing the Overview page of the Migration Wizard
is displayed.
) in the Workbench side panel or by clicking
and then from the main menu. As the following figure
shows, a new tab showing the Overview page of the Migration Wizard
is displayed.
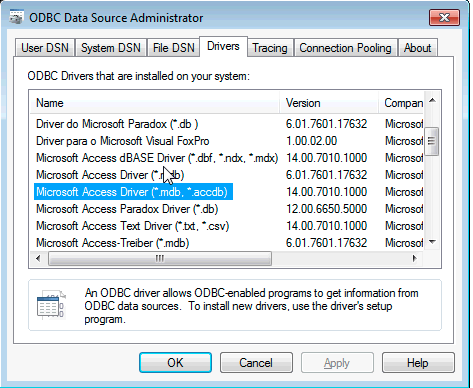
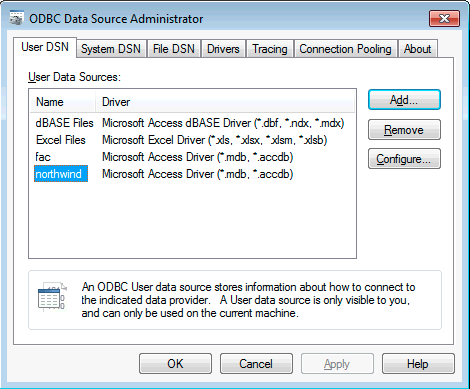
To verify that you have the ODBC driver installed, click from the MySQL Workbench migration overview page to open the system ODBC tool. Then, select the Drivers tab (see the figure that follows).
Important
MySQL Workbench has a 64-bit executable. The ODBC drivers you use must be of the same architecture as the MySQL Workbench binaries you are using. If during migration you get an ODBC error about "architecture mismatch between the Driver and Application", you installed the wrong version of MySQL Workbench.
In the User DSN tab, click to create a DSN for your database file. As the next figure shows, a new data source was created for the northwind database sample.
Click from the Overview page to advance to the Source Selection page. Here you need to provide the information about the Access database you are migrating from, the ODBC driver to use, and the parameters for the Access connection.
Open the Database System combo box for a list of supported RDBMSes, and select Microsoft Access from the list. There is another combo box below it named Stored Connection. It lists saved connection settings for that RDBMS. You can save connections by marking the check box at the bottom of the page, along with a name for the saved connection.
The next combo box selects the Connection Method. This time we are going to select ODBC Data Source from the list. This allows you to select pre-existing DSNs that you have configured in your system.
The DSN drop-down list will have all DSNs you have defined in your system. Pick the one you created for the Access database being migrated from the list.
In the Default Character Set field you can select the character set of your database (see the figure that follows). If your Access version uses western/latin characters, you can leave the default cp1252. However, if you use a localized version of Access, such as Japanese, you must enter the correct character set used by your edition of Microsoft Office, otherwise the data will be copied incorrectly.
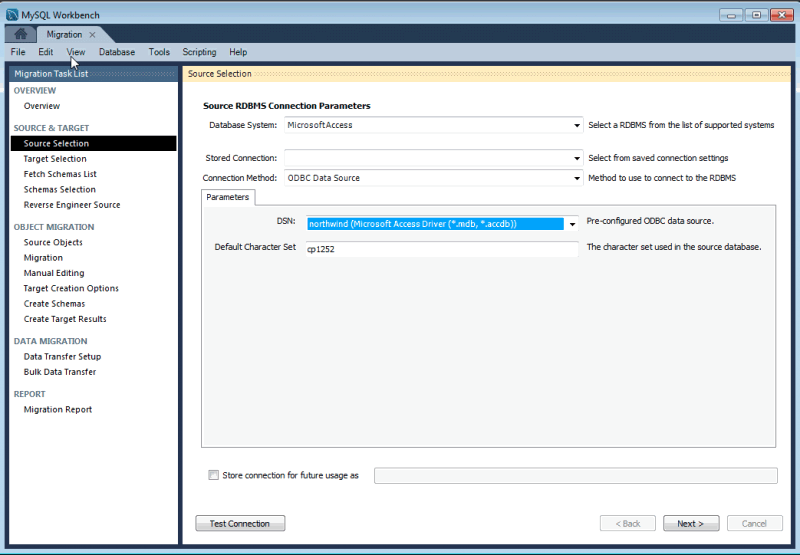
Lastly, click to check whether an ODBC connection can be established. If you entered the correct parameters then you should see a message reporting a successful connection attempt.
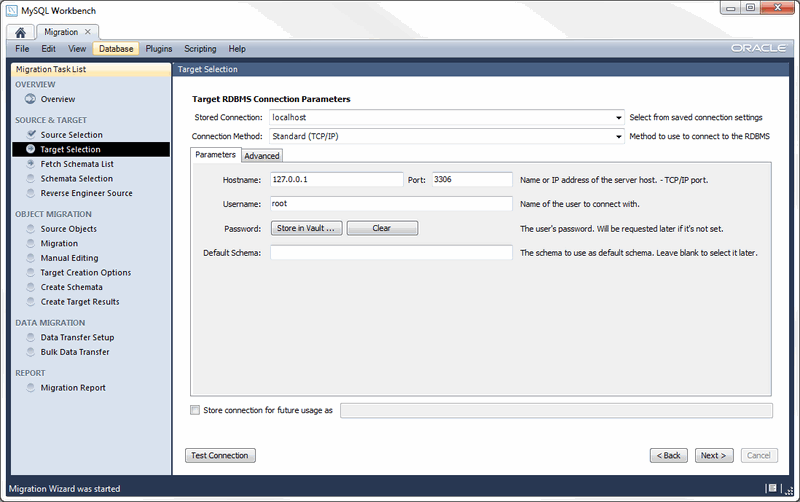
Next, set up the target (MySQL) database parameters by defining the parameters that connect to your MySQL Server instance. When finished, click to verify the connection definition. The following figure shows the Parameters tab.
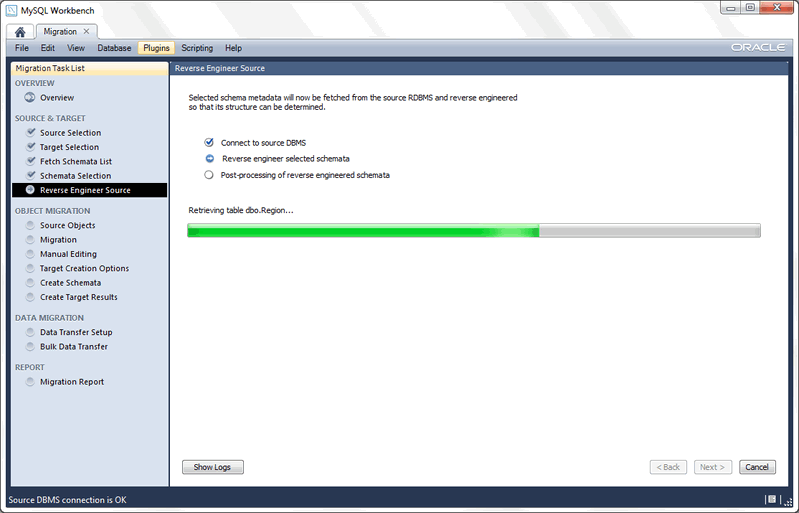
Next, you should see the reverse engineering of the selected database objects progress. At this point, the migration wizard is retrieving relevant information about the involved database objects (such as table names, table columns, primary and foreign keys, indexes, triggers, views, and more). You will be presented a page showing the progress as shown in the next figure.
Wait for it to finish and verify that everything went well. Next, the Source Objects displays a list with the objects that were retrieved and are available for migration. It will look similar to the figure that follows.
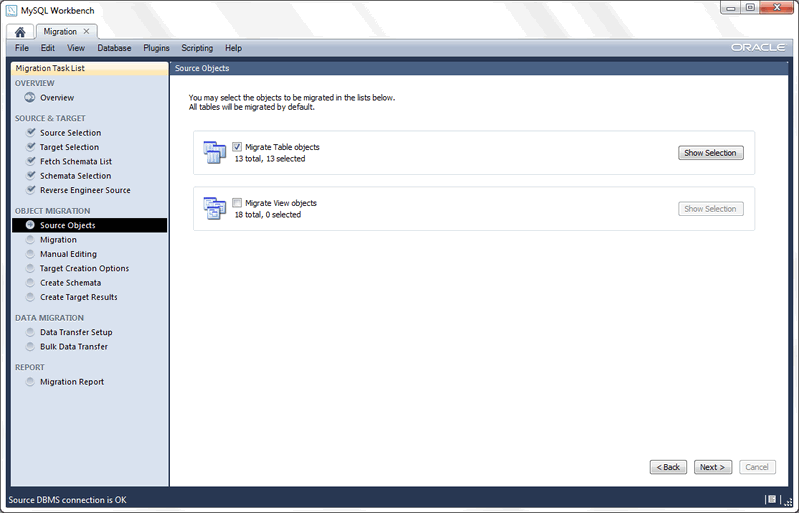
In the previous example, the migration wizard discovered table and view objects for our source database. Only the table objects are selected by default for migration.
Note
You can also select the view objects but you must also provide their corresponding MySQL equivalent code later (no automatic migration is available for them) so our example will leave the views unchecked. The same applies for stored procedures, functions and triggers.
Click to configure exactly which objects you want to migrate, as the next figure shows.
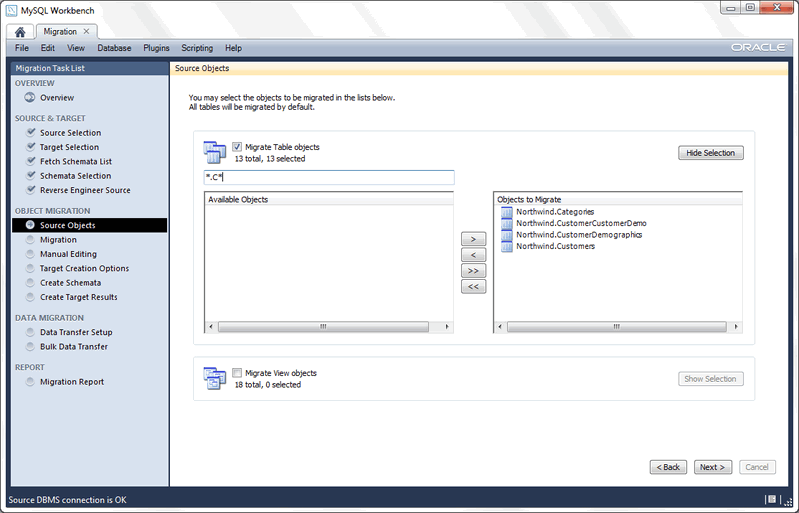
The objects on the right will be migrated. The filter box can filter the list (wildcards are allowed, as demonstrated above). By using the arrow buttons you can filter out the objects that you do not want to migrate. Before continuing, clear the filter text box to check the full list of the selected objects. Our example migrates all of the table objects so all of them are in the Objects to Migrate list, and the Migrate Table Objects check box is checked.
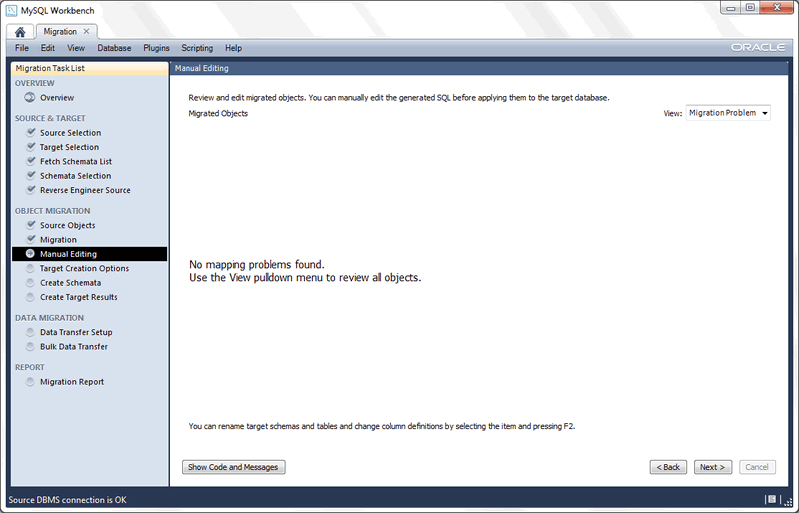
At this point, the migration wizard converts the selected objects into their equivalent objects into the target MySQL server, and it also generates the MySQL code needed to create them. You might have to wait before the Manual Editing step displays the initial page shown in the next figure.
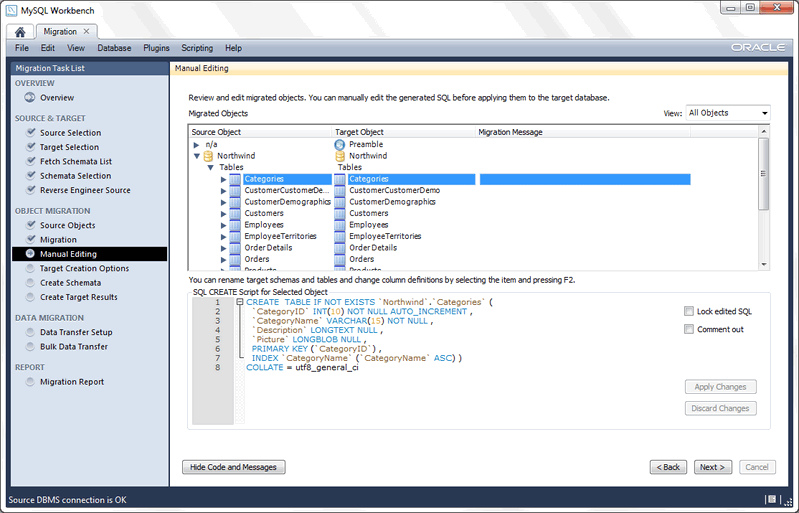
The View combo box changes the way the migrated database objects are shown (see the figure that follows). Click to view and edit the generated MySQL code that corresponds to the selected object. Additionally, you can double-click on a row in the object tree to edit the object name, or double-click the database row to change its name.
The View combo box also has a Column Mappings option. As the following figure indicates, it shows the table columns and allows you to review and fix the mapping of column types, default values, and other attributes.

Next is the Target Creation Options page, as shown in the following figure.

Use target-creation options to execute the generated code in the target RDBMS (your MySQL instance from the second step) or you can dump it to an SQL script file. Leave it as shown in the previous figure and move to the next page. The migrated SQL code will be executed on the target MySQL server. You can view its progress in the Create Schemas page shown in the next figure.
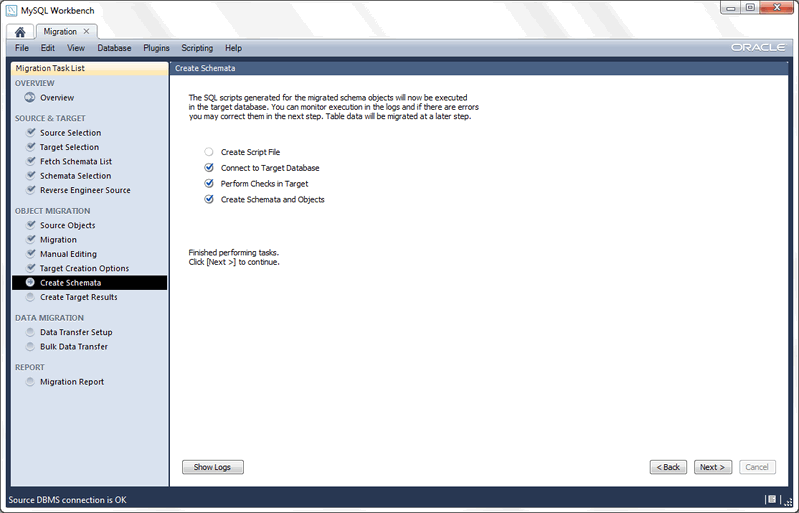
When the creation of the schemas and objects finishes, you can move to the Create Target Results page. It presents a list of created objects and includes any generated errors while they were created. It will look similar to the following figure.
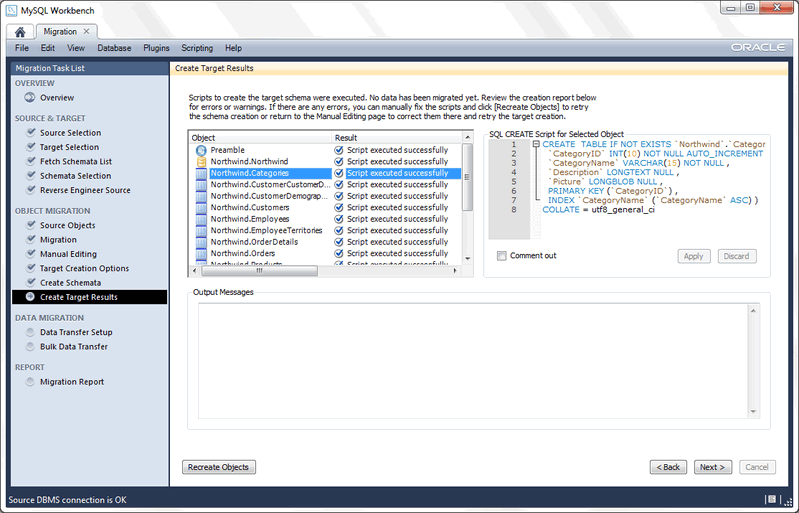
You can edit the migration code using the code box to the right, and save your changes by clicking . If edits were made, you still need to recreate the objects with the modified code in order to perform the changes. This is done by clicking . In this tutorial we are not changing anything, so leave the code as it is, and continue on to the Data Transfer Setup page.
The next step transfers data from the source Access database into your newly created target MySQL database. The Data Transfer Setup page allows you to configure this process (see the figure that follows).
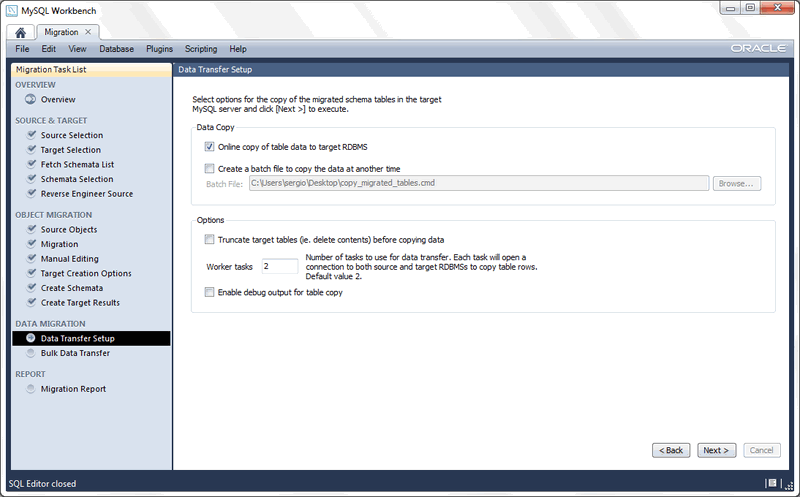
There are two sets of options here. The first allows you to perform a live transference and/or to dump the data into a batch file that you can execute later. The other set of options allows you to alter this process.
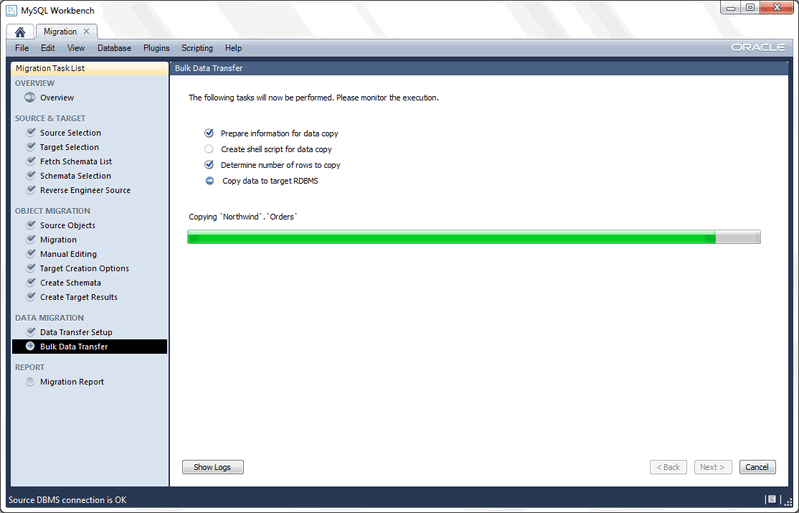
This tutorial uses the default values for the options in this page as shown in the previous figure. Next, the data is transferred. At this point the corresponding progress page confirms the tasks being performed (see the figure that follows).
Once it finishes, move to the next page. You will be presented a report page summarizing the whole process. Now, review and click Finish to close the wizard.
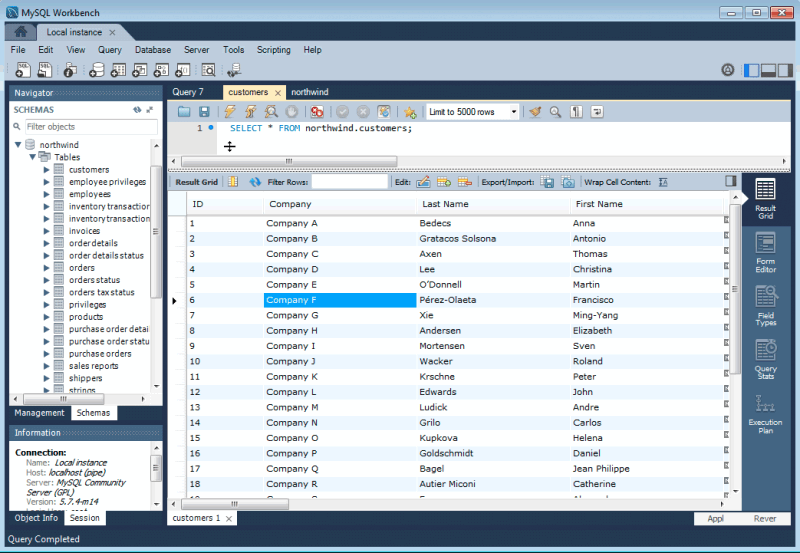
Now that the northwind database was successfully migrated, you can
view the results. Open an SQL Editor that is associated with your
MySQL server instance and then query the northwind database. For
example, execute a query like SELECT * FROM
northwind.customers, which populates the result grid as
shown in the next figure.