MySQL is getting native support for JSON. This blog post will show you how to quickly get the MySQL server with these new features running on your Windows rig and how to write a small C# program in Visual Studio 2015 that stores a JSON document using the new native JSON data type.
Schema or Schemaless
The upcoming 5.7 version of MySQL introduces a ton of new features, some of which I am quite excited about—in particular the native JSON support and Generated Columns. I think these can be very powerful for rapid development where the database is constantly changing as I add features and refactor existing ones. With the introduction of the new JSON data type I can combine schema and schemaless data.
Schema bound or schemaless with with ACID features, combined with transparent and easy data model changes? Yes, thank you, both please.
Installing Docker on Windows
The first step is to get the JSON labs release version of the MySQL server running on our computer. The easiest way is to have Docker do this for us. If you already have Docker installed (or Boot2Docker) then you can skip this step.
- Go to https://docs.docker.com/installation/windows/
- Follow the instructions and download the installer from https://github.com/boot2docker/windows-installer/releases/latest
- Install Boot2Docker (VirtualBox is a part of the install)
Installing the MySQL JSON Labs Release
Now that we have Docker installed, lets start it up. Simply double click the new desktop icon. This will then take us into a shell.

Now install the MySQL JSON Labs release using some Docker magic:
|
1 |
docker run -p 3306:3306 --name ml -e MYSQL_ROOT_PASSWORD=my-secret-pw -d mysql/mysql-labs:5.7.7-json |
You can then use this command to verify that the server is up and running:
|
1 |
docker ps -a |
Which should read something like this:
|
1
2
|
CONTAINER ID IMAGE COMMAND CREATED STATUS PORTS NAMES 6fda78d86926 mysql/mysql-labs:5.7.7-json "/entrypoint.sh mysq 3 seconds ago Up 3 seconds 0.0.0.0:3306->3306/tcp ml |
Connecting to the Server Using the MySQL Client
Let’s then start a bash process inside the same container that the new MySQL server is running in. This will give us access to the mysql command-line client which we can then use to interact with the MySQL server.
At the Docker prompt enter
docker exec -it ml bash, this give us a bash shell inside the container. From here enter
mysql -p to connect to the MySQL server. The password is ‘my-secret-pw‘ or whatever you chose at install.
|
1
2
3
4
5
6
7
8
9
10
11
12
13
14
15
16
|
$ docker exec -it ml bash [root@6fda78d86926 /]# mysql -p Enter password: Welcome to the MySQL monitor. Commands end with ; or \g. Your MySQL connection id is 2 Server version: 5.7.7-labs-json MySQL Community Server (GPL) Copyright (c) 2000, 2015, Oracle and/or its affiliates. All rights reserved. Oracle is a registered trademark of Oracle Corporation and/or its affiliates. Other names may be trademarks of their respective owners. Type 'help;' or '\h' for help. Type '\c' to clear the current input statement. mysql> |
Trying out the New Native JSON Type
All righty then, finally we can play around with the new JSON type. It has a lot more to offer than simply storing JSON data, heck one could do that in a TEXT/BLOB or VARCHAR/CHAR type. The JSON data type enforces validation and fast look ups of sub-elements inside of the JSON document.
|
1
2
3
4
5
6
7
8
9
10
11
12
13
14
15
16
17
18
19
20
21
22
23
24
25
26
27
28
29
30
31
32
33
34
35
36
37
38
39
40
41
42
43
44
45
46
47
48
49
50
51
|
# Create a new database. mysql> create database mydb; Query OK, 1 row affected (0.00 sec) mysql> use mydb; Database changed # Create new table. mysql> create table users (id int auto_increment, key(id), doc json); Query OK, 0 rows affected (0.01 sec) mysql> show columns from users; +-------+---------+------+-----+---------+----------------+ | Field | Type | Null | Key | Default | Extra | +-------+---------+------+-----+---------+----------------+ | id | int(11) | NO | MUL | NULL | auto_increment | | doc | json | YES | | NULL | | +-------+---------+------+-----+---------+----------------+ 2 rows in set (0.00 sec) # Insert some data. mysql> insert into users (doc) values ('{"name" : "Bob", "age" : 25, "slogan" : "If it works; fix it"}'); Query OK, 1 row affected (0.00 sec) mysql> insert into users (doc) values ('{"name" : "Jim", "age" : 22, "slogan" : "I like pie"}'); Query OK, 1 row affected (0.00 sec) # Look at the data. mysql> select * from users; +----+-------------------------------------------------------------+ | id | doc | +----+-------------------------------------------------------------+ | 1 | {"age": 25, "name": "Bob", "slogan": "If it works; fix it"} | | 2 | {"age": 22, "name": "Jim", "slogan": "I like pie"} | +----+-------------------------------------------------------------+ 2 rows in set (0.00 sec) # Select a field from the JSON document. mysql> select jsn_extract(doc, '$.name') from users; +----------------------------+ | jsn_extract(doc, '$.name') | +----------------------------+ | "Bob" | | "Jim" | +----------------------------+ 2 rows in set (0.00 sec) |
Exposing the Server Port to the OS
We now have a MySQL server running on a virtual Linux server inside VirtualBox. The problem is that this MySQL server is living inside a docker container completely cut off from any outside access, but we want to interact with it from the our Windows host. So, what we need to do is to tell Docker to expose the server port to VirtualBox, and then tell VirtualBox to expose that port to Windows.
We already did the first step by using the “-p 3306:3306” parameter when we installed the mysql/mysql-labs:5.7.7-json container. Read more about docker run -p if you are interested in knowing all of the gory details.
The next step requires starting VirtualBox. We have exposed the server port in Docker to VirtualBox, now we need to tell VirtualBox to pass that port along to Windows. You should have a start icon on the desktop after installing Boot2Docker.
Go to Settings -> Network -> Port forwarding and add the following rule:
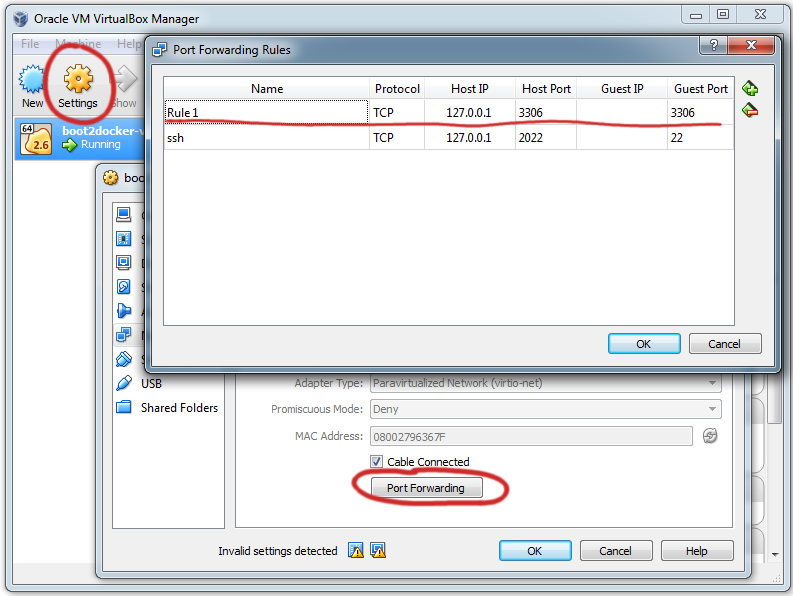
This is a good time to open a command shell and check if you see port 3306 being listened on.
|
1
2
|
C:\Users\TRS>netstat -a -n | findstr 3306 TCP 127.0.0.1:3306 0.0.0.0:0 LISTENING |
Create a Project in Visual Studio 2015
So in case you haven’t been paying attention—Microsoft has released a free and fully featured version of their IDE which I recommend you get if you’re even remotely interested in developing on the Windows platform (or even for mobile and Web development).
Head over to www.visualstudio.com and grab it. I use the community edition.
Once you have it installed, then create a new project called JsonTest (for example), and to keep it simple choose a project of type ‘Console Application’.
Add MySQL Connector/Net to the Project
Now we want to communicate with the MySQL server that is running in our Docker container from our C# program, so what we need is MySQL Connector/Net, this is a pure C# library for exactly this purpose.
-
 In Solution Explorer, right click on ‘References’ to bring up the menu
 - Choose “Manage nuget packages” from the menu.
- Type in ‘mysql’ in the search bar
- Choose the ‘MySql.Data ADO.Net driver for MySQL’.
- Press the install button

C# Code for Using the New JSON Data Type
This is a simple example program of how to create a table with a JSON type column, INSERT a couple of JSON Documents, and then finally to read them back from the database.
Notice line 36, here I do a small trick to avoid getting MySqlException ‘Unknown data type’, because this is a Labs release that contains functionality which is slightly ahead of the current generation of connectors. So to work around the fact that the connector is clueless about the new JSON type, I CAST the type to a CHAR(40) column in the SELECT statement.
Copy & paste the program below into your own project and hit CTRL-F5 to run it:
|
1
2
3
4
5
6
7
8
9
10
11
12
13
14
15
16
17
18
19
20
21
22
23
24
25
26
27
28
29
30
31
32
33
34
35
36
37
38
39
40
41
42
43
44
45
46
47
48
49
50
|
using System; using MySql.Data.MySqlClient; namespace JsonTest { class Program { private MySqlConnection conn; static void Main(string[] args) { Program prog = new Program(); prog.TestJson(); } public void Execute(string sql) { try { MySqlCommand cmd = new MySqlCommand(sql, conn); cmd.ExecuteNonQuery(); Console.WriteLine("OK: " + sql ); } catch (Exception e) { Console.WriteLine("ERROR: "+sql+"\n"+e.ToString()); } } public void TestJson() { Console.WriteLine("--- MySQL JSON Test ---"); string connStr = "server=localhost;user=root;port=3306;password=my-secret-pw;"; conn = new MySqlConnection(connStr); try { Console.WriteLine("Connecting to MySQL..."); conn.Open(); Execute("CREATE DATABASE IF NOT EXISTS trs"); Execute("DROP TABLE IF EXISTS trs.t"); Execute("CREATE TABLE trs.t (doc json)"); Execute("INSERT INTO trs.t VALUES(' { \"name\" : \"Bob\" , \"age\" : 25 } ')"); Execute("INSERT INTO trs.t VALUES(' { \"name\" : \"Sue\" , \"age\" : 26 } ')"); MySqlCommand cmd = new MySqlCommand("select cast(doc as char(40)) from trs.t", conn); using (MySqlDataReader rdr = cmd.ExecuteReader()) { while (rdr.Read()) { string doc = rdr.GetString(0); Console.WriteLine("ROW: json -> "+ doc); } } } catch (Exception ex) { Console.WriteLine(ex.ToString()); } conn.Close(); Console.WriteLine("Done."); } } } |
You should then get the following result:
|
1
2
3
4
5
6
7
8
9
10
11
|
--- MySQL JSON Test --- Connecting to MySQL... OK: CREATE DATABASE IF NOT EXISTS trs OK: DROP TABLE IF EXISTS trs.t OK: CREATE TABLE trs.t (doc json) OK: INSERT INTO trs.t VALUES(' { "name" : "Bob" , "age" : 25 } ') OK: INSERT INTO trs.t VALUES(' { "name" : "Sue" , "age" : 26 } ') ROW: json -> {"age": 25, "name": "Bob"} ROW: json -> {"age": 26, "name": "Sue"} Done. Press any key to continue . . . |
As you can see, we’ve successfully created a table in MySQL 5.7 which has a JSON column, we’ve then INSERTED two JSON Documents into that table, and finally we’ve queried the table to get JSON Documents back.
That’s it for now. I hope that this brief introduction was helpful! Please stay tuned as we add additional helpful information regarding working with JSON in MySQL 5.7. As always, THANK YOU for using MySQL!