MySQL Shell 8.0.13 (GA) introduced a new feature to import JSON documents to MySQL in an easy way. The basics of this new feature were described in a previous blog post. Here, we provide more details about this feature, focusing on a practical use case that may be of interest for some readers: How to import JSON data from MongoDB to MySQL. The same “recipe” may be applied to import of data from other document-store databases to MySQL, as long as they are able to produce or export data to JSON.
The task of migrating to a different database product, whatever the reason that motivated it, should not be taken lightly and it can be quite elaborated in many cases. Among others aspects, it depends on the number of database servers and their organization in the system (singe server Vs complex replication topology), the size of the data, the requirements and available resources to execute this task. A comprehensive and detailed plan should be defined to successfully perform this task, including all the required steps and corresponding actions/tools to execute them.
NOTE: Before jumping into the migration of your production database system, it is highly recommended that you first migrate a sample of your data and test the final result in order to make sure that it matches your expectations and requirements. This will also allow you to test your migration plan.
Every migration plan is different and specific to each use case, but all likely include common steps, such as updating the application to work with the new database, and exporting and importing the database data. The new feature from the MySQL Shell to import JSON data helps us perform this step in a much simpler way. Let’s see how it works in practice to import data from MongoDB to MySQL using JavaScript.
Export data from MongoDB to JSON
MongoDB allows you to export all your data to JSON, but it generates a strict mode representation of MongoDB Extended JSON. Fortunately, the MySQL Shell JSON import feature allows you to convert the BSON ObjectId type, using the option ‘convertBsonOid‘ for that purpose.
NOTE: If your data contains other BSON types besides the ObjectId, that are represented in strict mode (e.g., BinData, Date, Timestamp, NumberLong, NumberDecimal, etc.), then you might need to handle the conversion of those types manually to convert them properly according to your requirements (for example, using your own custom conversion script during the import/export process, or converting them at the application level). For more information about BJSON types and their representation in strict mode, see: BSON Data Types and Associated Representations.
The first thing that you need to do is actually export all your MongoDB data to JSON documents. For example, assuming that you have two collections in a ‘test‘ database, named: restaurants and neighboors. You would use the following instructions to export your MongoDB data to JSON documents (one file for each collection):
|
1
2
3
4
5
6
7
|
$ mongoexport --db test --collection restaurants --out restaurants_mongo.json 2018-10-08T18:38:19.104+0100 connected to: localhost 2018-10-08T18:38:19.633+0100 exported 25359 records $ mongoexport --db test --collection neighborhoods --out neighborhoods_mongo.json 2018-10-08T18:38:45.923+0100 connected to: localhost 2018-10-08T18:38:46.382+0100 exported 195 records |
As a result, you will get two JSON files “restaurants_mongo.json” and “neighborhoods_mongo.json” with your data.
Import JSON data to MySQL using JavaScript
Next, you just need to use the new MySQL Shell feature to import the resulting JSON files to your MySQL database. For that purpose, we will use the JavaScript function ‘util.importJson‘ in the next example. However, the same can be achieved using the command line as shown in our previous blog post.
>
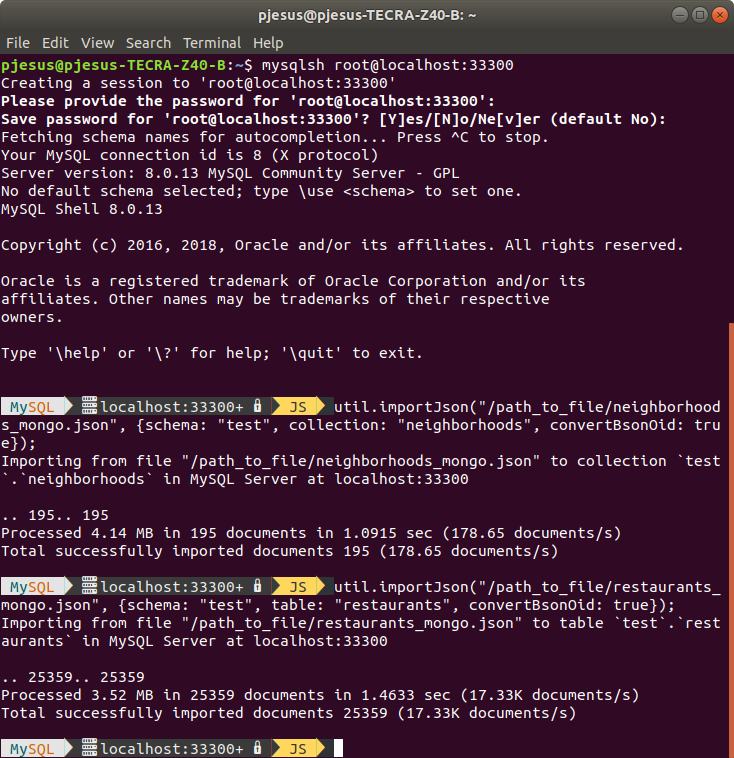
util.importJson("/path_to_file/neighborhoods_mongo.json", {schema: "test", collection: "neighborhoods", convertBsonOid: true});>
util.importJson("/path_to_file/restaurants_mongo.json", {schema: "test", table: "restaurants", convertBsonOid: true});As can see, the option ‘convertBsonOid‘ was used with the value “true” to import both files. This will convert the MongoDB Object Id (OID) to the correct value. In particular, this is required in the case of importing the JSON data to a collection, since the OID is converted to the collection Id used by MySQL to identify each stored document (more specifically, the ‘_id‘ column and ‘_id‘ field for each document in the collection), otherwise an error will be issued when trying to import the field containing the OID to the MySQL document Id (‘_id‘) in the collection.
The first file “neighborhoods_mongo.json” was imported to a collection ‘neighborhoods‘, using the JavaScript function util.importJson(). The second file “restaurants_mongo.json” was imported to a table ‘restaurants‘, using the same function. In both cases, none of the target collection and table already existed and was automatically added using the JSON import function.
More detailed information about the JSON import utility is available here. You can also use the help directly from the MySQL Shell, to easily get additional information about the function, just type: “\h importJson“.
Difference between importing JSON to a collection and table
The use of different target objects (a collection vs a table) there are some subtle differences in the result of an import. Let’s take a look a the structure of the resulting data to highlight those differences.
>
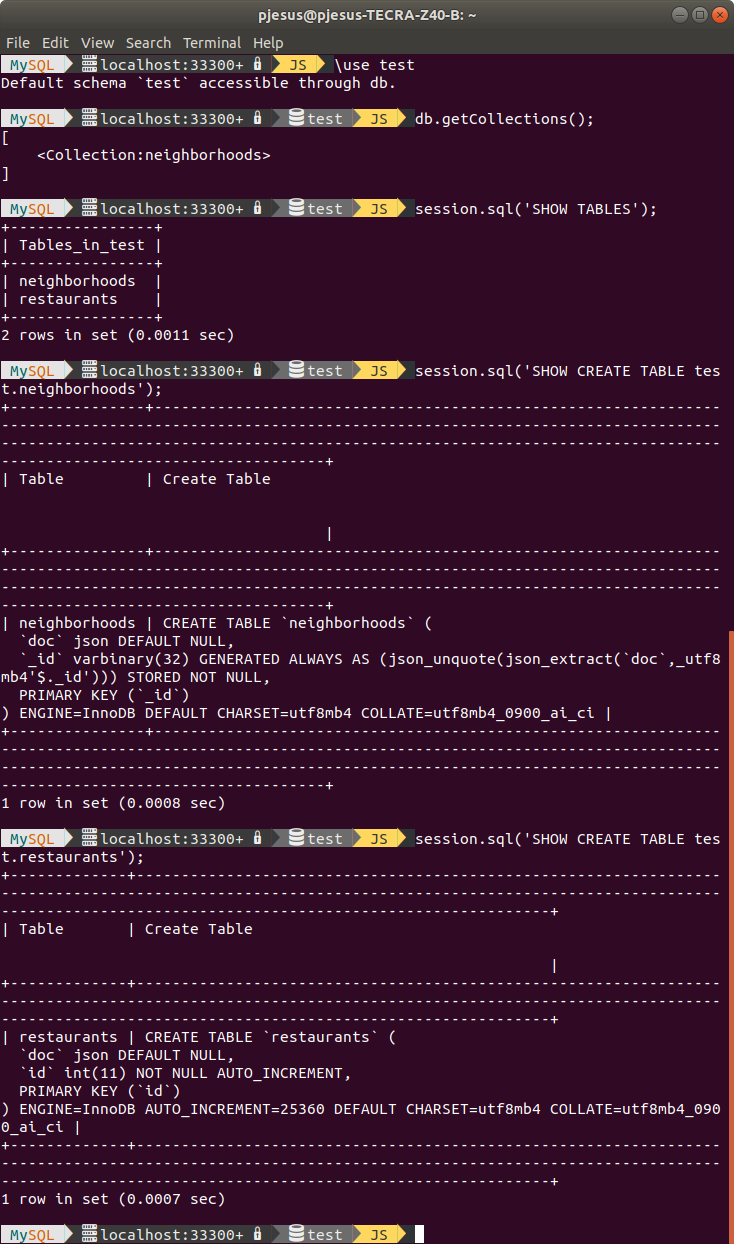
\use test>
db.getCollections(); >
session.sql("SHOW TABLES"); >
session.sql("SHOW CREATE TABLE test.neighborhoods"); >
session.sql("SHOW CREATE TABLE test.restaurants");First, as expected we can observe that the ‘restaurants‘ data is not listed as a collection since it was specifically imported to a table. However, all imported files are listed as a table, even the JSON documents imported to a collection. This is because collections are also internally stored as a table in MySQL, but with a very specific structure.
Looking at the result of ‘SHOW CREATE TABLE’ statements for the ‘neighborhoods’ and ‘restaurants’ tables, it is possible to observe the differences between them. In both cases, the JSON documents are actually stored in a ‘doc‘ column of JSON type. The difference is the identification column. In the case of the collection ‘neighborhoods‘, the identification is held by the ‘_id‘ column which matches the ‘_id‘ field in the JSON document that contains the value of the converted OID during the import. Thus, the OID will actually match the Id of each imported JSON document in MySQL, being used as the primary key. In the case of the table ‘restaurants‘, the identification is held by the ‘id‘ column which is an auto-increment integer, meaning that a new identification is generated for each JSON documents (row). Thus, the original OID will be somehow ignored, i.e., not used as primary key, although the _id field in each JSON document will contain the OID value converted from the import.
In practice, this difference has implications in the way you will be able to use the imported data. If you choose a collection as the target of the import you will be able to take advantage of all MySQL Document Store features (NoSQL + SQL). On the other hand, if you choose a table as the target of the import you will be “limited” to the available JSON type features and JSON functions natively provided by MySQL to manipulate your JSON data (only SQL).
NOTE: There are some relevant syntax differences between the commands for MongoDB versus MySQL Document Store, which will likely be useful to know when updating your application to use MySQL. You can find more information about it in the following blog posts: Part I, Part II, Part III.
How to create a new column for some imported data
From the previous examples, we can observe that all the imported data is stored in a single column of the JSON type. However, in some situations, it might be desirable to have part of this data in another column, for example, to create an index on it to improve the execution time of some queries. Let’s see a simple example of how easy and quick this can be done. Suppose that we import some additional JSON data from “primer-dataset.json” to a new ‘my_restaurants’ table and that our application needs to query all the restaurant’s names for a specific type of cuisine.
>
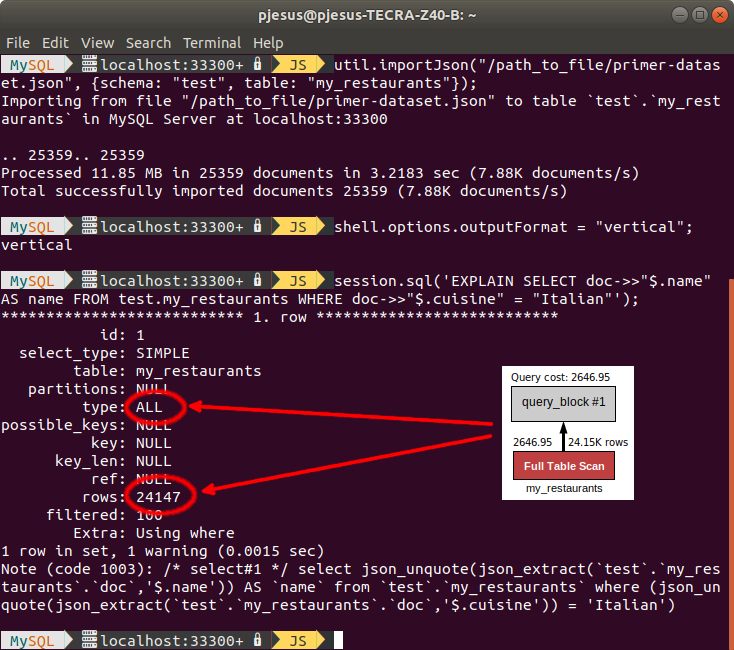
util.importJson("/path_to_file/primer-dataset.json", {schema: "test", table: "my_restaurants"}); >
shell.options.outputFormat = "vertical"; >
session.sql('EXPLAIN SELECT doc->>"$.name" AS name FROM test.my_restaurants WHERE doc->>"$.cuisine" = "Italian"');As you can see using the EXPLAIN statement to display information about the query execution plan, we can verify that the query will perform a full table scan to retrieve the desired information, which is not recommended (especially for tables with a huge amount of data). Fortunately, this can be easily solved by adding a new column and index for the attribute that we want to use to filter our results, using the ALTER TABLE statement to create a secondary index on a generated column.
>
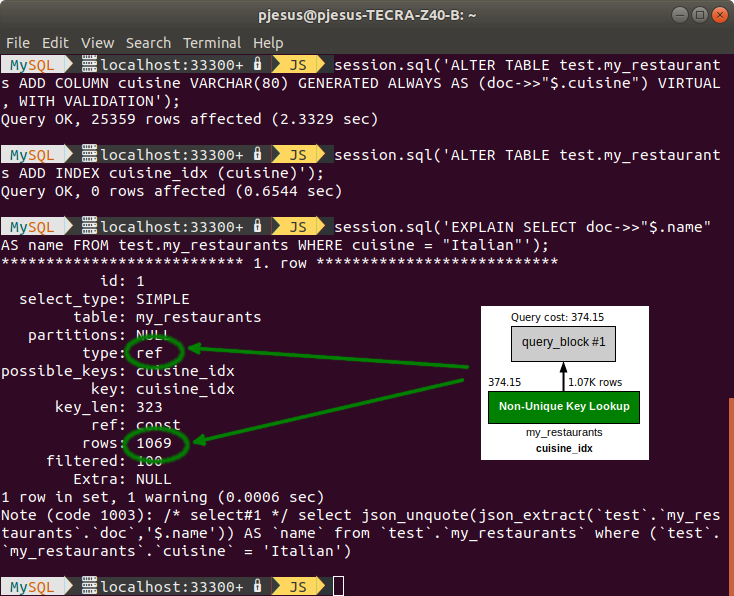
session.sql('ALTER TABLE test.my_restaurants ADD COLUMN cuisine VARCHAR(80) GENERATED ALWAYS AS (doc->>"$.cuisine") VIRTUAL, WITH VALIDATION'); >
session.sql('ALTER TABLE test.my_restaurants ADD INDEX cuisine_idx (cuisine)'); >
session.sql('EXPLAIN SELECT doc->>"$.name" AS name FROM test.my_restaurants WHERE cuisine = "Italian"');The first ALTER TABLE statement adds a new column ‘cuisine’ to the ‘my_restaurants’ table, extracting the values for that column from ‘cuisine’ attribute of the JSON data (in the ‘doc’ column) for each row. In this specific case, a virtual column was created and validations were performed to make sure the generated values are not out of range, but other options are available to create the new column, for more information see: ALTER TABLE and Generated Columns. Then, a second ALTER TABLE was executed to add an index on the new ‘cuisine’ column.
Now, analyzing the result of EXPLAIN, we can verify that the query execution cost is much lower because the index was used (no full table scan).
NOTE: In the above figures, we show the diagram of the query execution plan obtained from MySQL Workbench to give a better visual illustration of the cost for each situation.
Try it now and send us your feedback
MySQL Shell is available for download from the following links.
- MySQL developers website: https://dev.mysql.com/downloads/shell/
- MySQL Shell is also available on GitHub: https://github.com/mysql/mysql-shell
The documentation of MySQL Shell can be found here: https://dev.mysql.com/doc/mysql-shell/8.0/en/
The sample JSON data used in the examples above is publicly available on the following links. You can download it and try it yourself.
- Restaurants and Neighborhoods JSON documents (used to create a sample MongoDB database to import to MySQL):
https://raw.githubusercontent.com/mongodb/docs-assets/geospatial/restaurants.json
https://raw.githubusercontent.com/mongodb/docs-assets/geospatial/neighborhoods.json - Primer dataset JSON document:
https://raw.githubusercontent.com/mongodb/docs-assets/primer-dataset/primer-dataset.json