For a long time, the only algorithm for executing a join in MySQL has been variations of the nested loop algorithm. With the release of MySQL 8.0.18, the server can now execute joins using hash join. This blog post will have a look at how it works, when it is used, and how it compares to the old join algorithms in MySQL in terms of performance.
What is hash join?
Hash join is a way of executing a join where a hash table is used to find matching rows between the two inputs (an input is one or more tables). It is typically more efficient than nested loop joins, especially if one of the inputs can fit in memory. To see how it works, we will use the following query as an example:
|
1
2
3
4
|
SELECT given_name, country_name FROM persons JOIN countries ON persons.country_id = countries.country_id; |
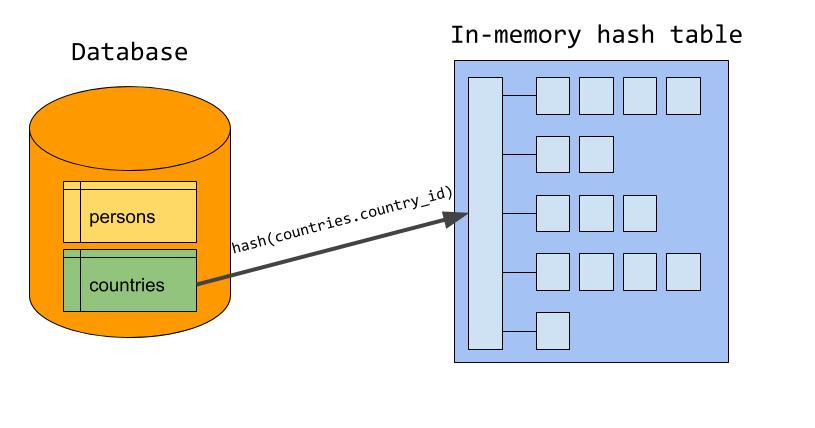
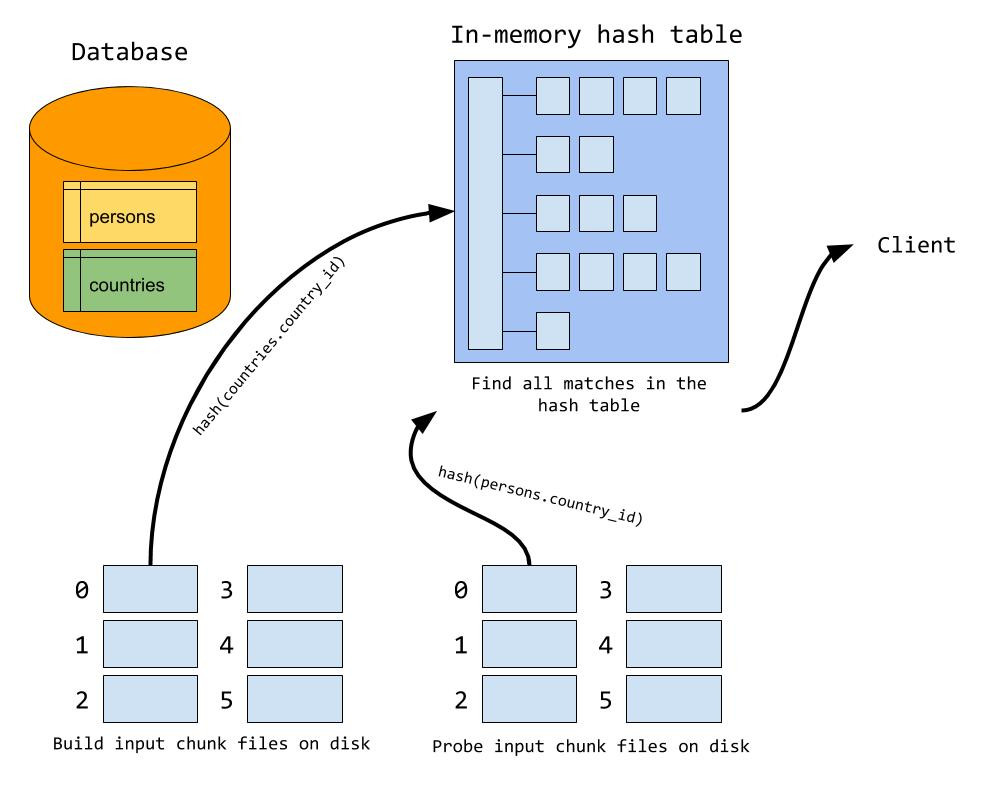
The build phase
The literature usually divides hash join in two phases; the build phase and the probe phase. In the build phase, the server builds an in-memory hash table where rows from one of the inputs are stored, using the join attribute(s) as the hash table key. This input is also known as the build input, and let us assume that ‘countries’ is designated as the build input. Ideally, the server will choose the smaller of the two inputs as the build input (measured in bytes, not number of rows). Since ‘countries.country_id’ is the join condition that belongs to the build input, this is used as the key in the hash table. Once all the rows has been stored in the hash table, the build phase is done.
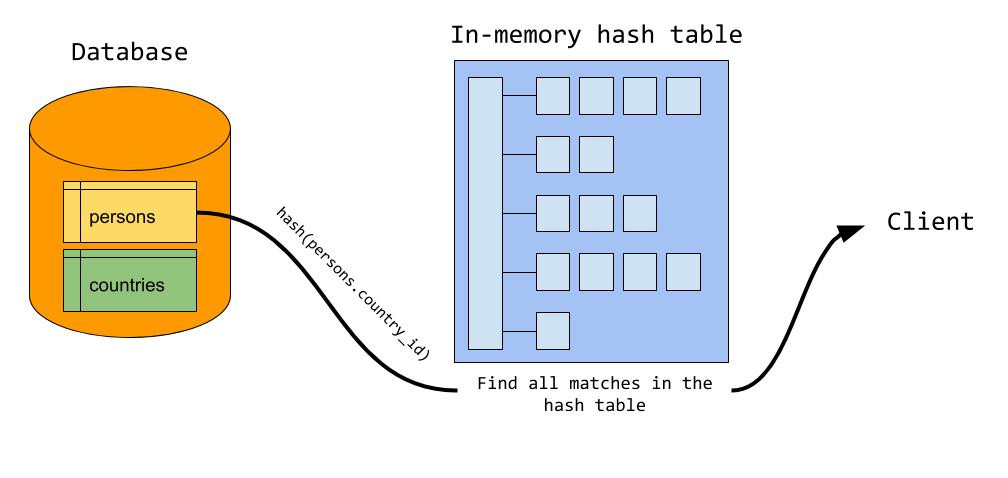
The probe phase
During the probe phase, the server starts reading rows from the probe input (‘persons’ in our example). For each row, the server probes the hash table for matching rows using the value from ‘persons.country_id’ as the lookup key. For each match, a joined row is sent to the client. In the end, the server has scanned each input only once, using constant time lookup to find matching rows between the two inputs.
This works very well given that the server can store the entire build input in memory. The amount of memory available is controlled by the system variable join_buffer_size, and can be adjusted at runtime. But what happens if the build input is bigger than the available memory? We spill to disk!
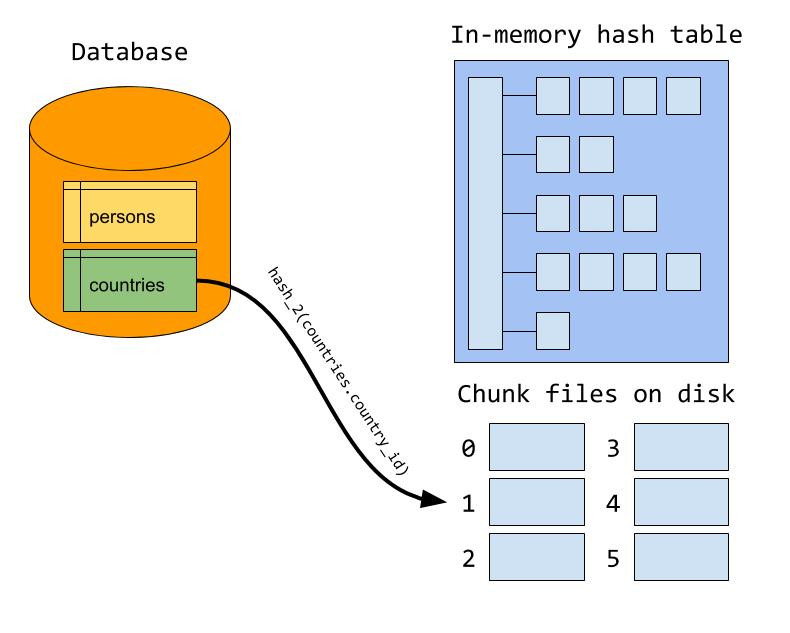
Spill to disk
When the memory goes full during the build phase, the server writes the rest of the build input out to a number of chunk files on disk. The server tries to set the number of chunks so that the largest chunk fits exactly in memory (we will see why soon), but MySQL has a hard upper limit of 128 chunk files per input. Which chunk file a row is written to is determined by calculating a hash of the join attribute. Note that in the illustration, there is a different hash function used than the one used in the in-memory build phase. We will see why a bit later.
During the probe phase, the server probes for matching rows in the hash table, just like when everything fits in memory. But in addition, a row may also match one of the rows from the build input that is written to disk. Thus, each row from the probe input is also written to a set of chunk files. Which chunk file a row is written to is determined using the same hash function and formula that is used when the build input is written to disk. This way, we know for sure that matching rows between the two inputs will be located in the same pair of chunk files.
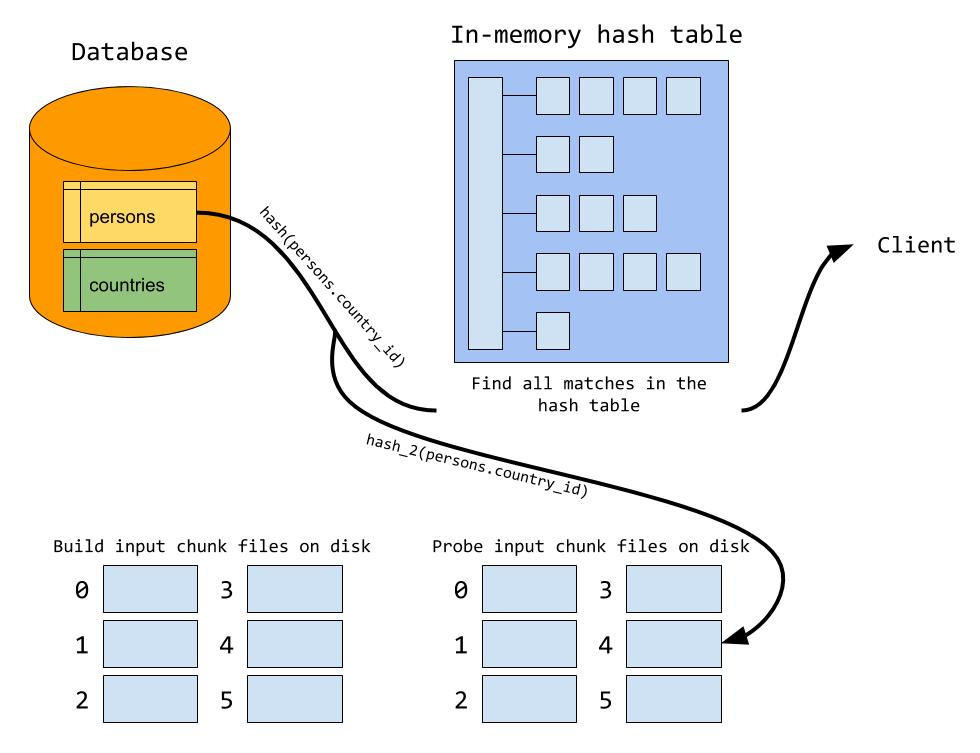
When the probe phase is done, we start reading chunk files from disk. In general, the server does a build and probe phase using the first set of chunk files as the build and probe input. We load the first chunk file from the build input into the in-memory hash table. This explains why we want the largest chunk to fit exactly in memory; if the chunk files are too big we need to split it up in even smaller chunks. After the build chunk is loaded, we read the corresponding chunk file from the probe input and probe for matches in the hash table, just like when everything fits in memory. When the first pair of chunk files is processed, we move to the next pair of chunk files, continuing until all pair of chunk files has been processed.
You might have guessed now why we should use two different hash functions when partitioning rows out to chunk files and writing rows to the hash table. If we were to use the same hash function for both operations, we would get an extremely bad hash table when loading a build chunk file into the hash table since all rows in the same chunk file would hash to the same value.
Awesome, how do I use it?
Hash join is enabled by default, so no action is needed to make use of hash join. One notable thing is that hash join builds on the new iterator executor, which means that you can (and must) use EXPLAIN FORMAT=tree to see whether hash join will be used:
|
1
2
3
4
5
6
7
8
9
10
11
12
13
14
15
|
mysql> EXPLAIN FORMAT=tree -> SELECT -> given_name, country_name -> FROM -> persons JOIN countries ON persons.country_id = countries.country_id; +---------------------------------------------------------------------------------------------------------------------------------------------------------------------------------------------------------+ | EXPLAIN | +---------------------------------------------------------------------------------------------------------------------------------------------------------------------------------------------------------+ | -> Inner hash join (countries.country_id = persons.country_id) (cost=0.70 rows=1) -> Table scan on countries (cost=0.35 rows=1) -> Hash -> Table scan on persons (cost=0.35 rows=1) | +---------------------------------------------------------------------------------------------------------------------------------------------------------------------------------------------------------+ 1 row in set (0.01 sec) |
In general, hash join will be used if you are joining together tables using one or more equi-join conditions, and there are no indexes available for the join conditions. If an index is available, MySQL tends to favor nested loop with index lookup instead.
We have introduced a new optimizer switch which lets you disable hash join for any query:
|
1
2
3
4
5
6
7
8
9
10
11
12
13
14
15
|
mysql> SET optimizer_switch="hash_join=off"; Query OK, 0 rows affected (0.00 sec) mysql> EXPLAIN FORMAT=tree -> SELECT -> given_name, country_name -> FROM -> persons JOIN countries ON persons.country_id = countries.country_id; +----------------------------------------+ | EXPLAIN | +----------------------------------------+ | | +----------------------------------------+ 1 row in set (0.00 sec) |
With hash join switched off, MySQL will fall back to block-nested loop, and thus the old executor (block-nested loop is not supported in the iterator executor). This switch makes it easy to compare the performance hash join and block-nested loop.
If you see that hash join is using disk due to the build input being too large to fit in memory, it is possible to increase the join buffer size. In contrast to block-nested loop, hash join will allocate memory incrementally, meaning that it will never use more memory than it needs. For this reason, it is safer to play with larger join buffer sizes when hash join is being used.
Performance numbers, please!
Before Percona Live Europe 2019, we did a few benchmarks to see how hash join compared to block-nested loop, and the results looked like this:
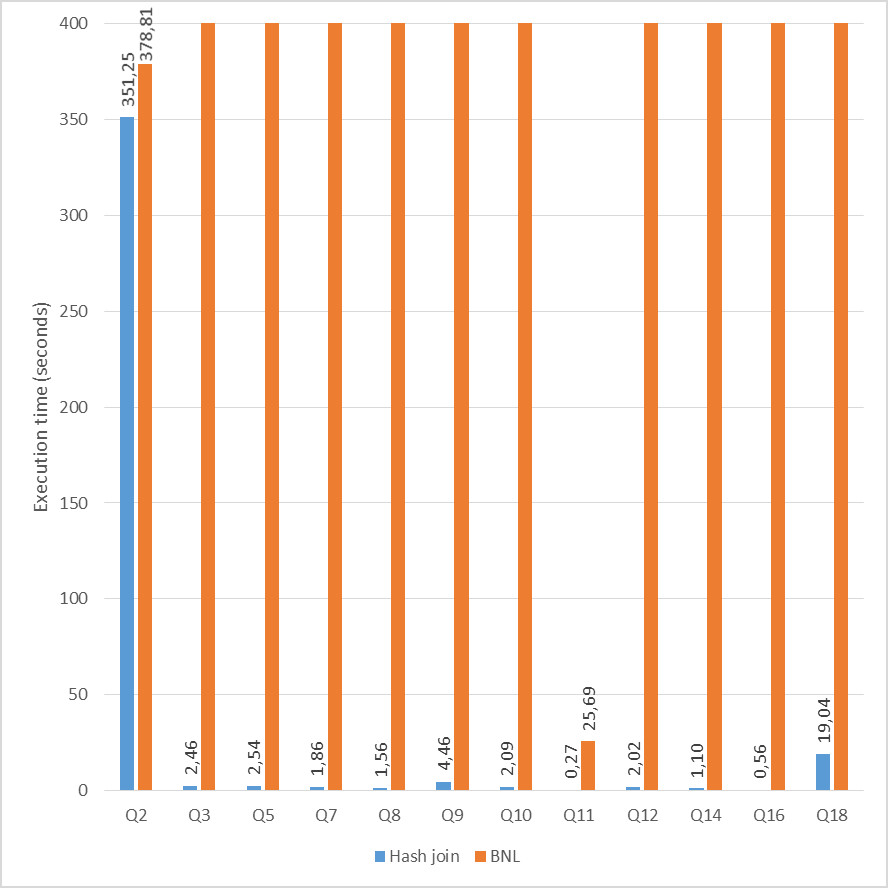
You can see the presentation of the results here. First of all, I must mention that we did disable all indexes in this test. This was to make the optimizer create execution plans using block-nested loop and hash join, so the numbers you see here does not display overall improvements to DBT-3 execution times. This test was done to highlight the difference between block-nested loop and hash join. But we can see that hash join clearly outperforms block-nested loop in all queries where it is used. The buffer pool size was adjusted so all data was in memory, and the join buffer size remained unchanged from the default value (around 250kB). The dramatic improvement is due to the fact that hash join scans each input only once, and that it uses constant time lookup to find matching rows between the two tables.
Sadly, there are a few limitations to the current implementation of hash join:
- MySQL only supports inner hash join, meaning that that anti, semi and outer joins are still executed using block-nested loop.
- The optimizer/planner thinks it will execute joins using block-nested loop. This means that the optimizer probably should use hash join more often than it does.
We hope to lift both of these limitations in the future, but hash join should make your queries run faster even with these two limitations.