 Cloning MySQL instance data reliably and efficiently is required in many scenarios. This includes MySQL HA solutions where one needs to provision an instance before joining it to a Group Replication cluster or adding it as Slave in classic the replication model.
Creating a MySQL replica for a replication topology has always been cumbersome. There were too many steps involved. It involved first taking a backup of the MySQL server, transferring the backup over the network to the new MySQL node that we wanted to add to the replication set, followed by a restore of the backup on that node. A MySQL server was then started manually to complete the process. To use it for HA, and get the cluster up and running one needs to set the backed up GTID correctly too. The number of manual steps involved was not good for usability. The Clone plugin solves this problem and simplifies the replica provisioning. You can use the MySQL client (and SQL commands) to provision new nodes and observe the cloning progress as it happens. No need to mess around with multiple steps manually and maintain your own infrastructure to provision new MySQL nodes.
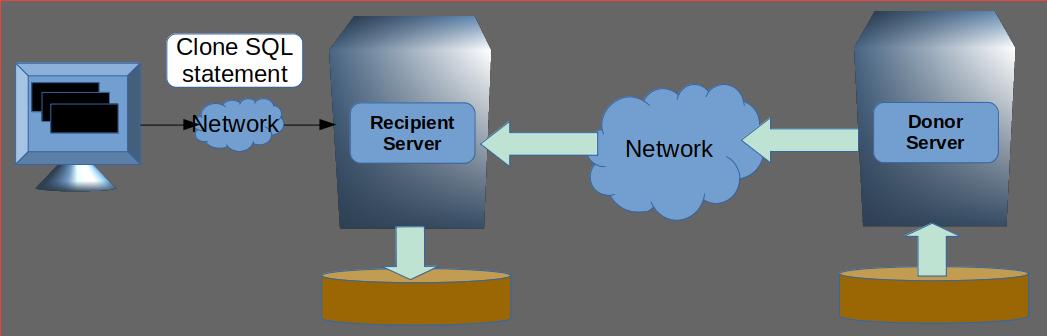
MySQL 8.0.17 introduces the CLONE SQL statement to make the current MySQL server a “clone” of another MySQL server running at a different node. We refer to the server instance, where the clone statement is executed, as the “Recipient”. The source server instance from which the data is going to be cloned is referred to as the “Donor”. The Donor clones all its data and metadata stored in the InnoDB storage engine at a consistent snapshot to replace the data in Recipient.
After the successful execution of a CLONE SQL statement the Recipient server is restarted automatically. The restart involves recovery of the snapshot data cloned just like it would if the data was copied across in the old way. Once recovery completes, the Recipient is a clone of the Donor and is ready for use! It’s as simple as that.
A few important points to note here about the cloning process.
- MySQL configuration parameters are not cloned and the Recipient retains all its original configuration parameters as before clone. This is done because many configurations could be specific to a node (e. g. PORT) and thus preserving them seems a good choice. On the other hand, some storage configurations do need to match (e. g. innodb_page_size) between the Donor and the Recipient, the CLONE will report an error if such configuration parameters mismatch.
- The Clone plugin does not clone the binary logs. Note that donor binary logs are not required to be cloned for joining the node to HA cluster.
- Clone plugin supports only the InnoDB storage engine currently. Tables created in other storage engines like MyISAM and CSV will be cloned as empty tables. The design of the Clone infrastructure allows for cloning any storage engine supported by MySQL. However, only the InnoDB serialize and deserialize methods have been implemented and tested.
- Clone blocks all concurrent DDLs in Donor.
- One needs to be careful about the fact that “Recipient” gives up all its data along with any binary logs in order to become clone of the donor instance. The current recipient data needs to backed up, if deemed necessary, before executing CLONE.
Let’s now go through a real example and steps to perform clone. In the following examples we will also look at some interesting details e.g., observability – how to monitor the progress of a long running Clone command and the privileges required to Clone etc. In the following example we will use the classic shell. With the new shell you can visualize the cloning state as a progress bar.
Step-1: Choose and setup the Donor.
Choose the MySQL server to clone from and connect to it as the system user. Then install clone plugin and provide backup privilege to the user that would transfer data from donor server.
|
1
2
3
|
mysql> INSTALL PLUGIN CLONE SONAME "mysql_clone.so"; mysql> CREATE USER clone_user IDENTIFIED BY "clone_password"; mysql> GRANT BACKUP_ADMIN ON *.* to clone_user; |
Grant privilege to view performance schema and execute functions. This is for observing clone progress.
|
1
2
|
mysql> GRANT SELECT ON performance_schema.* TO clone_user; mysql> GRANT EXECUTE ON *.* to clone_user; |
Step-2: Choose and setup Recipient.
Choose the server that would become a clone of Donor. If provisioning a new node, then first initialize a data directory and start the server.
Connect to the server as the system user. Then install clone plugin and provide CLONE_ADMIN privilege to the user that would replace the current instance data with cloned data. We also maintain a configuration which lists a set of valid donors that one can clone from.
|
1
2
3
4
|
mysql> INSTALL PLUGIN CLONE SONAME "mysql_clone.so"; mysql> SET GLOBAL clone_valid_donor_list = "donor.host.com:3306"; mysql> CREATE USER clone_user IDENTIFIED BY "clone_password"; mysql> GRANT CLONE_ADMIN ON *.* to clone_user; |
Grant privilege to view performance schema and execute functions. This is for observing clone progress.
|
1
2
|
mysql> GRANT SELECT ON performance_schema.* TO clone_user; mysql> GRANT EXECUTE ON *.* to clone_user; |
Step-3: Connect to Recipient and execute CLONE SQL statement.
We mention here the host name where the Donor is running and the MySQL protocol PORT which defaults to 3306. The donor sever must be reachable from Recipient . The Recipient will connect to Donor with the address and credential provided and start cloning.
|
1
2
3
|
mysql> CLONE INSTANCE -> FROM clone_user@donor.host.com:3306 -> IDENTIFIED BY "clone_password"; |
Clone command might take time to finish depending on the size of the data set and load on Donor. It’s as simple as that!
Step-3A: Wait for clone to finish and check progress
While cloning if data is in progress, create another connection to the Recipient to observe the progress of the running clone operation using performance_schema views.
The data shown here is for cloning a database of around 100GB over LAN with moderate sysbench read-write load on Donor. The data could vary based on cpu, disk, network used and load on Donor.
|
1
2
3
4
5
6
7
8
9
10
11
12
13
|
mysql> select STATE, CAST(BEGIN_TIME AS DATETIME) as "START TIME", CASE WHEN END_TIME IS NULL THEN LPAD(sys.format_time(POWER(10,12) * (UNIX_TIMESTAMP(now()) - UNIX_TIMESTAMP(BEGIN_TIME))), 10, ' ') ELSE LPAD(sys.format_time(POWER(10,12) * (UNIX_TIMESTAMP(END_TIME) - UNIX_TIMESTAMP(BEGIN_TIME))), 10, ' ') END as DURATION from performance_schema.clone_status; +-------------+---------------------+------------+ | STATE | START TIME | DURATION | +-------------+---------------------+------------+ | In Progress | 2019-07-17 17:23:26 | 4.84 m | +-------------+---------------------+------------+ |
Clone is in progress after about 5 minutes of starting the command. Now we check the progress view for more details.
We use the format from sys.format_time to display time in “DURATION” column conveniently. “m” implies minutes here. See for more details.
|
1
2
3
4
5
6
7
8
9
10
11
12
13
14
15
16
17
18
19
20
21
22
23
24
25
|
mysql> select STAGE, STATE, CAST(BEGIN_TIME AS TIME) as "START TIME", CASE WHEN END_TIME IS NULL THEN LPAD(sys.format_time(POWER(10,12) * (UNIX_TIMESTAMP(now()) - UNIX_TIMESTAMP(BEGIN_TIME))), 10, ' ') ELSE LPAD(sys.format_time(POWER(10,12) * (UNIX_TIMESTAMP(END_TIME) - UNIX_TIMESTAMP(BEGIN_TIME))), 10, ' ') END as DURATION, LPAD(CONCAT(FORMAT(ROUND(ESTIMATE/1024/1024,0), 0), " MB"), 16, ' ') as "Estimate", CASE WHEN BEGIN_TIME IS NULL THEN LPAD('0%', 7, ' ') WHEN ESTIMATE > 0 THEN LPAD(CONCAT(CAST(ROUND(DATA*100/ESTIMATE, 0) AS BINARY), "%"), 7, ' ') WHEN END_TIME IS NULL THEN LPAD('0%', 7, ' ') ELSE LPAD('100%', 7, ' ') END as "Done(%)" from performance_schema.clone_progress; +-----------+-------------+------------+------------+-----------+---------+ | STAGE | STATE | START TIME | DURATION | Estimate | Done(%) | +-----------+-------------+------------+------------+-----------+---------+ | DROP DATA | Completed | 17:23:26 | 790.86 ms | 0 MB | 100% | | FILE COPY | In Progress | 17:23:27 | 4.85 m | 94,729 MB | 47% | | PAGE COPY | Not Started | NULL | NULL | 0 MB | 0% | | REDO COPY | Not Started | NULL | NULL | 0 MB | 0% | | FILE SYNC | Not Started | NULL | NULL | 0 MB | 0% | | RESTART | Not Started | NULL | NULL | 0 MB | 0% | | RECOVERY | Not Started | NULL | NULL | 0 MB | 0% | +-----------+-------------+------------+------------+-----------+---------+ |
Clone is in the FILE COPY stage (copying files) and 47% of the total work of about 94G is now complete. Now we wait for some more time and re-check progress.
|
1
2
3
4
5
6
7
8
9
10
11
|
+-----------+-------------+------------+----------+------------+---------+ | STAGE | STATE | START TIME | DURATION | Estimate | Done(%) | +-----------+-------------+------------+----------+------------+---------+ | DROP DATA | Completed | 17:23:26 | 790.86 ms | 0 MB | 100% | | FILE COPY | Completed | 17:23:27 | 10.33 m | 94,729 MB | 100% | | PAGE COPY | Completed | 17:33:47 | 15.91 s | 11,885 MB | 100% | | REDO COPY | Completed | 17:34:03 | 1.07 s | 293 MB | 100% | | FILE SYNC | In Progress | 17:34:04 | 51.68 s | 0 MB | 0% | | RESTART | Not Started | NULL | NULL | 0 MB | 0% | | RECOVERY | Not Started | NULL | NULL | 0 MB | 0% | +-----------+-------------+------------+-----------+-----------+---------+ |
Most clone stages are complete and clone is now in FILE SYNC stage (syncing data to disk). After FILE SYNC stage is completed the clone command will return and the server will be restarted automatically. During the last two stages RESTART and RECOVERY the server will not be available. This is because MySQL is doing a full recovery at this stage from the cloned data . The redo logs are being applied and the new clone has to be synchronized on the snapshot GTID so that it can catch up with upstream server using the bin log. We can check the status only after these stages are over.
Step-4: Verify that clone completed successfully
CLONE SQL needs a server restart after completion. After CLONE SQL returns successfully, the server will shutdown automatically. The client executing CLONE SQL can expect the connection to be lost. Note: If auto-reconnect is enabled, the connection will be reestablished after the server restarts. Otherwise, the connection must be reestablished manually.
Recipient should be running in an environment with a monitoring process to detect a server shutdown and restart. See the generally preferred environment for running the MySQL server.
In the presence of a monitoring process, client would be able to re-connect to the Recipient once it restarts automatically after CLONE.
In absence of monitoring process, clone will return an error and shutdown the server.
|
1 |
ERROR 3707 (HY000): Restart server failed (mysqld is not managed by supervisor process). |
This error message doesn’t indicate a clone failure. It means the server needs to be restarted manually and then client needs to reconnect to the server.
Once the client reconnects to the Recipient, check the performance_schema views to verify that clone completed successfully.
|
1
2
3
4
5
6
7
8
9
10
11
12
13
14
15
16
|
mysql> select STATE, ERROR_NO, BINLOG_FILE, BINLOG_POSITION, GTID_EXECUTED, CAST(BEGIN_TIME AS DATETIME) as "START TIME", CAST(END_TIME AS DATETIME) as "FINISH TIME", sys.format_time(POWER(10,12) * (UNIX_TIMESTAMP(END_TIME) - UNIX_TIMESTAMP(BEGIN_TIME))) as DURATION from performance_schema.clone_status \G *************************** 1. row *************************** STATE: Completed ERROR_NO: 0 BINLOG_FILE: binlog.000005 BINLOG_POSITION: 101810585 GTID_EXECUTED: 229fc19e-a876-11e9-a441-0010e0b6728a:1-2008636 START TIME: 2019-07-17 17:23:26 FINISH TIME: 2019-07-17 17:40:27 DURATION: 17.01 m |
Clone has completed successfully and took about 17 minutes to complete. Verify that all stages completed successfully and the time taken in individual stages.
|
1
2
3
4
5
6
7
8
9
10
11
12
13
14
15
16
17
18
19
20
21
22
|
mysql> select STAGE, STATE, CAST(BEGIN_TIME AS DATETIME) as "START TIME", CAST(END_TIME AS DATETIME) as "FINISH TIME", LPAD(sys.format_time(POWER(10,12) * (UNIX_TIMESTAMP(END_TIME) - UNIX_TIMESTAMP(BEGIN_TIME))), 10, ' ') as DURATION from performance_schema.clone_progress; select STAGE, STATE, CAST(BEGIN_TIME AS TIME) as "START TIME", CAST(END_TIME AS TIME) as "FINISH TIME", LPAD(sys.format_time(POWER(10,12) * (UNIX_TIMESTAMP(END_TIME) - UNIX_TIMESTAMP(BEGIN_TIME))), 10, ' ') as DURATION from performance_schema.clone_progress; +-----------+-----------+------------+-------------+------------+ | STAGE | STATE | START TIME | FINISH TIME | DURATION | +-----------+-----------+------------+-------------+------------+ | DROP DATA | Completed | 17:23:26 | 17:23:27 | 790.86 ms | | FILE COPY | Completed | 17:23:27 | 17:33:47 | 10.33 m | | PAGE COPY | Completed | 17:33:47 | 17:34:03 | 15.91 s | | REDO COPY | Completed | 17:34:03 | 17:34:04 | 1.07 s | | FILE SYNC | Completed | 17:34:04 | 17:35:32 | 1.46 m | | RESTART | Completed | 17:35:32 | 17:35:40 | 7.77 s | | RECOVERY | Completed | 17:35:40 | 17:40:27 | 4.79 m | +-----------+-----------+------------+-------------+------------+ |
That’s it! Recipient is now a clone of Donor with GTID set to correct value. It is now ready to join the HA cluster either based on GTID or binary log position. Please refer to MySQL HA documents for more details on configuring a MySQL instance as slave or group replication node.
I will cover more details about clone security aspects, performance, internal details like clone stages and other salient features in future posts.
Thank you for using MySQL. Happy cloning 🙂