Windows Nano Server is a deployment option of the upcoming Windows Server 2016. It is a “headless” version of Windows Server, pared back to provide the bare essentials necessary to host server / “born in the cloud” applications such as MySQL. In this article I’ll provide an overview of Nano Server itself and some of the ways in which it can host MySQL.
The highlights of Nano Server are its relatively small disk and memory footprint and its support for the new Windows Containers. Nano Server’s small footprint has multiple advantages: it starts faster than the “larger” versions of Windows Server, has a smaller attack surface (requiring fewer updates and “compulsory” system restarts), can be deployed more rapidly and leaves more system resources available for applications.
A number of blog posts, presentations and videos have been published that describe the motivation for Nano Server, how to install and configure its current preview release (Technical Preview 5 at the time of writing). The Getting Started With Nano Server MSDN article is a great introduction to the Nano Server Technical preview.
The new Windows Containers from Microsoft supported on Windows Server 2016 and Nano Server are described in some detail here. Windows Containers are similar in concept to Linux containers, but run native Windows applications and can be supported on a host Windows operating system such as Nano Server, Windows Server 2016 or (in future) Windows 10 without requiring an intervening Linux virtual machine.
There have recently been significant improvements in Docker support for Windows containers. You can now manage Windows containers with a version of the Docker engine running on Windows. See the Docker on Windows documentation from Microsoft for details how to deploy the docker engine on Windows Nano Server (and/or Windows Server 2016). As a quick start, having set up a Nano Server configured with Windows Containers support and deployed the Docker engine on the Nano Server, you can use the docker pull command to download a prebuilt Windows Container image (prepared by Microsoft) from Docker Hub that contains MySQL 5.6.26.
Downloading and installing Nano Server
The Getting Started with Nano Server MSDN article describes how you can configure a Nano Server image with just the packages that you need for your application.
You can download either the full Windows Server 2016 Technical preview ISO or a developer preview VHD of Nano Server from the Windows Server 2016 Technical Preview 5 site.
The Nano Server in a VHD file can be hosted by Hyper-V available in Windows 10/Windows Server 2012, or it can be hosted by VirtualBox on Windows 7 and later versions of Windows. If you have the hardware available, you can even set up a dual boot system to boot into the VHD file “natively”.
Managing Nano Server
Once installed (either as a virtual machine or on “bare metal”), the headless nature of Nano Server means that you need to attach a remote PowerShell session to manage it.
If you’re running Nano Server from a Windows 10 Hyper-V host, you can easily connect a remote PowerShell session from the host computer to the (virtual) Nano Server without having to address the usual PowerShell remoting network/firewall and remote management requirements. See the TechNet blog entry PowerShell Direct – Running PowerShell inside a virtual machine from the Hyper-V host for more details. Note that if you are running Nano Server on a Windows Server 2012 R2 Hyper-V host, you can also use PowerShell Direct but you will need to install the Windows Management Framework (WMF) 5.0 first.
Alternatively, if you’re hosting the (pre-built) Nano Server in VirtualBox, the Nano Server firewall is already configured to allow remote PowerShell connections – but you will still probably need to configure the TrustedHosts on the host/remote computer. You can run the PowerShell Get-Item cmdlet against the WSMAN provider as shown in the example below to find out the current setting of the TrustedHosts:
|
1 |
PS C:\> Get-Item WSMan:\localhost\Client\TrustedHosts |
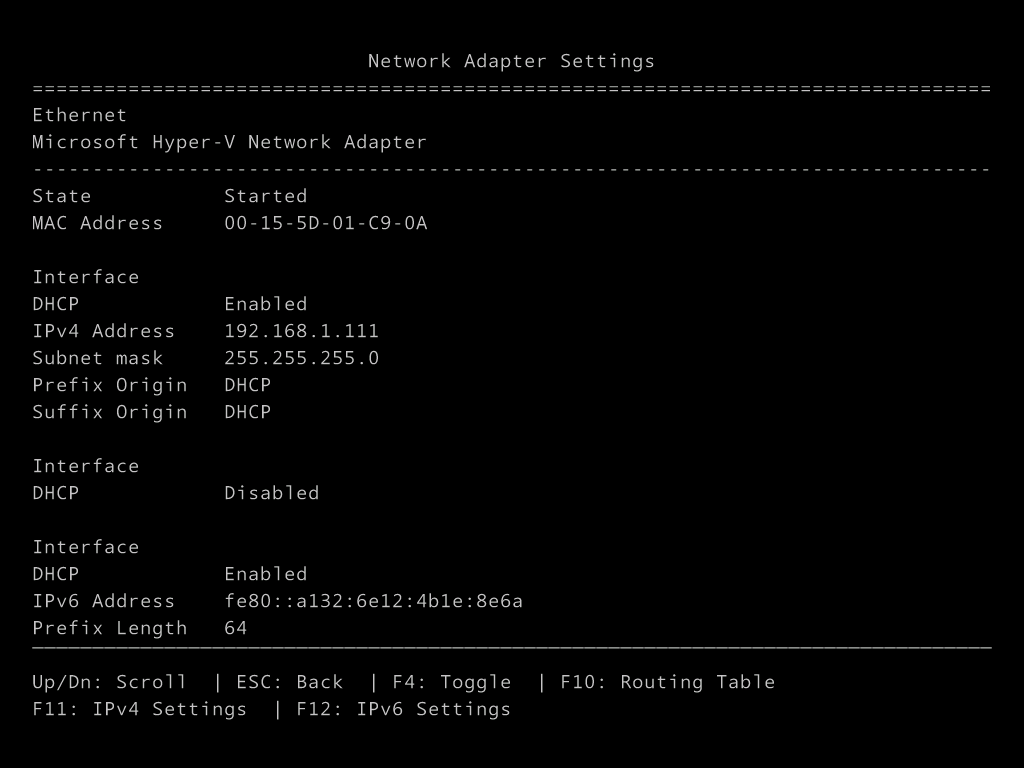
You could use * as the TrustedHosts value for a “quick and dirty” way of enabling remoting – but be aware that this is a security risk. A safer alternative is to find the IP address of the Nano Server instance you’re going to manage by signing in to the Nano Server recovery console, navigating to the network adapter settings and then adding this address to the TrustedHosts value(s).
The following screenshot of the Nano Server console shows the network adapter settings:
Note that you need to run PowerShell as administrator to execute the following command:
|
1 |
PS C:\> Set-Item WSMan:\localhost\Client\TrustedHosts -Value xxx.xxx.xxx.xxx |
where xxx.xxx.xxx.xxx is the IP address of the Nano Server instance you wish to manage (192.168.1.111 would be the value to use from the screenshot above).
Having set up the TrustedHosts value, an interactive remote PowerShell session can be established by the Enter-PSSession cmdlet thus:
|
1 |
PS C:\> Enter-PSSession -ComputerName xxx.xxx.xxx.xxx -Credential ~\Administrator |
You will be prompted for the Nano Server’s Administrator password before the remote PowerShell session connects.
Installing MySQL on Nano Server
A consequence of the stripped back nature of Nano Server is that it doesn’t support Windows MSI files as an installer mechanism. However, MySQL is available in a zip file, which is easy to set up on Nano Server. Start by downloading the 64 bit Windows zip file (mysql-5.7.12-winx64.zip at the time of writing) from http://dev.mysql.com/downloads/mysql/ to the machine where you will host the Nano Server virtual machine. Nano Server only supports 64 bit applications.
Having downloaded the MySQL zip file, you need to transfer its contents into the Nano Server virtual machine instance. If you are using Hyper-V on Windows 10 or have WMF 5.0 installed, copying files between the host and guest VM is easy with the PowerShell Copy-Item -ToSession/-FromSession command.
If you don’t have access to WMF 5.0, an alternative way to transfer files is via a file share between the host and Nano Server virtual machine. Using file sharing requires you to enable the File and Printer Sharing (SMB-In) firewall rule on the Nano Server, either via the recovery console or by executing the following command (via PowerShell remoting) on the Nano Server (note 192.168.1.111 is the IP address allocated to the guest Nano Server in my system – yours will probably differ):
|
1 |
[192.168.1.111]: PS C:\> netsh advfirewall firewall set rule group="File and Printer Sharing" new enable=yes |
When the firewall on the Nano Server is enabled for file sharing the following command will connect the P: drive letter on the host machine to the guest Nano Server.
|
1 |
PS C:\> net use p: \\192.168.1.111\c$ /u:~\Administrator |
Once you have copied the (unzipped) contents of the mysql-5.7.12-winx64.zip file onto the Nano Server via the file share, you can use the mysqld.exe –initialize-insecure command from the remote PowerShell session to initialize the MySQL data directory. Note that I’m using the –initialize-insecure option here rather than the more secure –initialize option to simplify this setup process.
The following shows the results initializing the data directory on my Nano Server:
|
1
2
3
4
5
6
7
8
9
10
11
12
|
[192.168.1.111]: PS C:\mysql-5.7.12-winx64> .\bin\mysqld.exe --initialize-insecure --console .\bin\mysqld.exe : 2016-03-24T18:27:15.330637Z 0 [Warning] TIMESTAMP with implicit DEFAULT value is deprecated. Please use --explicit_defaults_for_timestamp server option (see documentation for more details). + CategoryInfo : NotSpecified: (2016-03-24T18:2... more details).:String) [], RemoteException + FullyQualifiedErrorId : NativeCommandError 2016-03-24T18:27:16.033667Z 0 [Warning] InnoDB: New log files created, LSN=45790 2016-03-24T18:27:16.088849Z 0 [Warning] InnoDB: Creating foreign key constraint system tables. 2016-03-24T18:27:16.278397Z 0 [Warning] No existing UUID has been found, so we assume that this is the first time that this server has been started. Generating a new UUID: 09278c58-f1ee-11e5-aa10-00155d01c905. 2016-03-24T18:27:16.278397Z 0 [Warning] Gtid table is not ready to be used. Table 'mysql.gtid_executed' cannot be opened. 2016-03-24T18:27:16.278397Z 1 [Warning] root@localhost is created with an empty password ! Please consider switching off the --initialize-insecure option. |
Next, install MySQL as a Windows service on the Nano Server. The following transcript of the remote PowerShell session connected to the Nano Server shows MySQL being installed as a Windows service, verifying that the service is present (and not running) with the Get-Service command and starting the service :
|
1
2
3
4
5
6
7
8
|
[192.168.1.111]: PS C:\mysql-5.7.12-winx64> .\bin\mysqld.exe --install Service successfully installed. [192.168.1.111]: PS C:\mysql-5.7.12-winx64> Get-Service mysql Status Name DisplayName ------ ---- ----------- Stopped MySQL MySQL [192.168.1.111]: PS C:\mysql-5.7.12-winx64> Start-Service mysql |
To create a root user for remote access you can create a file c:\utils\createuser.sql with the following contents (easily done via notepad and the fileshare):
|
1
2
|
CREATE USER 'root'@'%' IDENTIFIED BY ''; GRANT ALL ON *.* TO 'root'@'%' WITH GRANT OPTION; |
As with the –initialize-insecure option used above, this is not a secure technique for setting up remote access – I’m just using an empty password in the interests of simplifying this description.
|
1
2
3
4
|
[192.168.1.111]: PS C:\mysql-5.7.12-winx64> .\bin\mysql.exe --user=root --execute="source C:\utils\CreateUser.sql" .\bin\mysql.exe : mysql: [Warning] Using a password on the command line interface can be insecure. + CategoryInfo : NotSpecified: (mysql: [Warning...an be insecure.:String) [], RemoteException + FullyQualifiedErrorId : NativeCommandError |
We’ll also need to open a port in the Nano Server firewall for remote access to MySQL thus:
|
1
2
|
[192.168.1.111]: PS C:\mysql-5.7.12-winx64> netsh advfirewall firewall add rule name="MySQL server" dir=in action=allow localport=3306 protocol=tcp Ok. |
From this point, the MySQL server running in the Nano Server should be accessible from the host machine (and other machines on the same local network).
Docker Hub, Windows Containers, Nano Server and MySQL
In this section, I’ll describe how to use an existing Windows Container image from Microsoft that contains MySQL version 5.6.26.
To simplify matters, we’ll use the pre-configured Nano Server VHD described in the Downloading and installing Nano Server section above. The pre-configured Nano Server VHD already has the Windows container packages installed. If you’re building your own Nano Server image to get the smallest possible Nano Server footprint, see the more detailed Container Host Deployment – Nano Server documentation.
As I mentioned in the introduction above, Microsoft have added support in Docker on Windows for Windows containers, documented in more detail here. Windows containers and images can be managed with either PowerShell cmdlets or Docker, but at the time of writing using PowerShell commands to manage Windows Containers in Nano Server TP5 results in a warning being displayed as Microsoft is “… updating the Containers PowerShell module to better align with Docker.” Bearing this warning in mind, I’ll focus on using Docker for now.
Note that the version of Docker that handles Windows Containers is not included in the Nano Server TP5, but can be downloaded/installed following the directions here (follow the instructions for Nano Server, not Windows Server!).
The Interactive Nano Session section of the Docker Engine on Windows documentation referenced above mentions that the PowerShell remoting session that you normally use to manage a Nano Server does not support all the docker operations and describes how to avoid these limitations by managing Docker from a remote client. Using a remote Docker client to run/attach to a Nano Server container hosting a MySQL server makes using the MySQL client program much easier. Remember to open ports in the Nano Server container host’s firewall for both MySQL (port 3306) and Docker (port 2375 or 2376).
Using the docker search command shows the Windows Container images that Microsoft have made available on Docker Hub. Among the images listed is microsoft/sample-mysql:nanoserver (see https://hub.docker.com/r/microsoft/sample-mysql/) which can be downloaded with
|
1 |
docker pull microsoft/sample-mysql:nanoserver |
This image contains MySQL version 5.6.26, but the MySQL server is not configured to start automatically. Having downloaded the image, you can start a container from the image and connect a (remote) terminal to it with
|
1 |
docker run -it -p 3306:3306 microsoft/sample-mysql:nanoserver powershell |
The -p 3306:3306 option to the docker run command above maps the default MySQL port 3306 on the (Nano Server) container host to port 3306 in the container. Thus when you start an instance of the MySQL server in the container, you can connect to it from outside the container host. Note that the contents of the microsoft/sample-mysql:nanoserver image are set up with a local root MySQL user without a password, but no users with remote access, so you’ll need to start a local session with the container to set up remote users.
The following is an example of how you might do this:
|
1
2
3
4
5
6
7
8
9
10
11
12
13
14
15
|
# From the host Windows 10 system, set up the DOCKER_HOST environment variable to the # IP address and port of the docker daemon running on the guest Nano Server Win10Host C:\> $env:DOCKER_HOST="tcp://192.168.1.111:2375" # Start a docker container running powershell, exposing the default # MySQL port on the container host Win10Host C:\> docker run -it -p 3306:3306 microsoft/sample-mysql:nanoserver powershell # Start the MySQL server process on the docker container PS C:\> Start-Process c:\mysql-5.6.26\bin\mysqld.exe -ArgumentList "--basedir=c:\mysql-5.6.26 --datadir=c:\mysql-5.6.26\data --bind-address=*" # Connect a local mysql client in the container to the MySQL server PS C:\> c:\mysql-5.6.26\bin\mysql.exe -u root # Now you should have a local connection to the MySQL server, logged on as root: add remote users... |
From this point, you can manipulate the container as you see fit, save a new image and upload the image to Docker Hub using the usual docker commands. Note that if you do upload a Windows Container image to Docker Hub, the docker on Windows tool for Windows Containers won’t list it with the docker search command (at least, not at the time of writing): at present this only shows the contents of the Microsoft Docker Hub user – but you can still upload and download your own images from Docker Hub with it.
I hope this has whetted your appetite for running MySQL on Nano Server and in Windows Containers! There is a great deal more to Nano Server and Windows containers than I have covered in this simple (albeit lengthy) introduction.
As always, THANK YOU for using MySQL.