The Developer Release for MySQL Cluster 7.2 includes a new feature that allows the system data required for checking user access to be shared amongst all of your MySQL Servers. By default all of the tables holding these credentials are stored in MyISAM and so are local to that MySQL Server.
This can become painful to manage – every time you want to create a new user or change their permissions you need to repeat it on every server, miss one out and the user won’t be able to access that server (or will still be able to access it after you withdraw their privileges).
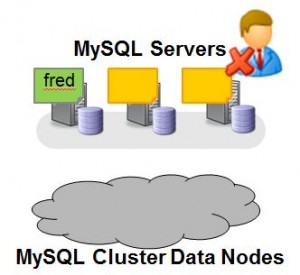
This is illustrated in Fig.1 – The user “fred” is created on one MySQL Server but when Fred attempts to connect to one of the MySQL Servers they’re blocked. This maybe what you wanted to happen but probably not.
In this post, we’ll see how to change this behaviour but first we’ll confirm the default behaviour.
Obviously, it makes sense to try this out for yourself and you can download the source or binaries from http://dev.mysql.com/downloads/cluster/ (select the sub-tab for the Development Milestone Release).
The first step is to run Cluster with multiple MySQL Servers – if you’re not comfortable with how to do this then refer to this post on how to distribute MySQL Cluster over multiple hosts.
Four mysql client connections will be used – one for root to connect to server 1; one for Fred to connect to server 1; one for root to connect to server 2 and one for Fred to try connecting to server 2.
So, let’s create Fred on server 1 and a table for him to access:
|
1
2
3
4
5
6
|
<span style="color: #993300;">$ mysql -h 192.168.1.7 -P3306 -u root --prompt 'server1-root> ' </span><span style="color: #993300;">server1-root> GRANT ALL ON *.* TO 'fred'@'192.168.1.7'; server1-root> CREATE DATABASE clusterdb; USE clusterdb; </span><span style="color: #993300;">server1-root> CREATE TABLE towns (id INT NOT NULL PRIMARY KEY, </span><span style="color: #993300;"> town VARCHAR(20)) ENGINE=NDBCLUSTER; </span><span style="color: #993300;">server1-root> INSERT INTO towns VALUES (1,'Maidenhead'),(2, 'Reading');</span> |
Next we confirm that Fred can access this data when connecting through server 1:
|
1
2
3
4
5
6
7
8
|
<span style="color: #339966;">$ mysql -h 192.168.1.7 -P3306 -u fred --prompt 'server1-fred> '</span> <span style="color: #339966;">server1-fred> SELECT * FROM clusterdb.towns;</span> <span style="color: #339966;">+----+------------+</span> <span style="color: #339966;">| id | town |</span> <span style="color: #339966;">+----+------------+</span> <span style="color: #339966;">| 1 | Maidenhead |</span> <span style="color: #339966;">| 2 | Reading |</span> <span style="color: #339966;">+----+------------+</span> |
Now try the same thing from server 2:
|
1
2
3
4
|
<span style="color: #ff0000;">$ mysql -h 192.168.1.7 -P3307 -u fred --prompt 'server2> '</span> <span style="color: #ff0000;">server2-fred> SELECT * FROM clusterdb.towns;</span> <span style="color: #ff0000;">ERROR 1142 (42000): SELECT command denied to user ''@'ws2.localdomain' for table 'towns'</span> |
What we need to do next is to run a script (as MySQL root) and then a stored procedure to convert 5 tables from the mysql database (“user”, “db”, “tables_priv”, “columns_priv” & “procs_priv”) from the MyISAM to the ndbcluster storage engine:
|
1
2
|
<span style="color: #993300;">server1-root> SOURCE /usr/local/mysql/share/mysql/ndb_dist_priv.sql; </span><span style="color: #993300;">server1-root> CALL mysql.mysql_cluster_move_privileges();</span> |
We can confirm that the storage engine has changed, for example:
|
1
2
|
<span style="color: #993300;">server1-root> SHOW CREATE TABLE mysql.userG</span> <span style="color: #993300;">*************************** 1. row ***************************</span> |
|
1
2
3
4
5
6
|
<span style="color: #993300;"> Table: userCreate Table: CREATE TABLE `user` (</span> <span style="color: #993300;"> `Host` char(60) COLLATE utf8_bin NOT NULL DEFAULT '',</span> <span style="color: #993300;">....</span> <span style="color: #993300;">....</span> <span style="color: #993300;"> ) <strong>ENGINE=ndbcluster</strong> DEFAULT CHARSET=utf8 COLLATE=utf8_bin COMMENT='Users and global privileges'</span> |
Note that “ENGINE=ndbcluster”.

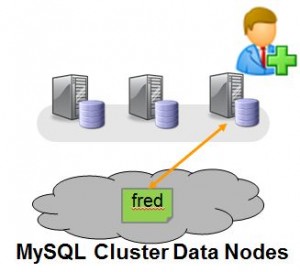
Now that these tables are stored in MySQL Cluster, they should be visible from all of the MySQL Servers. So now, whichever MySQL Server Fred attempts to connect through, that MySQL Server will fetch the privilege data from the shared data nodes rather than using local information and so Fred will get the same access rights. As our clusterdb.towns table was created using the ndbcluster storage engine as well, it is accessible from all servers and so Fred should now be able to see the contents of the table from server 2 as the access rights on server 2 now allow it. Note that the data already stored in those 5 mysql tables survived the migration from MyISAM to MySQL Cluster.
So the final test is to confirm that Fred really is allowed to get to this data from server 2:
|
1
2
3
4
5
6
7
8
9
|
<span style="color: #ff0000;">$ mysql -h 192.168.1.7 -P3307 -u fred --prompt 'server2-fred> server2-fred> SELECT * FROM clusterdb.towns; +----+------------+ | id | town | +----+------------+ | 1 | Maidenhead | | 2 | Reading | +----+------------+ </span> |
Note that if “fred” were already connected to server2 then he would need to disconnect and reconnect.
Once server1 has been set up in this way, changes to the user privileges data can be made from any one of the mysql servers in the Cluster (not just server1) and they will be enforced by all of the MySQL Servers.
You can find the official documentation for this feature here.