One of the most requested features for InnoDB cluster has been Windows support that we have now delivered as part of the InnoDB Cluster 5.7.17 Preview Release 2. This blog post will show you how to get your InnoDB cluster running on your MS Windows 10 64bit system.
We will run through the following steps.
- Downloading Packages
- Installation
- Creating an InnoDB Cluster Sandbox Configuration
- Bootstrapping the MySQL Router
- Testing the configuration
- What’s Next?
Let’s get started!
Downloading Packages
First, we have to download the four components we are going to need for installation.
- MySQL Server 5.7.17 with Group Replication, from dev.mysql.com.
- MySQL Shell 1.0.6 and MySQL Router 2.1.1, from labs.mysql.com.
- Microsoft Visual C++ 2015 Redistributable packages from MS
- OpenSSL 1.0.2j binary package from fabforce.net
Note: We are still working on the MSI Installer packages for Shell and Router and therefore we will use a ZIP package for now. This means that we also have to manually install the Microsoft Visual C++ 2015 Redistributable package.
Installation
Step 1 – Microsoft Visual C++ 2015 Redistributable
First, we will install the Microsoft Visual C++ 2015 Redistributable by opening the vc_redist.x64.exe and clicking through the installer wizard.
Step 2 – MySQL Server 5.7.17
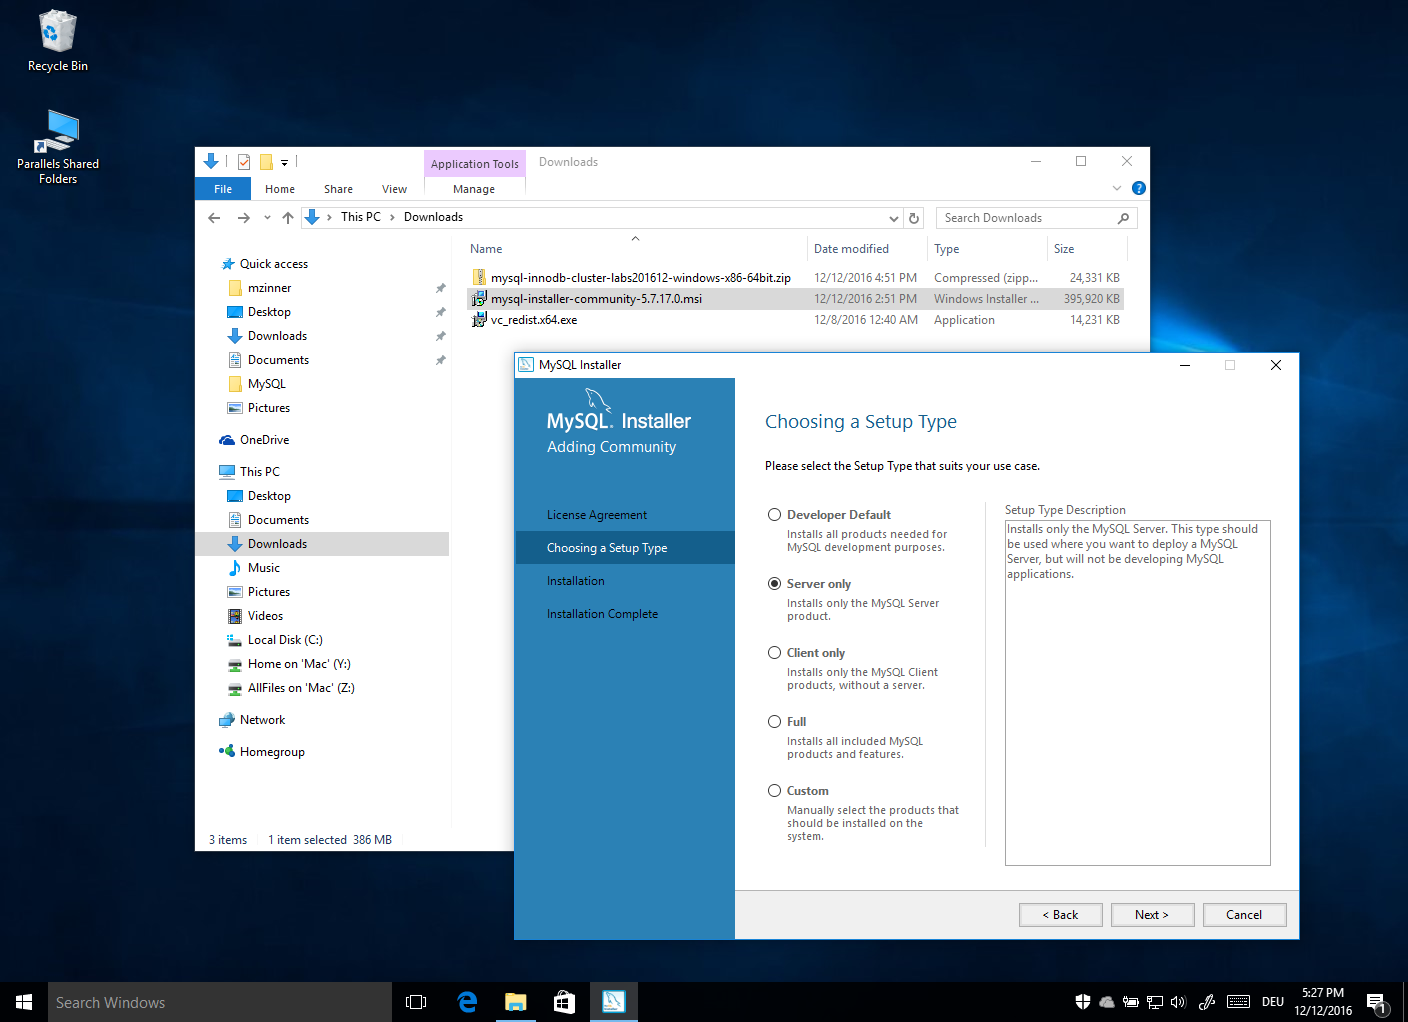
Now we are going to run the MySQL Installer to install the MySQL Server 5.7.17 onto our system. After opening the mysql-installer-community-5.7.17.0.msi and allowing the Installer to make changes to the system, the Installer will prompt to accept the GPL license Agreement.
On the next page we can choose the Setup Type. In this case, we will select “Server only” to only install the MySQL Server onto our system and continue with the installation.
After the installation has been completed we can press [Cancel] during the Product Configuration step, since we will be using the MySQL Shell to configure several sandbox instances for the InnoDB cluster instead.
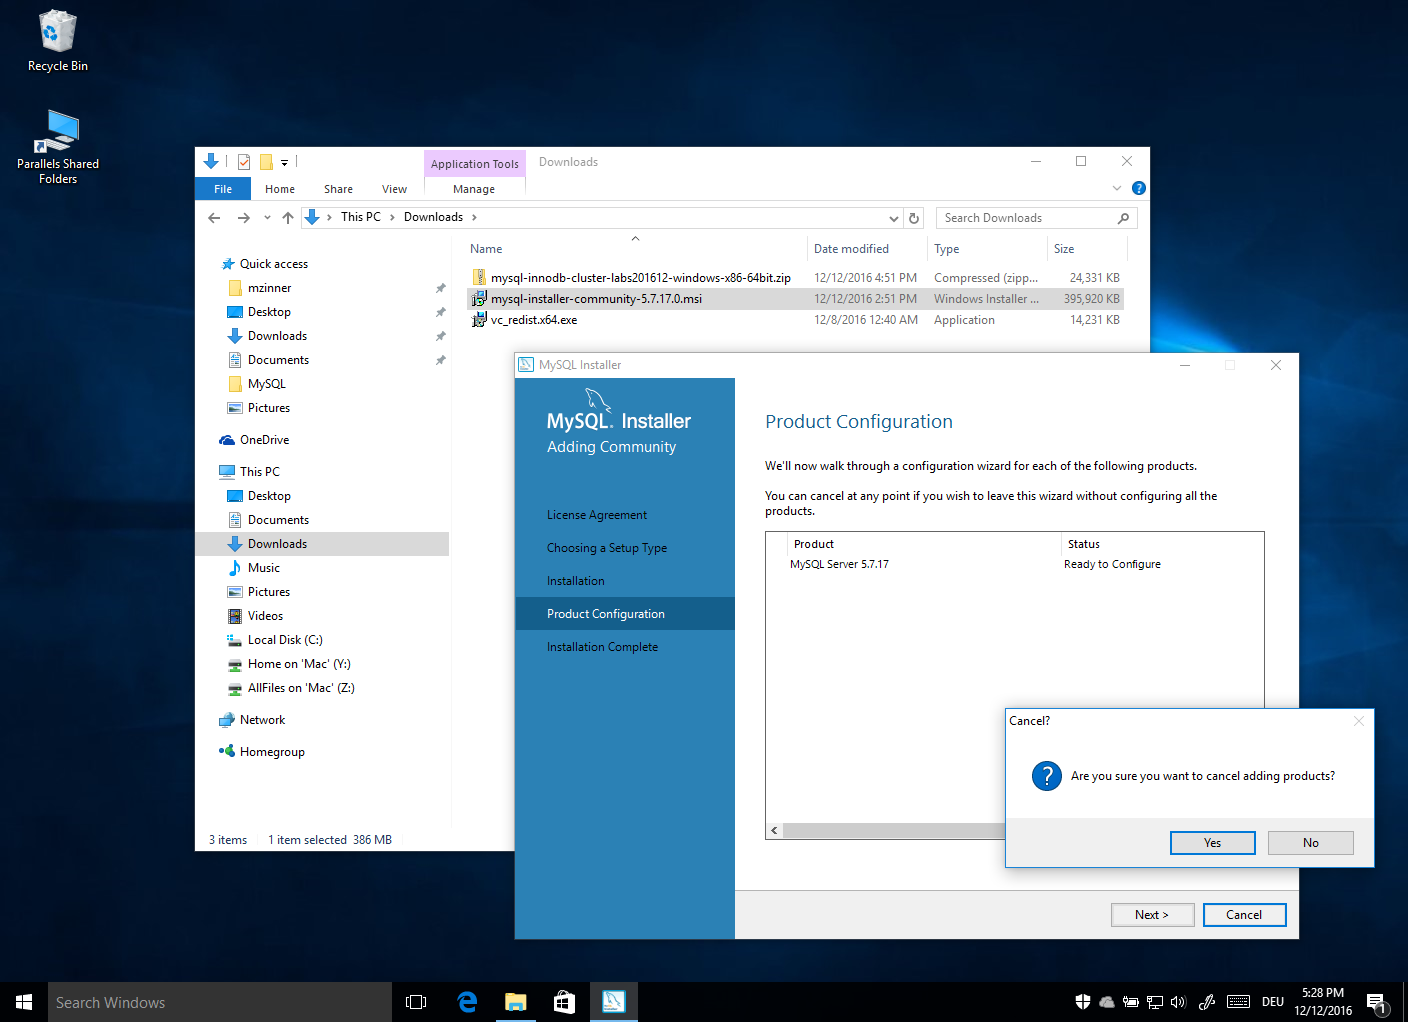
After that we can press [Next >] and [Finish] to close the MySQL Installer.
Step 3 – MySQL Shell and MySQL Router
Next, we will extract the MySQL Shell and the MySQL Router. Use the right mouse button and click on the mysql-innodb-cluster-labs201612-windows-x86-64bit.zip file and select [Extract All…], followed by [Extract].
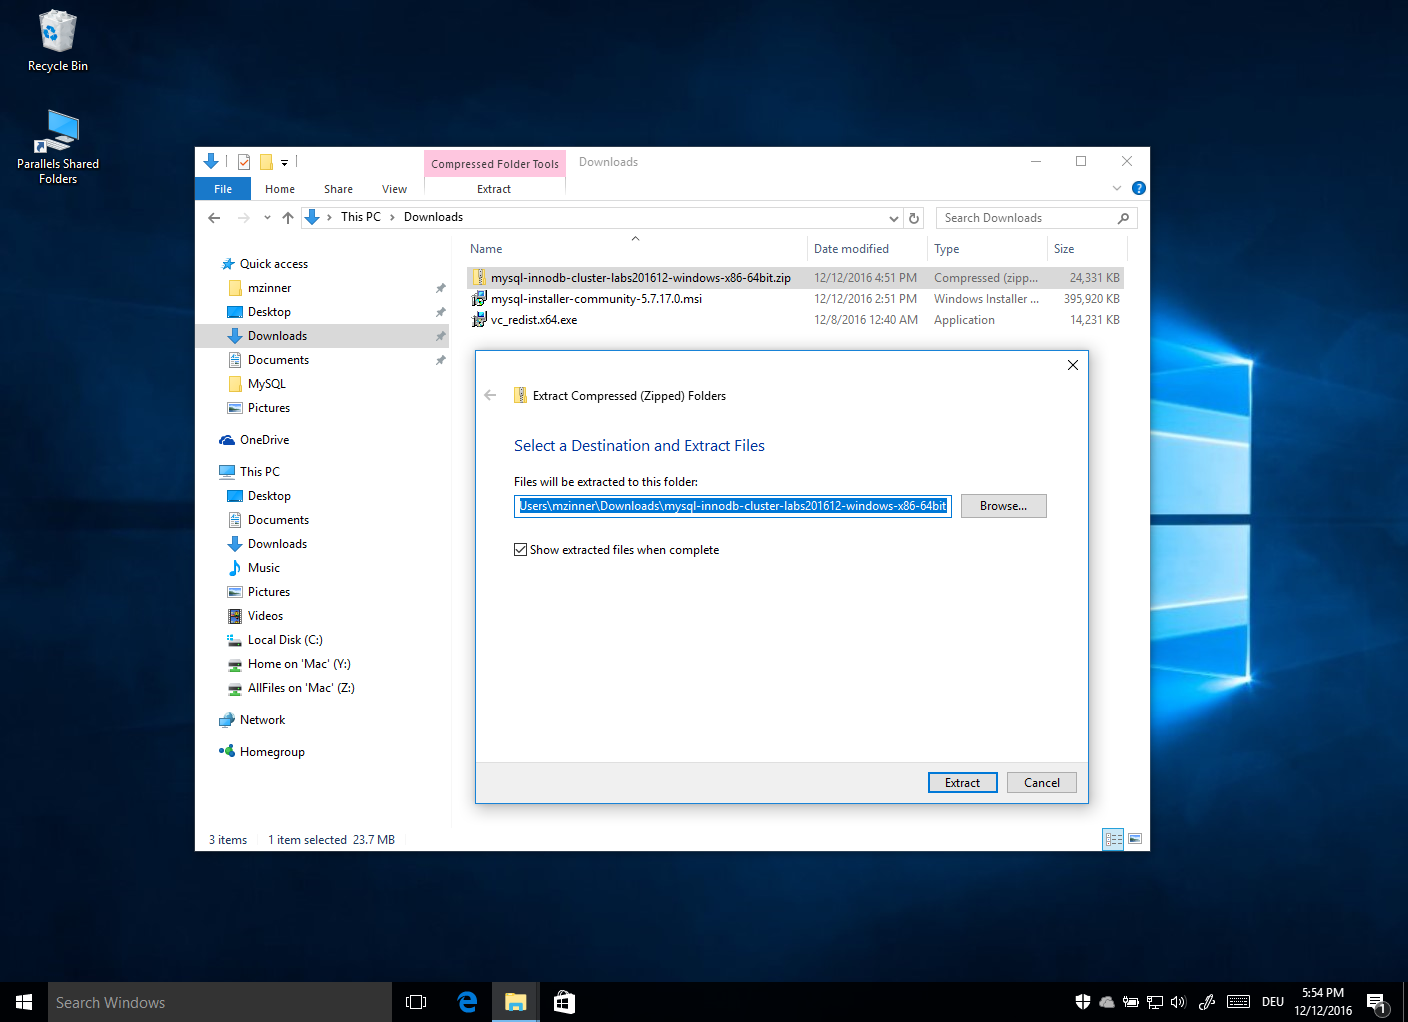
This will create a directory called mysql-innodb-cluster-labs201612-windows-x86-64bit that holds two files.
- mysql-router-2.1.1-windows-x86-64bit.zip
- mysql-shell-1.0.6-labs-windows-x86-64bit.zip
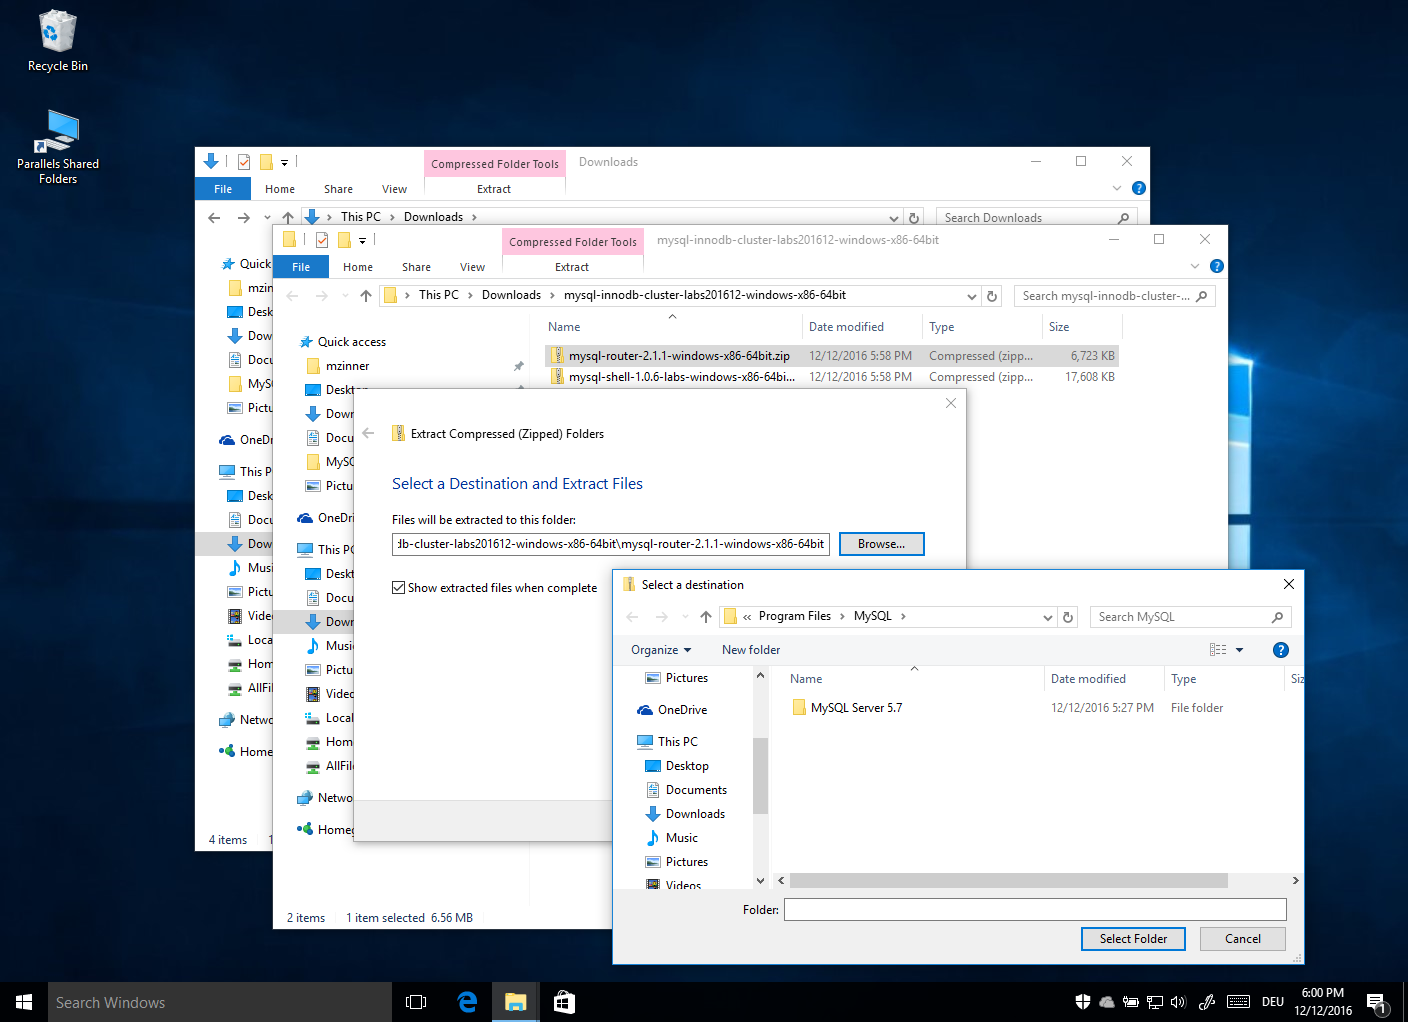
Let’s extract bot ZIPs into the “C:\Program Files\MySQL\” directory.
Right-click onto the mysql-router-2.1.1-windows-x86-64bit.zip file and select [Extract All…] in the popup menu. Then click on [Browse], navigate to “Local Disk (C:)”, then “Program Files” and “MySQL” and click [Select Folder] and then [Extract]. Press [Continue] on the access privileges dialog and the files will be extracted into the “C:\Program Files\MySQL\” directory.
Repeat the same for the mysql-shell-1.0.6-labs-windows-x86-64bit.zip file.
Step 4 – OpenSSL
Finally we need to extract the OpenSSL ZIP directly into “C:/” folder.
Right-click onto the file and select [Extract All…] in the popup menu. Then click on [Browse], navigate to “Local Disk (C:)” and click [Select Folder] and then [Extract]. Press [Continue] on the access privileges dialog and the files will be extracted into the “C:\OpenSSL” directory.

Step 5 – Adding MySQL Shell, Router and OpenSSL to the PATH variable
To make the MySQL Shell and the MySQL Router available on the command line we will add their installation directories to the PATH variable.
Click on the [Search Windows] control, type PATH and press [Enter].

This will launch the Environment Variables dialog where we can double-click on Path and three new entries.
- C:\Program Files\MySQL\mysql-router-2.1.1-windows-x86-64bit\bin
- C:\Program Files\MySQL\mysql-shell-1.0.6-labs-windows-x86-64bit\bin
- C:\Program Files\MySQL\MySQL Server 5.7\bin
- C:\OpenSSL
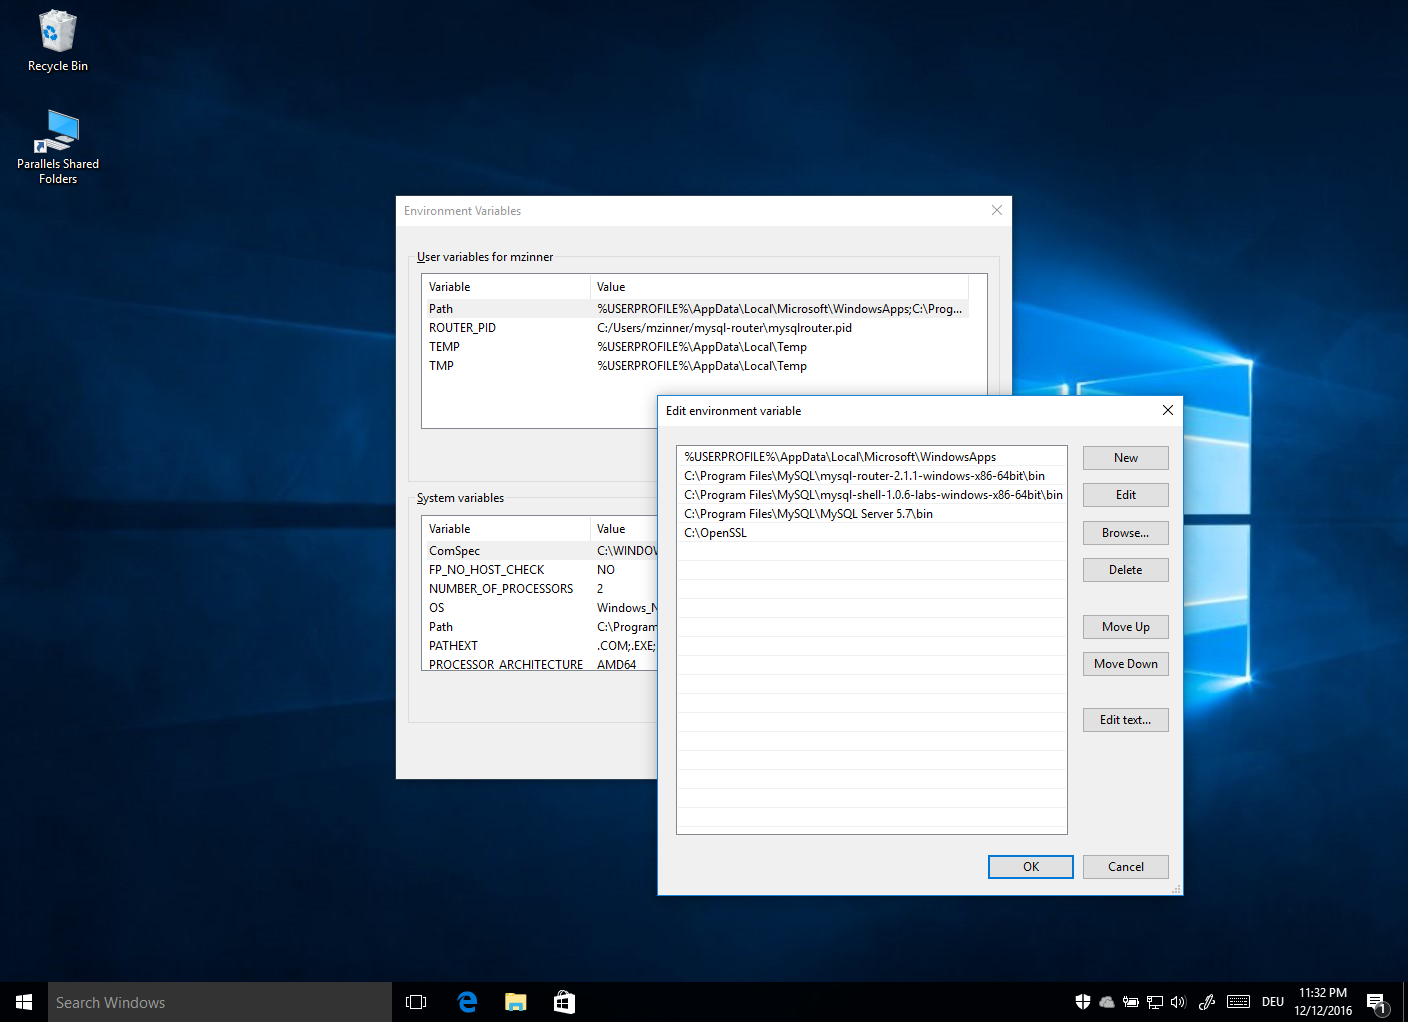
Then press [OK] two times to close the Environment Variables dialog.
We are now ready to start the InnoDB cluster configuration!
Creating an InnoDB Cluster Sandbox Configuration
Starting the MySQL Shell
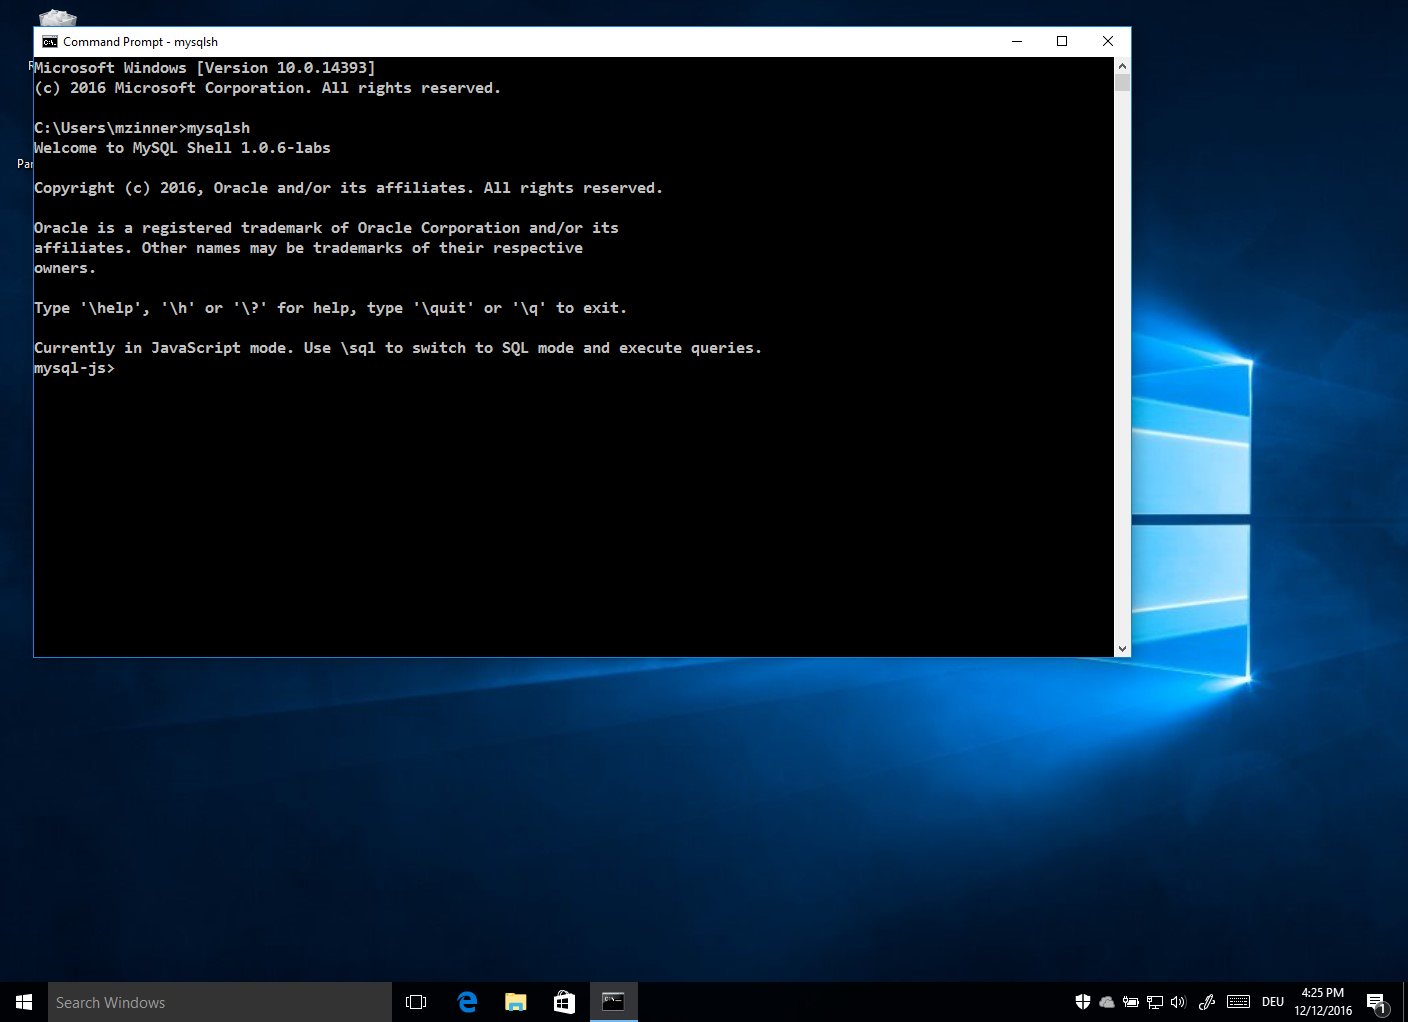
To create the InnoDB cluster setup we are going to use the new X AdminAPI that is part of the MySQL Shell. Click the [Search Windows] control in the task bar again and type cmd followed by [Enter]. This will open a Command Prompt window.

Type mysqlsh on the command line. This will start the MySQL Shell and you will see the welcome message and the JavaScript prompt mysql-js>
Now we are ready to create the InnoDB cluster.
Creating 3 Sandbox Instances
To provide tolerance for one failure we have to run the InnoDB cluster with three instances. In this example, we will be using three sandbox instances running on the same machine. In a real world setup those three instances would be running on different hosts on the network.
To create and start the MySQL sandbox instances we will be using the dba.deploySandboxInstance() function that is part of the X AdminAPI. Execute the following three statements in the MySQL Shell and enter a root password for each instance.
|
1
2
3
4
5
6
|
mysql-js> dba.deploySandboxInstance(3310); mysql-js> dba.deploySandboxInstance(3320); mysql-js> dba.deploySandboxInstance(3330); |
Note: Please use the same root password for all instances.
Note: You will note that we are passing a special option here, called ignoreSslError. We are not yet supporting automatic SSL certificate generation on Windows and therefore we have to explicitly set the option to disable SSL for each X AdminAPI function call. This will be improved in one of the next releases.
Creating the InnoDB Cluster
Next, we need to connect to the MySQL instance we want to start the InnoDB cluster with, also called the seed instance and then execute the command to create the cluster.
|
1
2
3
4
|
mysql-js> shell.connect('root@localhost:3310'); var cluster = dba.createCluster('devCluster'); |
To verify that the creation worked, let’s call the cluster.status(); function.
|
1
2
|
mysql-js> cluster.status(); |
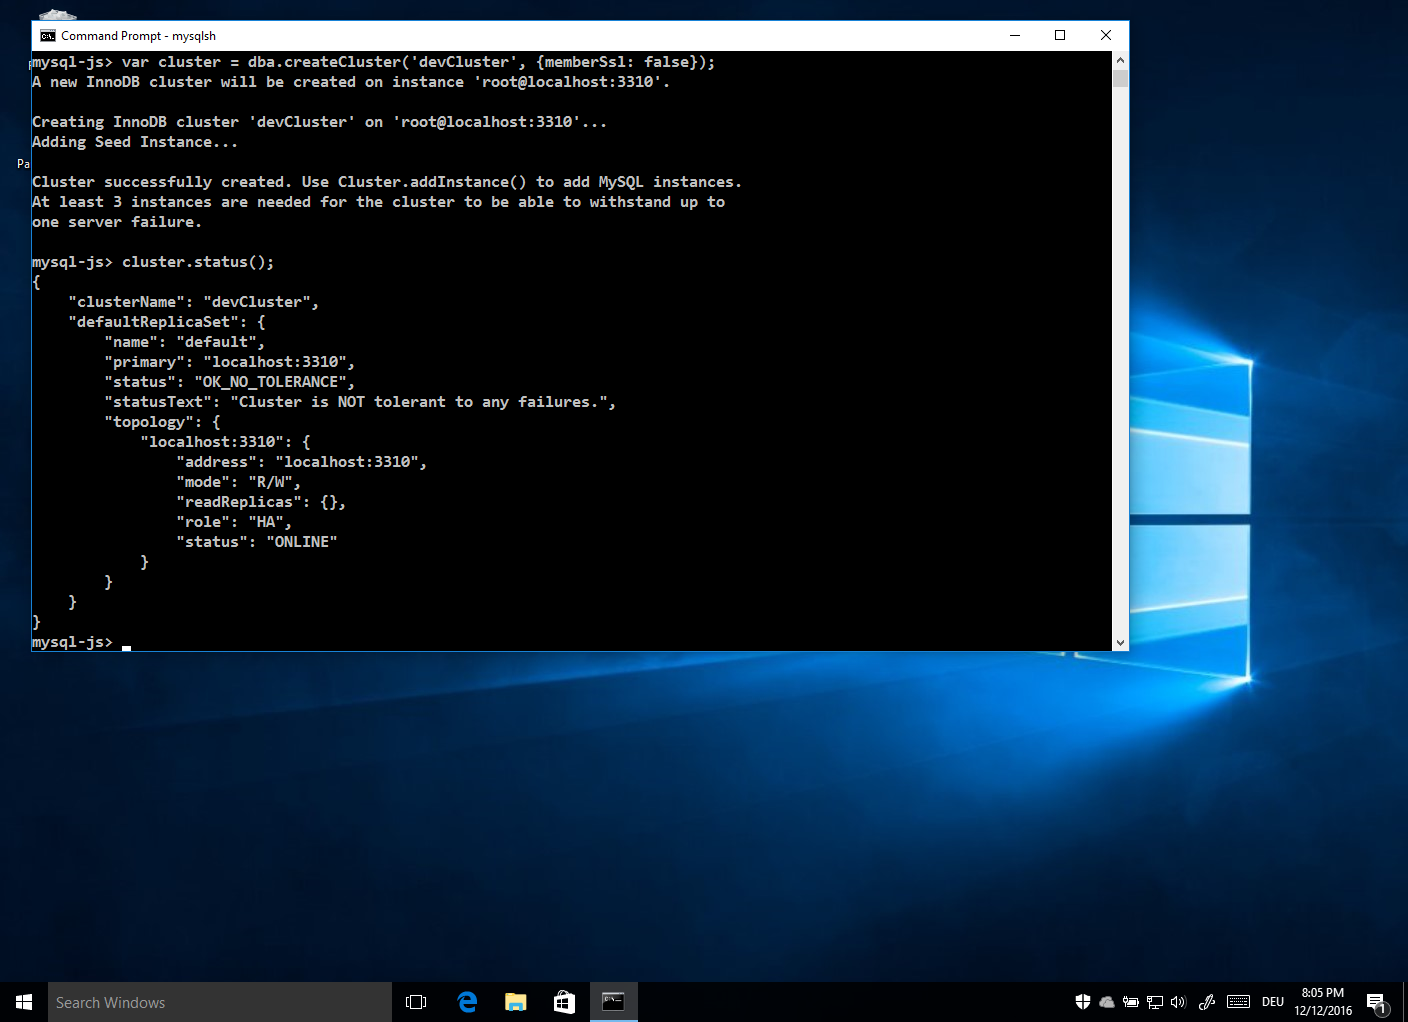
The status output shows that the cluster is up and running but not yet tolerant to a failure. We need to add the other two MySQL Server instances to the cluster. This is done via the cluster.addInstance() function.
|
1
2
3
4
|
mysql-js> cluster.addInstance('root@localhost:3320'); mysql-js> cluster.addInstance('root@localhost:3330'); |
After adding the other two instances, let’s take another look at the status of the cluster.
|
1
2
|
cluster.status(); |

The setup of the InnoDB cluster was successful! The cluster can now tolerate up to one failure.
You can now quit the MySQL Shell with \q
Bootstrapping the MySQL Router
After the MySQL InnoDB cluster is up and running we want to test the high availability of the cluster. For that purpose, we need the MySQL Router. If one instance would fail, the MySQL Router will update its routing configuration automatically and ensure that new connections are routed to the remaining instances.
Bootstrapping the MySQL Router
Before the MySQL Router can perform the routing operations we need to make it aware of the new InnoDB cluster. This is done with the ‘–bootstrap’ option and pointing the MySQL Router to the current R/W MySQL Server instance of the cluster. We will let the Router store its configuration into a folder called ‘mysql-router’ in our home directory by using the ‘-d’ option.
Let’s execute the following command on the Command Prompt.
|
1
2
|
C:\> mysqlrouter --bootstrap root@localhost:3310 -d %HOMEPATH%\mysql-router |
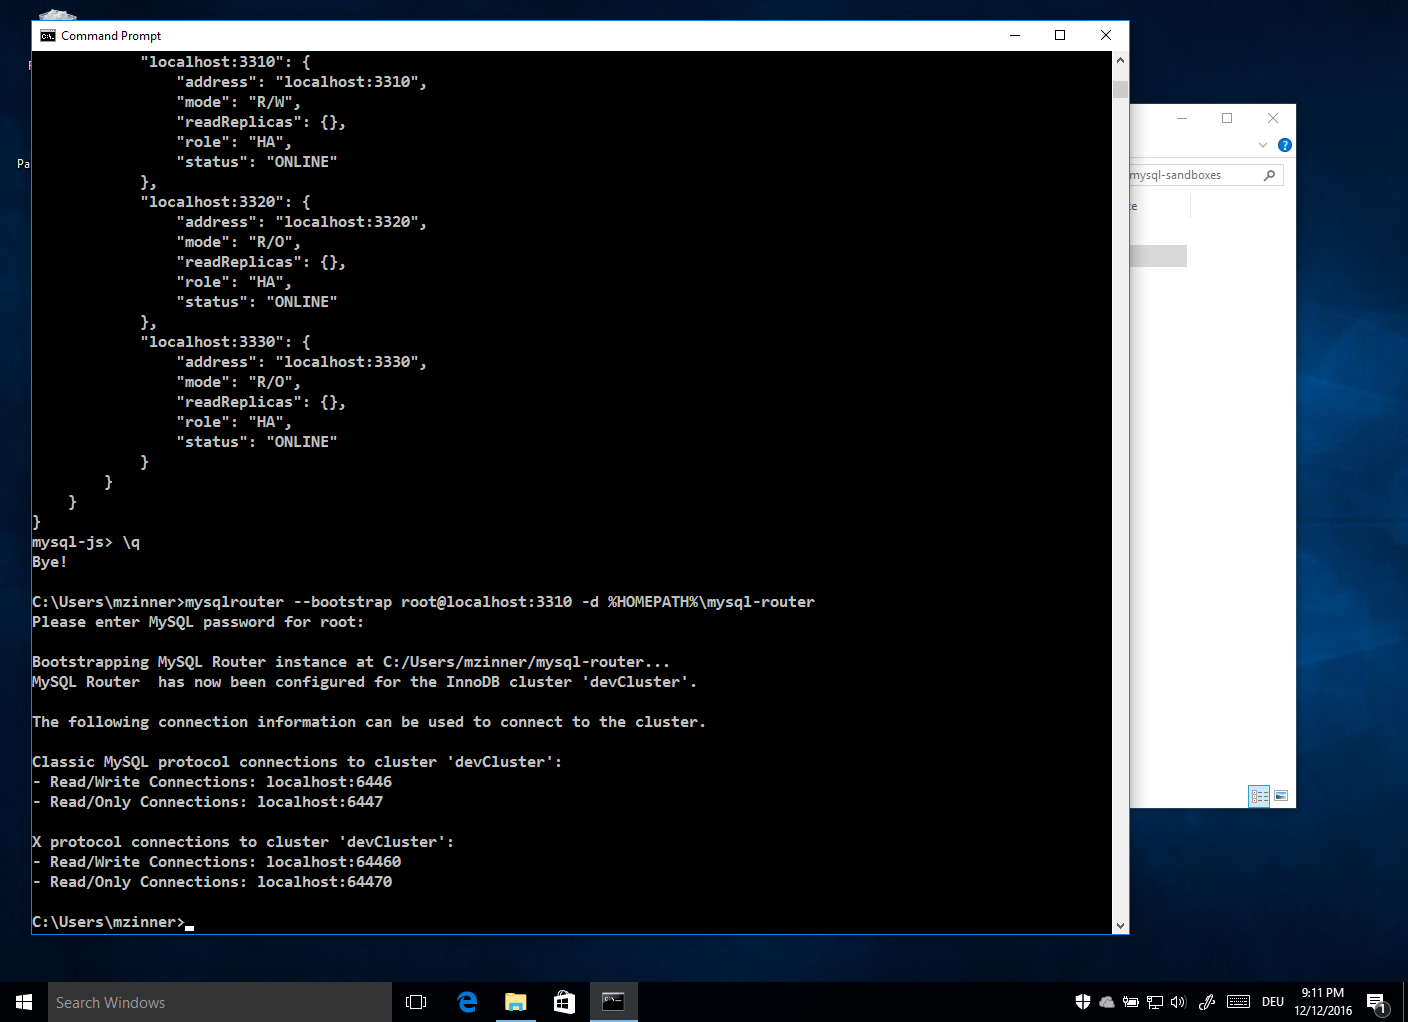
The Router then prints the TCP/IP ports it will use for routing our connections. For our tests, we will use the port 6446 which points to the Read/Write MySQL Server instance of our cluster.
Now that the Router has been successfully configured we can now start it up in a background thread by using the ‘start /B’ command and pointing the Router to the configuration file that we just generated by using the ‘–bootstrap’ option.
Let’s execute the following command.
|
1
2
|
C:\> start /B mysqlrouter -c %HOMEPATH%\mysql-router\mysqlrouter.conf |
After allowing access through the Windows Firewall the MySQL Router is now up and running. It printed its Process ID which later allows us to kill it after we are done with our tests.

Testing the configuration
Now that we have an InnoDB cluster and the MySQL Router running we can start testing our cluster setup.
Instead of connecting to one of the MySQL Server instances directly, we will connect through the MySQL Router instead.
|
1
2
|
C:\> mysqlsh root@localhost:6446 |
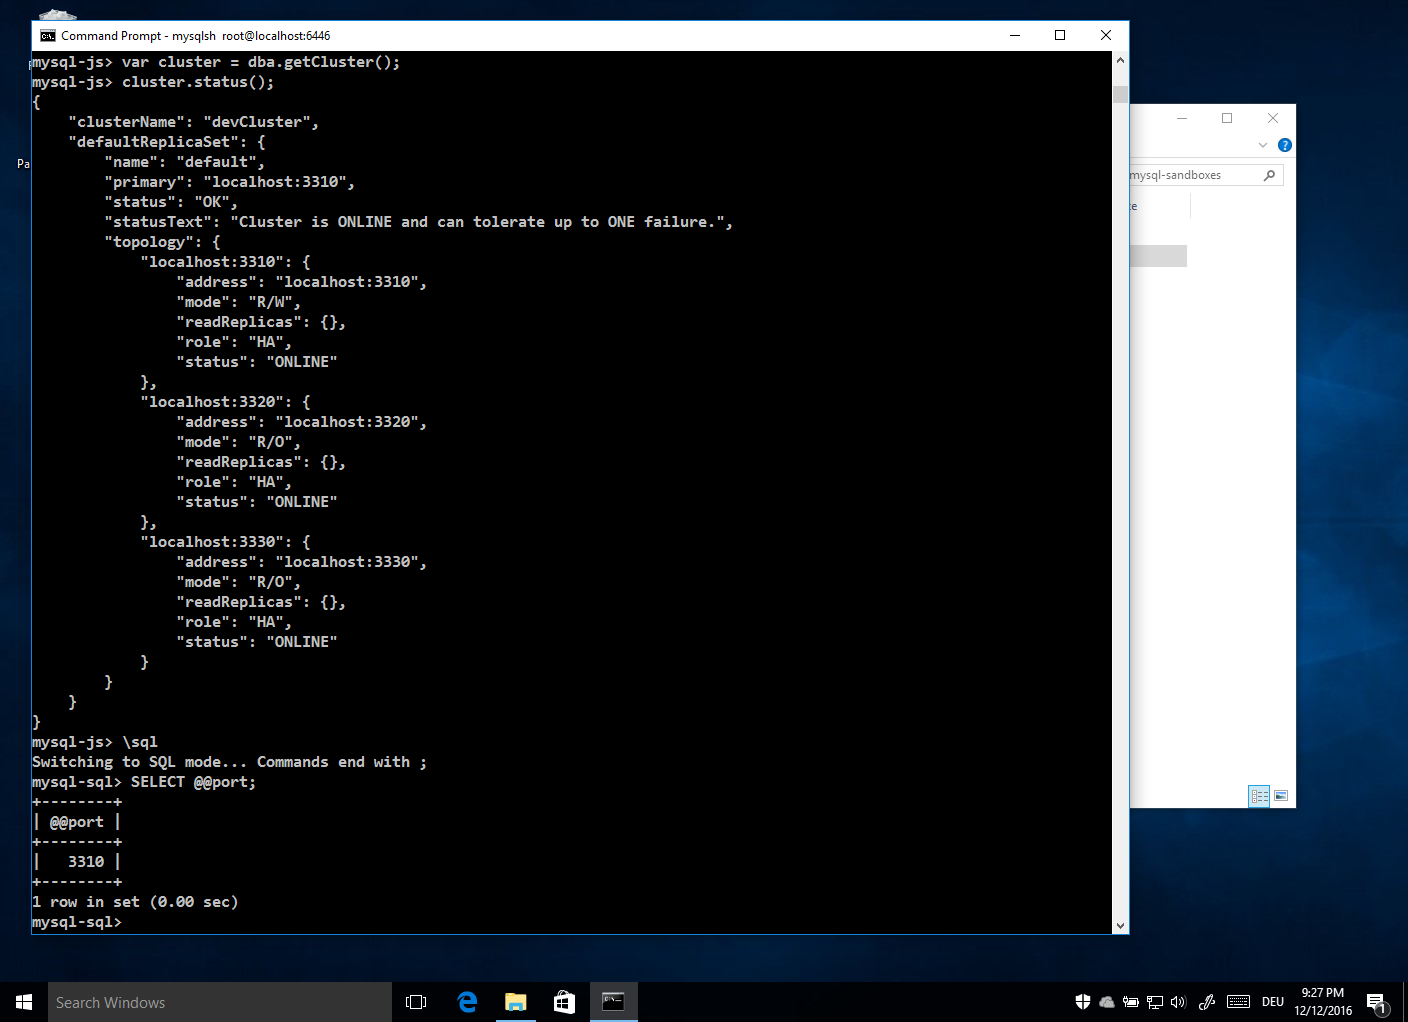
After providing the root password we will be connected to the InnoDB cluster. We can a get hold of the cluster instance by calling the ‘dba.getCluster()’ function.
|
1
2
3
4
|
mysql-js> var cluster = dba.getCluster(); mysql-js> cluster.status(); |
To find out which instance we are connected to, we can switch to SQL mode and query the port the instance is running on.
|
1
2
3
4
|
mysql-js> \sql mysql-sql> SELECT @@port; |
In this case, we are connected to the MySQL Instance running on port 3310.
Now we can switch back to the Javascript mode and use the ‘dba.killSandboxInstance()’ function to do a hard kill the MySQL Server instance.
|
1
2
3
4
|
mysql-sql> \js mysql-js> dba.killSandboxInstance(3310); |
Now that the instance is killed, let’s check if the MySQL Router now does the correct routing. We will try to run SELECT against the instances that was just killed and will check the result.
|
1
2
3
4
|
mysql-js> \sql mysql-sql> SELECT @@port; |
The MySQL Shell got an error “ERROR: 2006 (HY000): MySQL server has gone away” since we have killed the instance running on port 3310. Therefore, it automatically tried to reconnect via the MySQL Router to root@localhost:6446. The Router noticed that the instance 3310 was killed, updated its routing cache and re-routed us to the new Read/Write instance of the cluster.
Let’s see who was promoted to the new Read/Write instance.
|
1
2
|
mysql-sql> SELECT @@port; |
In this case, it was the MySQL Server instance running on port 3320.
Now, let’s take a look at the cluster status.
|
1
2
3
4
|
mysql-sql> \js mysql-js> cluster.status(); |
We can see that the MySQL Server instance formally running on port 3310 has gone (MISSING).

To bring it back we will use the ‘cluster.rejoinInstance()’ function. But first, we have to restart the instance.
|
1
2
3
4
5
6
|
mysql-js> dba.startSandboxInstance(3310); mysql-js> cluster.rejoinInstance('root@localhost:3310'); mysql-js> cluster.status(); |
The status output will show that all instances are back online and that we can again tolerate one failure.

This concludes our first test run.
To clean up the system one can stop and delete the sandbox instances.
|
1
2
3
4
5
6
7
8
|
mysql-js> dba.stopSandboxInstance(3310); mysql-js> dba.stopSandboxInstance(3320); mysql-js> dba.stopSandboxInstance(3330); mysql-js> dba.deleteSandboxInstance(3310); mysql-js> dba.deleteSandboxInstance(3320); mysql-js> dba.deleteSandboxInstance(3330); mysql-js> \q |
The MySQL Router can be stopped with the following command from the command line.
|
1
2
|
C:\> taskkill /IM mysqlrouter.exe /F |
To learn more about the InnoDB cluster please read through the other blog posts as well, like the Hands on Tutorial blog post.
What’s next?
We are going to improve several aspects of the Windows packages going forward.
Providing MSI packages will make installation much easier and shipping with SSL configuration will be supported out of the box, removing the requirement to skip the SSL options on every X AdminAPI command. We are also looking at a simple GUI configuration right from inside the MySQL Installer, removing the need to run the MySQL Shell on the command line for setting up the InnoDB cluster.
Our goal is to make it as easy as possible to put High Availability into the hands of everyone and making it a default for general MySQL installations going forward.