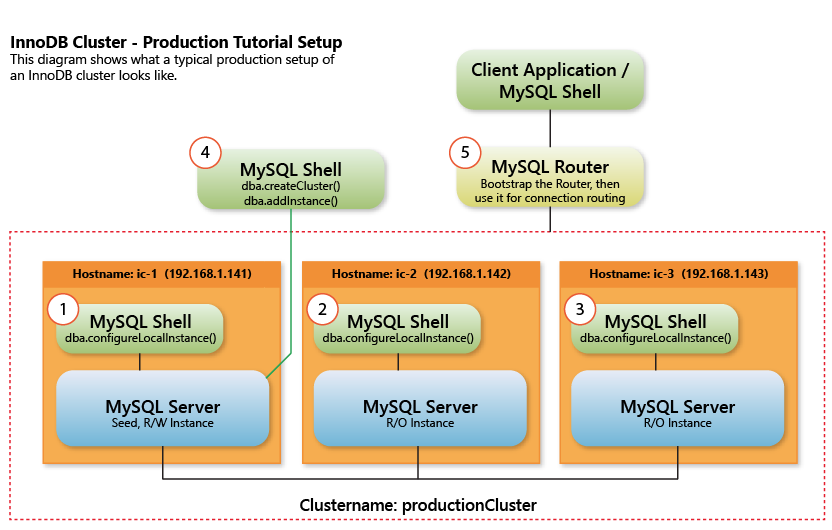
In this tutorial, we are going to guide you through the process of preparing and configuring RPM based distributions, such as OEL, Fedora or CentOS, for InnoDB cluster usage. We will address the steps from the initial configurations, to the cluster creation, and finally the MySQL Router configuration to map the data traffic.
A real world setup
In a real world setup, one would use real instances. However for explanatory purposes we will use Virtual machines to simulate a realistic setup as described in the previous tutorial.
Prerequisites
Python
Python is required to use MySQL Shell, please open a terminal and install it.
Fedora 25
|
1 |
$ sudo dnf install python |
CentOS 7 / Oracle Linux 7
|
1 |
$ sudo yum install python |
Hostname mapping
Important: For this tutorial, we assume that the hostname mapping is already done. That is, the name of each host should be resolvable from the other hosts in the cluster. If not, then please consider configuring the /etc/hosts file before continuing. Hostname mapping is required in order to map a valid hostname to an IP.
CentOS default hostname looks like the following:
|
1
2
|
127.0.0.1 localhost localhost.localdomain localhost4 localhost4.localdomain4 ::1 localhost localhost.localdomain localhost6 localhost6.localdomain6 |
To configure the host mapping open the hosts file:
|
1 |
$ sudo nano /etc/hosts |
Add the IP(s) of your host(s) and the name(s). Press ctrl+o and then enter to save the file. Press ctrl+x to close the file.
The file should have (something like) the following entries:
|
1
2
3
|
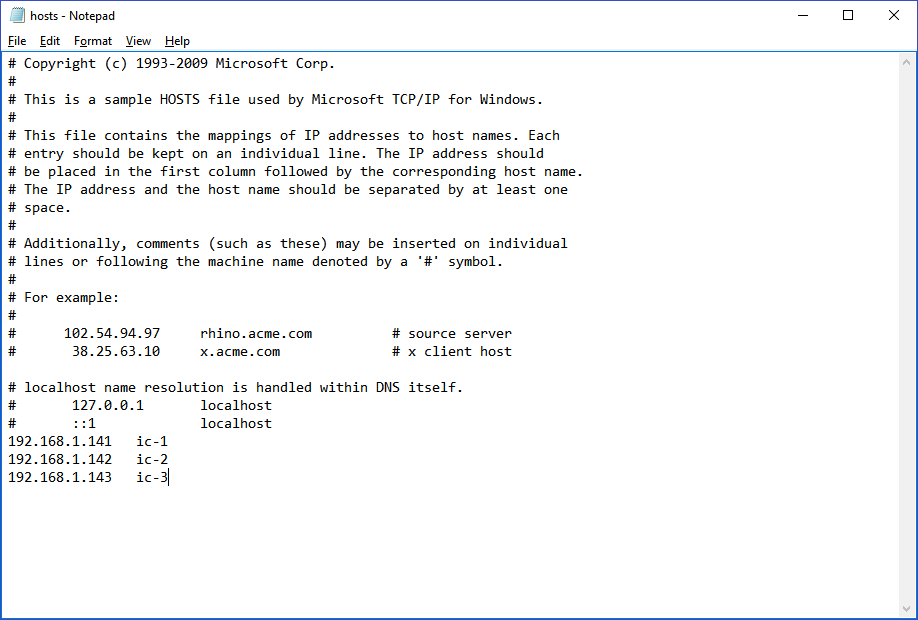
192.168.1.141 ic-1 192.168.1.142 ic-2 192.168.1.143 ic-3 |
Install the MySQL YUM repository
Open a terminal and use wget to download the official APT repository and then install the package:
Fedora 25
|
1
2
|
$ sudo wget https://dev.mysql.com/get/mysql57-community-release-fc25-10.noarch.rpm $ sudo rpm -i ./mysql57-community-release-fc25-10.noarch.rpm |
CentOS 7 / Oracle Linux 7
|
1
2
|
$ sudo wget https://dev.mysql.com/get/mysql57-community-release-el7-10.noarch.rpm $ sudo rpm -i ./mysql57-community-release-el7-10.noarch.rpm |
Update the repositories once the installation of the APT repository is complete:
Fedora 25
|
1 |
$ sudo dnf update |
CentOS 7 / Oracle Linux 7
|
1 |
$ sudo yum update |
Install MySQL Server and MySQL Shell
Type the following command in the terminal to install MySQL Server and MySQL Shell:
Fedora 25
|
1 |
$ sudo dnf install mysql-community-server mysql-shell |
CentOS 7 / Oracle Linux 7
|
1 |
$ sudo yum install mysql-community-server mysql-shell |
After the installation of MySQL Server and MySQL Shell finish, start the MySQL service and enable it to start on the startup:
The remaining instructions are common for Fedora 25, CentOS 7 and Oracle Linux 7:
|
1
2
|
$ sudo systemctl start mysqld.service $ sudo systemctl enable mysqld.service |
To enable remote connections, add a rule to the firewall and restart the firewall service:
|
1
2
|
$ sudo firewall-cmd --permanent --zone=public --add-service=mysql $ sudo systemctl restart firewalld.service |
To log in to MySQL Server, extract the temporary password that was set to root during the installation:
|
1 |
$ sudo grep 'A temporary password is generated for root@localhost' /var/log/mysqld.log |tail -1 |
Since the temporary password has expired, the first thing to do is to set a new one for root. When the installation finish start MySQL using root user to update the password:
|
1 |
$ mysql -u root -p |
Exit MySQL and the start MySQL Shell using root user, type the password for root when asked for it:
|
1 |
$ sudo -i mysqlsh |
Configure the local instance calling the following function. Type the password for the user when prompted:
|
1 |
mysql-js> dba.configureLocalInstance(); |
MySQL Shell will find the default configuration file and ask you if it is ok to modify it, type “Y”. Since root cannot do remote logins, you have three options to continue with the configuration: enable the remote connections for root, create a new user or not enable remote connections for root neither create a new user.
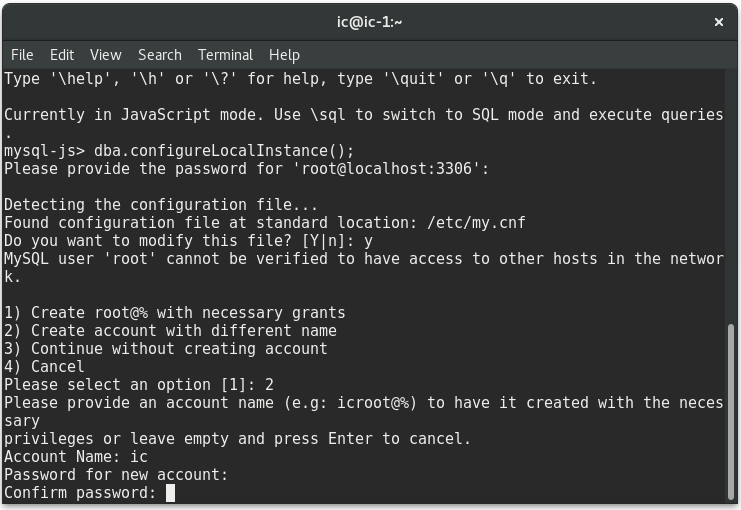
Fedora screenshot
In this blog post, we choose to create a new user.
You will see a report with the changes made by MySQL Shell and a message saying that you need to restart the MySQL service to apply them.
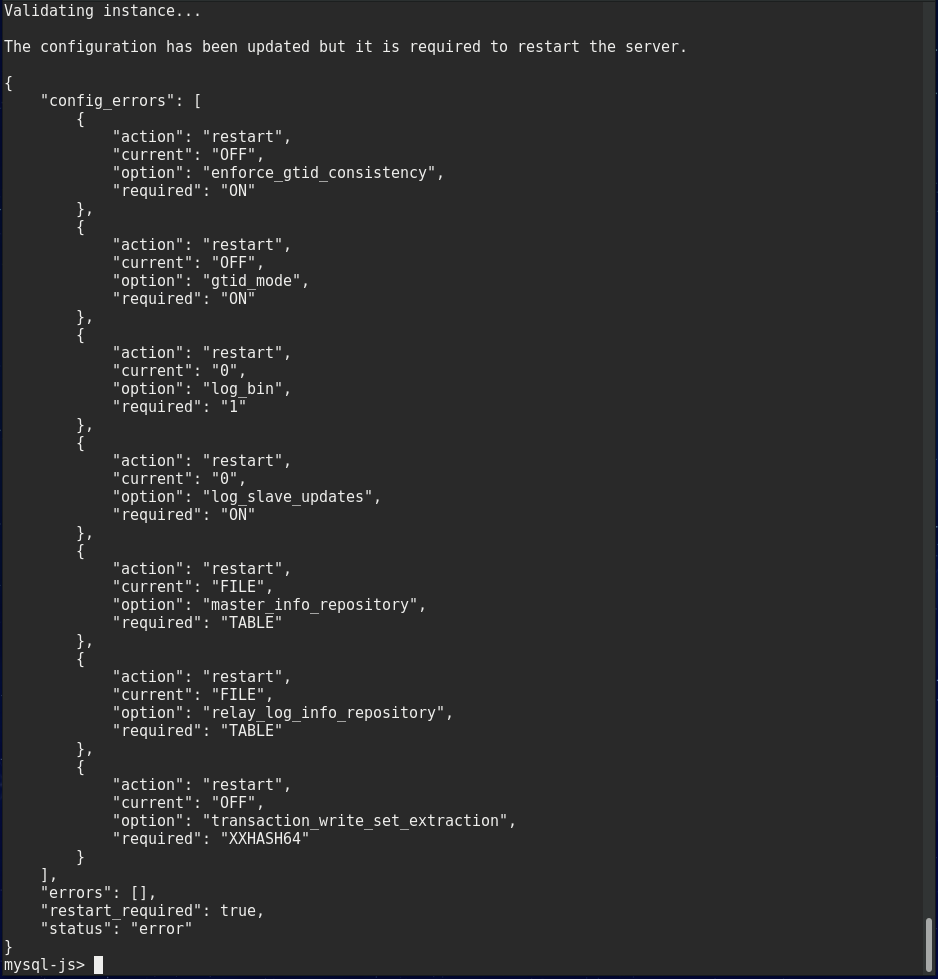 Fedora screenshot
Quit MySQL Shell:
|
1 |
mysql-js> \q |
Restart the MySQL Service:
|
1 |
$ sudo systemctl restart mysqld.service |
Once the restart of MySQL service is complete, start MySQL Shell and execute the following command:
|
1
2
3
|
$ mysqlsh mysql-js> dba.checkInstanceConfiguration('root@localhost:3306'); |
If the instance configuration was successful, you shall receive a message saying that the instance is valid for cluster usage.
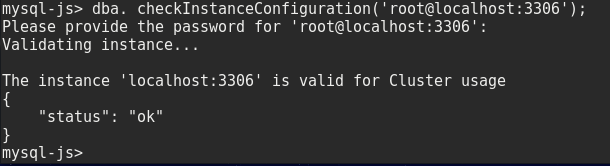 Fedora screenshot
The host is ready to be part of an InnoDB cluster.
Install MySQL Router
The next step is to install MySQL Router, which provides you the ability to hide your network configuration behind a proxy and map the data requests to the cluster.
In a terminal run the following command:
Fedora
|
1 |
$ sudo dnf install mysql-router |
CentOS / Oracle Linux 7
|
1 |
$ sudo yum install mysql-router |
Once the installation of MySQL Router finish, it’s time to create a cluster.
SSL and IP White List
Before continuing, we need to pause to mention some important aspects regarding security.
If you’re using MySQL Server Community edition you may not have SSL enabled on your Server. You can verify it by running the following command in a terminal:
|
1 |
$ mysql -u root -p --execute="show variables like '%have%ssl%'" |
You shall verify the value of the variables “have_openssl” and “have_ssl”, if the value is “YES” you have SSL enabled, if not then you don’t. In the case that you don’t have SSL enabled and want to have it enabled on your server you can use the mysql_ssl_rsa_setup tool. The mysl_ssl_rsa_setup tool generates the SSL certificate and key files as well as the RSA key-pair files required to support secure connections using SSL, the only requirement to use it is to have the openssl binary in the path environment. You can use the tool by executing the following command:
|
1 |
$ mysql_ssl_rsa_setup --datadir=mydir |
Where the value given to the “–datadir” option is the place where the certificate shall be created, which should be the MySQL data directory. If that option is not given, mysql_ssl_rsa_setup uses by default the MySQL compiled data directory when MySQL Server was installed or the specified in the my.cnf file.
Create and manage InnoDB Cluster using SSL
If you have decided to enable SSL, when creating the cluster and adding instances to it you must provide the ipWhitelist option parameter to specify the range of IPs that are going to be permitted to connect to the cluster. The ipWhiteList variable value is set to “AUTOMATIC” by default, which permits connections just from private subnetworks on the host where the cluster is created.
Also, you can specify the SSL mode that is going to be used to configure the members of a cluster using the memberSslMode parameter. You have the following options:
- REQUIRED: if used, SSL (encryption) will be enabled for the instances to communicate with other members of the cluster.
- DISABLED: if used, SSL (encryption) will be disabled.
- AUTO: if used, SSL (encryption) will be enabled if supported by the instance, otherwise disabled.
By default ‘AUTO’ is used even if it’s not specified.
Create an InnoDB cluster
Open a terminal and start MySQL Shell:
|
1 |
$ mysqlsh |
Then create a classic session to the host using the user created in the configuration step and the hostname of the host:
|
1 |
mysql-js> shell.connect('ic@ic-1:3306'); |

Fedora screenshot
Now create a cluster assigning the return value to a variable for later usage:
Remember to use the ipWhitelist option in case you have SSL enabled
|
1 |
mysql-js> var cluster = dba.createCluster('myCluster'); |
You will see a couple of messages with information about the cluster creation and the function required to add instances to it:
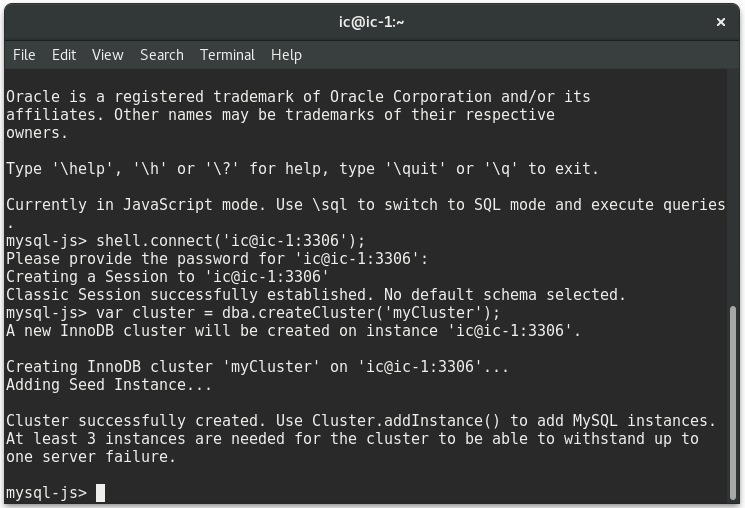
Fedora screenshot
If you have SELinux enabled this step may fail, because you may need to run additional commands to add a policy and enabled nis.
Using SSL
In the following example a cluster is created using the ipWhiteList option and setting SSL as required for all the members of the cluster:
|
1 |
mysql-js> dba.createCluster('myCluster', { memberSslMode: 'REQUIRED', ipWhitelist:'10.196.0.0/16,127.0.0.1/8'}); |
The first address is the range of the IP’s of our host, the second IP is the localhost. You can add multiple IP ranges separating them by a comma. The number after the slash is the number of network bits when using CIDR values.
The following command is an example of the usage of the ipWhiteList and memberSslMode options to add a new instance to a cluster:
|
1 |
mysql-js> cluster.addInstance('user@host:3306', { memberSslMode: 'REQUIRED', ipWhitelist:'10.196.0.0/16,127.0.0.1/8'}); |
Remember to set the same memberSslMode value set in the cluster creation if it’s not ‘AUTO’, when you try to add a new instance to the cluster.
Once the cluster creation is complete, you can see the status of the cluster calling the following function:
|
1 |
mysql-js> cluster.status(); |

Fedora screenshot
To add new instances use the following command, be sure to use a valid user and IP of an already configured host:
Remember to use the ipWhitelist option in case you have SSL enabled
|
1 |
mysql-js> cluster.addInstance('ic@ic-2:3306'); |
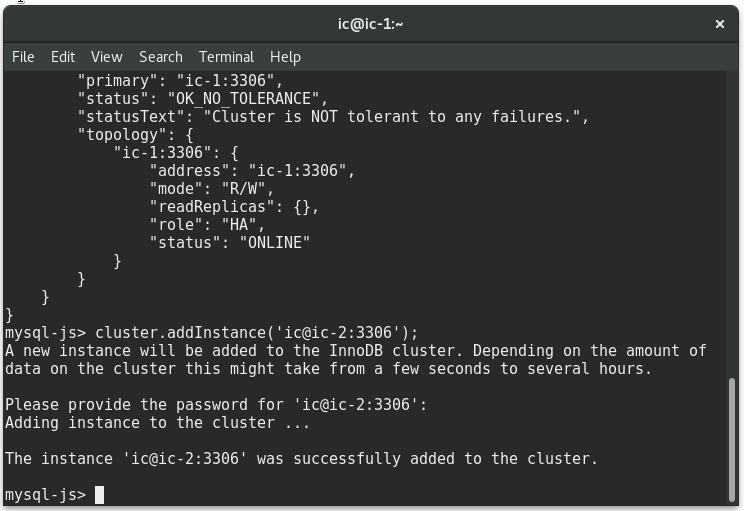
Type the password for the user when prompted. Add as many hosts as you want in your cluster, and take in mind that at least three are required to have tolerance to one failure.

Persist cluster configuration
In order to persist the cluster configuration of each instance, so if a restart happens the instances automatically rejoin the cluster, we must use the dba.configureLocalInstance() again on each instance. The command will update the my.cnf files with the parameters necessary for the automatic rejoin on the cluster on startup.
Run the following commands, locally on each instance:
|
1 |
mysql-js> dba.configureLocalInstance('ic@ic-1:3306'); |
|
1 |
mysql-js> dba.configureLocalInstance('ic@ic-2:3306'); |
|
1 |
mysql-js> dba.configureLocalInstance('ic@ic-3:3306'); |
Use MySQL Router
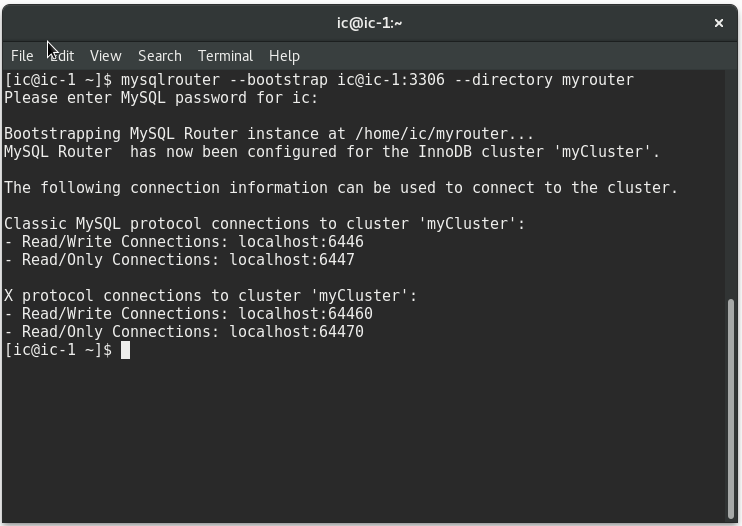
Now, it’s time to bootstrap our cluster. Open a new terminal and type the following command, and type the password for the user when requested:
|
1 |
$ mysqlrouter --bootstrap ic@ic-1:3306 --directory myrouter |
Fedora screenshot
With the previous command the following it’s done:
- A specific configuration for the cluster “myCluster” it’s created, MySQL Router got connected to the cluster and extracted the metadata to run by itself
- A directory named “myrouter” is created in “home” and it contains the configuration required by MySQL Router to run
- Four TCP ports are generated to get connected to the cluster: rean only and read-write for classic protocol and X ptrotocol.
To start MySQL Router run the following command:
|
1 |
$ myrouter/start.sh |
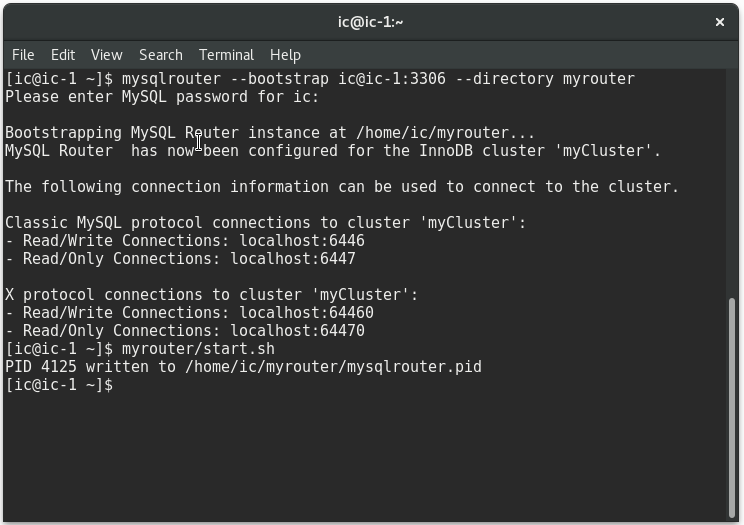
Fedora screenshot
To stop MySQL Router, in a terminal run the stop script generated:
|
1 |
$ myrouter/stop.sh |
Remote Connection
Now we can get connected to the cluster using the IP generated by MySQL Router. The following screenshot is from a Windows host that is connected to the cluster using the read/write port:
|
1 |
$ mysqlsh ic@ic-1:6446 |

Windows screenshot
And the following screenshot is from a windows host that it’s connected to the cluster using the read-only port:
|
1
2
|
$ mysqlsh ic@ic-1:6447 |

Remember that to be able to connect to a remote host using its name, you should configure the host mapping in Windows as well. The file to edit it’s in the directory “C:\Windows\System32\drivers\etc\hosts”, once you configure the host mapping the file should looks like:
Conclusion
You’ve acquired the knowledge to configure hosts for cluster usage, as well as create cluster and add instances to it. Also, you have learned the basics to bootstrap a cluster and to create a proxy for remote connections to map the data traffic using MySQL Router. The environment can be tested as described in a previous tutorial.
You’ve certainly realized how simple and easy to use is the collection of products provided by MySQL to create a high availability environment.
See you in the next blog post!