.NET Core and MySQL Connector/NET
It is exciting times! Recently Microsoft released .NET Core 1.0, a cross platform implementation of the .NET Framework. .NET Core works on Windows, Mac OS, and Linux and is fully open source!
We wanted to enable users of Connector/Net to be able to use .NET Core so we have been working hard for the past few months to make our provider fully .NET Core compatible. Because .NET Core does not yet fully replace the traditional .NET Framework, we will continue to ensure our provider is compatible with both frameworks.
Along with these exciting changes, we are also including in our most recent release support for Entity Framwork 7.0 and Entity Framework Core 1.0.
In this article I will explain how to install and setup .NET Core and how to make a simple sample that connects and retrieve data in screen.
Setup
Further information about this new framework, API, etc. can be found on the product website https://www.microsoft.com/net/core
Tools
The SDK and dotnet CLI is available for all the supported platforms (see the website to know the list of specific platforms supported). Visual Studio Code (available at https://code.visualstudio.com/) is a new, fully open source editor that works on Windows, Mac, and Linux and provides a nice GUI for editing, compiling, and even debugging your project. When installing Visual Studio Code, be sure and install the plugin for C#. This will enable compiling and debugging of C# projects.
Installing on Windows
The installation guide followed in this page is https://www.microsoft.com/net/core#windows
You could install only the .NET Core 1.0 SDK and use Visual Studio Code. The download for the .NET Core 1.0 SDK is at https://go.microsoft.com/fwlink/?LinkID=809122.
If you are on Windows you can choose to use Visual Studio 2015. If you do not wish to purchase Visual Studio 2015, you can use the Community Edition which can be found at https://go.microsoft.com/fwlink/?LinkId=691978
To work with .NET Core projects you ‘ll want to make sure you are using Update 3 for Visual Studio 2015. That can be found at https://go.microsoft.com/fwlink/?LinkId=691129. Also, there is a separate download to provide some “tooling” for using in Visual Studio 2015. That can be found at https://go.microsoft.com/fwlink/?LinkID=824849
Install on Linux
.NET Core 1.0 is compatible with serveral Linux variants. We will explain how to install it for Ubuntu (14.04 or 16.04, 15.04 it is not supported) or Linux Mint 17 and the guide used is here https://www.microsoft.com/net/core#ubuntu
Other Linux distributions are supported, follow the guide from the .NET Core website
Add the dotnet apt-get feed
First we need to set up the apt-get feed
Ubuntu 14.04/Linux Mint 17
sudo sh -c 'echo "deb [arch=amd64] https://apt-mo.trafficmanager.net/repos/dotnet-release/ trusty main" > /etc/apt/sources.list.d/dotnetdev.list'
sudo apt-key adv --keyserver apt-mo.trafficmanager.net --recv-keys 417A0893
sudo apt-get update
Ubuntu 16.04
sudo sh -c 'echo "deb [arch=amd64] https://apt-mo.trafficmanager.net/repos/dotnet-release/ xenial main" > /etc/apt/sources.list.d/dotnetdev.list'
sudo apt-key adv --keyserver apt-mo.trafficmanager.net --recv-keys 417A0893
sudo apt-get update
.NET Core SDK
If you have any previous versions of the .NET Core is necessary to run this script to remove any previous version. It is important to do this before you continue.
Use apt-get to install the .NET Core
sudo apt-get install dotnet-dev-1.0.0-preview2-003121
Install on Mac OS
The guide used is here https://www.microsoft.com/net/core#macos
It is necessary to have the latest version of OpenSSL installed. The easiest way is installing Homebrew. Please follow the guide from here
After installing Homebrew execute the following command
brew update
brew install openssl
ln -s /usr/local/opt/openssl/lib/libcrypto.1.0.0.dylib /usr/local/lib/
ln -s /usr/local/opt/openssl/lib/libssl.1.0.0.dylib /usr/local/lib/
.NET Core SDK (Mac OS)
Download and execute the installer from here https://go.microsoft.com/fwlink/?LinkID=809124
Sample
Now that the SDK is installed we can proceed to create a sample project. You could use Visual Studio 2015 or Visual Studio Code.
There are two different kind of projects for Core, Library and Console app. So far .NET Core doesn’t have support for GUI style applications. The sample we will create now is a console app
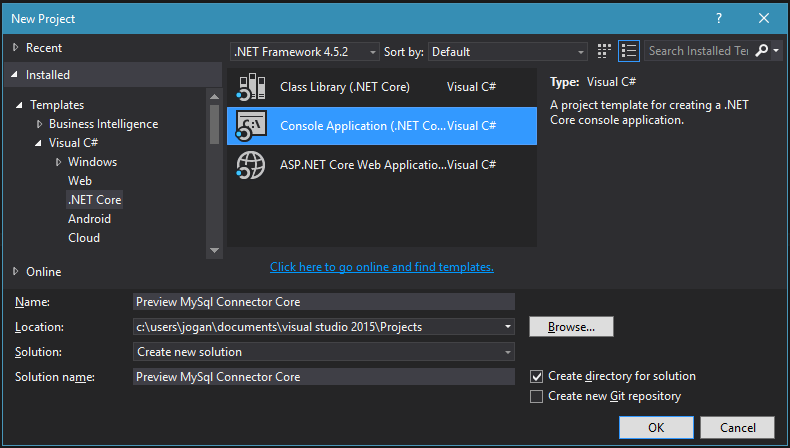
If you are using Visual Studio 2015 then create a new project of type “Console Application (.NET Core)”, type the name of the project and click the “Ok” button
If you want to create using dotnet CLI and VS Code, open a prompt command, create a new folder for your project, change to that folder and create the project.
mkdir MyProject
cd MyProject
dotnet new
After the project was created, it is necessary to do a “restore” ir order to download the dependencies
For Visual Studio 2015 click with Right button in the project and click in the menu “Restore Packages”
For dotnet cli/VS Code
dotnet restore
After this compile your project in Visual Studio 2015 or run the “build” command using dotnet cli
dotnet build
And last for execute this sample hit F5 on Visual Studio 2015 or use the “run” command for cli
dotnet run
You should now see the output “Hello World!”
We have now a really basic app. Now lets add some code and a reference to the MySQL Connector for .NET Core dependency. We will continue using the dotnet cli and VS Code for the rest of this article.
Open the directory in the Visual Studio Code. We will see two files, program.cs and project.json
The project.json is our configuration project file and is where we have the project properties like name, version, author. Also we set the build and pack options We establish the framework targets and their specific configurations like the dependencies.
Our recently created project has a “project.json” file that should look like this
{
  "version": "1.0.0-*",
  "buildOptions": {
    "debugType": "portable",
    "emitEntryPoint": true
  },
  "dependencies": {},
  "frameworks": {
    "netcoreapp1.0": {
      "dependencies": {
        "Microsoft.NETCore.App": {
          "type": "platform",
          "version": "1.0.0"
        }
      },
      "imports": "dnxcore50"
    }
  }
}
In order to make a connection to a MySQL Server we need to add a reference to the MySQL Connector for .NET Core. We will add the dependency after the Microsoft.NETCore.App dependency. Notice that we could also add the the dependency as a general dependency that doesn’t depend on the target (in the empty section “dependencies” before the frameworks section. This is up to you and your needs.
{
  "version": "1.0.0-*",
  "buildOptions": {
    "debugType": "portable",
    "emitEntryPoint": true
  },
  "dependencies": {},
  "frameworks": {
    "netcoreapp1.0": {
      "dependencies": {
        "Microsoft.NETCore.App": {
          "type": "platform",
          "version": "1.0.0"
        },
        "MySql.Data.Core": "7.0.4-IR-191"
      },
      "imports": "dnxcore50"
    }
  }
}
Lets consider that we have a MySQL server up and running and it has the Sakila sample database configured. If you need to setup the database, sql script could be found here
After we change the dependencies, we must do a restore again in order that .NET Core downloads the NuGet package and we can use the it.
dotnet restore
Now open program.cs and add a using statement to the MySql.Data.MySqlClient namespace and add code for create and open a connection
using System;
using MySql.Data.MySqlClient;

namespace ConsoleApplication
{
    public class Program
    {
        public static void Main(string[] args)
        {
            MySqlConnection connection = new MySqlConnection
            {
                ConnectionString = "server=<ServerAddress>;user id=<User>;password=<Password>;persistsecurityinfo=True;port=<Port>;database=sakila"
            };
            connection.Open();
        }
    }
}
Now lets add code to get information from “Category” table from Sakila database
using System;
using MySql.Data.MySqlClient;

namespace ConsoleApplication
{
    public class Program
    {
        public static void Main(string[] args)
        {
            MySqlConnection connection = new MySqlConnection
            {
                ConnectionString = "server=localhost;user id=root;password=;persistsecurityinfo=True;port=3305;database=sakila"
            };
            connection.Open();
            MySqlCommand command = new MySqlCommand("SELECT * FROM sakila.category;", connection);

            using (MySqlDataReader reader =  command.ExecuteReader())
            {
                System.Console.WriteLine("Category Id\t\tName\t\tLast Update");
                while (reader.Read())
                {
                string row = $"{reader["category_id"]}\t\t{reader["name"]}\t\t{reader["last_update"]}";
                System.Console.WriteLine(row);
                }
            }

            connection.Close();

            System.Console.ReadKey();
        }
    }
}
This is all that we need to retrieve data from the server in a simple sample. Let’s do a build and then run the sample (if didn’t do a restore then that is the first thing we should do)
dotnet restore
dotnet build
dotnet run
The output will be something like this
Category Id             Name            Last Update
        1               Action                  15/02/2006 04:46:27
        2               Animation                       15/02/2006 04:46:27
        3               Children                        15/02/2006 04:46:27
        4               Classics                        15/02/2006 04:46:27
        5               Comedy                  15/02/2006 04:46:27
        6               Documentary                     15/02/2006 04:46:27
        7               Drama                   15/02/2006 04:46:27
        8               Family                  15/02/2006 04:46:27
        9               Foreign                 15/02/2006 04:46:27
        10              Games                   15/02/2006 04:46:27
        11              Horror                  15/02/2006 04:46:27
        12              Music                   15/02/2006 04:46:27
        13              New                     15/02/2006 04:46:27
        14              Sci-Fi                  15/02/2006 04:46:27
        15              Sports                  15/02/2006 04:46:27
        16              Travel                  15/02/2006 04:46:27
Hope this simple sample helps you. While this post was written on Windows, the command line steps and code should work the same on Linux and Mac.
Enjoy.