 As the title of this post suggests, MySQL Cluster Manager 1.1 is now available – but this actually has a double meaning:
- MySQL Cluster Manager 1.1 is GA (I’ll explain below the major improvements over 1.0)
- Everyone is now able to download and try it (without first having to purchase a license)!
This software is only available through commercial licenses (i.e. not GPL like the rest of Cluster) and until recently there was no way for anyone to try it out unless they had already bought MySQL Cluster CGE; this changed on Monday when the MySQL software became available through Oracle’s E-Delivery site. Now you can download the software and try it out for yourselves (just select “MySQL Database” as the product pack, select your platform, click “Go” and then scroll down to get the software).
So What is MySQL Cluster Manager?
MySQL Cluster Manager provides the ability to control the entire cluster as a single entity, while also supporting very granular control down to individual processes within the cluster itself. Administrators are able to create and delete entire clusters, and to start, stop and restart the cluster with a single command. As a result, administrators no longer need to manually restart each data node in turn, in the correct sequence, or to create custom scripts to automate the process.
MySQL Cluster Manager automates on-line management operations, including the upgrade, downgrade and reconfiguration of running clusters as well as adding nodes on-line for dynamic, on-demand scalability, without interrupting applications or clients accessing the database. Administrators no longer need to manually edit configuration files and distribute them to other cluster nodes, or to determine if rolling restarts are required. MySQL Cluster Manager handles all of these tasks, thereby enforcing best practices and making on-line operations significantly simpler, faster and less error-prone.
MySQL Cluster Manager is able to monitor cluster health at both an Operating System and per-process level by automatically polling each node in the cluster. It can detect if a process or server host is alive, dead or has hung, allowing for faster problem detection, resolution and recovery.
To deliver 99.999% availability, MySQL Cluster has the capability to self-heal from failures by automatically restarting failed Data Nodes, without manual intervention. MySQL Cluster Manager extends this functionality by also monitoring and automatically recovering SQL and Management Nodes.
How is it Implemented?

MySQL Cluster Manager is implemented as a series of agent processes that co-operate with each other to manage the MySQL Cluster deployment; one agent running on each host machine that will be running a MySQL Cluster node (process). The administrator uses the regular mysql command to connect to any one of the agents using the port number of the agent (defaults to 1862 compared to the MySQL Server default of 3306).
How is it Used?
When using MySQL Cluster Manager to manage your MySQL Cluster deployment, the administrator no longer edits the configuration files (for example config.ini and my.cnf); instead, these files are created and maintained by the agents. In fact, if those files are manually edited, the changes will be overwritten by the configuration information which is held within the agents. Each agent stores all of the cluster configuration data, but it only creates the configuration files that are required for the nodes that are configured to run on that host.
Similarly when using MySQL Cluster Manager, management actions must not be performed by the administrator using the ndb_mgm command (which directly connects to the management node meaning that the agents themselves would not have visibility of any operations performed with it).
When using MySQL Cluster Manager, the ‘angel’ processes are no longer needed (or created) for the data nodes, as it becomes the responsibility of the agents to detect the failure of the data nodes and recreate them as required. Additionally, the agents extend this functionality to include the management nodes and MySQL Server nodes.
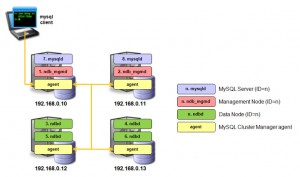
Example 1: Create a Cluster from Scratch
The first step is to connect to one of the agents and then define the set of hosts that will be used for the Cluster:
|
1
2
|
<span style="color: #800000;"><span style="color: #000080;">$ mysql -h 192.168.0.10 -P 1862 -u admin -psuper --prompt='mcm> '</span> mcm> create site --hosts=192.168.0.10,192.168.0.11,192.168.0.12,192.168.0.13 mysite;</span> |
Next step is to tell the agents where they can find the Cluster binaries that are going to be used, define what the Cluster will look like (which nodes/processes will run on which hosts) and then start the Cluster:
|
1
2
3
4
5
6
|
<span style="color: #800000;">mcm> add package --basedir=/usr/local/mysql_6_3_27a 6.3.27a; mcm> create cluster --package=6.3.26 --processhosts=ndb_mgmd@192.168.0.10,ndb_mgmd@192.168.0.11, ndbd@192.168.0.12,ndbd@192.168.0.13,ndbd@192.168.0.12, ndbd@192.168.0.13,mysqld@192.168.0.10,mysqld@192.168.0.11 mycluster; mcm> start cluster mycluster; </span> |
Example 2: On-Line upgrade of a Cluster
A great example of how MySQL Cluster Manager can simplify management operations is upgrading the Cluster software. If performing the upgrade by hand then there are dozens of steps to run through which is time consuming, tedious and subject to human error (for example, restarting nodes in the wrong order could result in an outage). With MySQL Cluster Manager, it is reduced to two commands – define where to find the new version of the software and then perform the rolling, in-service upgrade:
|
1
2
|
<span style="color: #800000;"><span style="color: #800000;">mcm> add package --basedir=/usr/local/mysql_7_1_8 7.1.8; mcm> upgrade cluster --package=7.1.8 mycluster;</span></span> |
Behind the scenes, each node will be halted and then restarted with the new version – ensuring that there is no loss of service.
What’s New in MySQL Cluster Manager 1.1
If you’ve previously tried out version 1.0 then the main improvements you’ll see in 1.1 are:
- More robust; 1.0 was the first release and a lot of bug fixes have gone in since then
- Optimized restarts – more selective about which nodes need to be restarted when making a configuration change
- Automated On-line Add-node
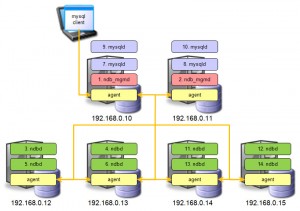
MySQL Cluster Manager 1.1 – Automated On-Line Add-Node

Since MySQL Cluster 7.0 it has been possible to add new nodes to a Cluster while it is still in service; there are a number of steps involved and as with on-line upgrades if the administrator makes a mistake then it could lead to an outage.
We’ll now look at how this is automated when using MySQL Cluster Manager; the first step is to add any new hosts (servers) to the site and indicate where those hosts can find the Cluster software:
|
1
2
|
<span style="color: #800000;">mcm> add hosts --hosts=192.168.0.14,192.168.0.15 mysite; mcm> add package --basedir=/usr/local/mysql_7_1_8 --hosts=192.168.0.14,192.168.0.15 7_1_8;</span> |
The new nodes can then be added to the Cluster and then started up:
|
1
2
3
|
<span style="color: #800000;">mcm> add process --processhosts=mysqld@192.168.0.10,mysqld@192.168.0.11,ndbd@192.168.0.14, ndbd@192.168.0.15,ndbd@192.168.0.14,ndbd@192.168.0.15 mycluster; mcm> start process --added mycluster; </span> |
The Cluster has now been extended but you need to perform a final step from any of the MySQL Servers to repartition the existing Cluster tables to use the new data nodes:
|
1
2
|
<span style="color: #008000;">mysql> ALTER ONLINE TABLE <table-name> REORGANIZE PARTITION; mysql> OPTIMIZE TABLE <table-name>;</span> |
Where can I found out more?
There is a lot of extra information to help you understand what can be achieved with MySQL Cluster Manager and how to use it: