One of the most important things in any application is having a good and well back up security mechanism that ensures the access to the site or application is well managed and controlled.
With the ASP.NET Identity provider you have a balance between customization and a good separation between the storage of the identity information and the code that implements the security system. This separation allows to have a very good customization in terms of the information that the application will store from each one of the users and roles. (more information and context here)
Here are some important features within the ASP.NET Identity provider
- A higher level of customization of the data associated with the user account.
Developers have the facility to add or change the data stored of the user by implementing the IUser interface. All the data will be stored by doing the implementation of the IUserStore interface.
- Entity Framework 6 support. There are defaults implementations of the IUser and IUserStore interfaces in Entity Framework 6. For the IUser interface there is a class called ApplicationUser and another one called UserStore for the IUserStore interface. This makes it very straightforward for developers to know which data is stored and how it is stored. Finally there is an ApplicationDbContext class for the developers to setup a connection string to indicate the database to be used.
- Asynchronous support and many virtual methods. A good amount of methods have asynchronous support which many of the applications can benefit from. Here you can see more documentation about it. Also, most of the APIs are virtual; if the developer needs to customize any of the built-in behavior then he would simply override the appropriate method.
In this post we will build an MVC application using ASP.NET Identity provider with an integer primary key, which will require some changes to the default template. The provider is by default using the UUID type so with MySQL we will do the necessary changes to use an integer type instead as the primary key for the users table.
Requirements:
– Visual Studio 2013 update 4
– A running server with MySQL 5.6 (can be downloaded here).
– Connector/Net 6.9.6 (download it here)
Create the MVC Application
Open Visual Studio 2013 and click on File Menu and select New Project. Make sure you are using the .Net 4.5 Framework version.

Select the Web Category and then select the ASP.NET Web Application to start with the template that has the ASP.NET Identity provider set up already. Notice that the type of Authentication used is by default Individual User Accounts, which is the one using ASP.NET Identity provider.

Customizing the application
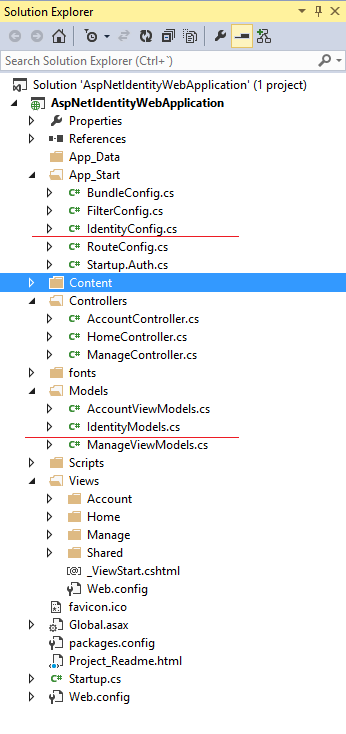
Once the application is created there are two files related to the Identity provider back end: IdentityModel and IdentityConfig. Here’s an image that highlights these two files.
Step One: Customization of the ApplicationUser class
We have mentioned that the ApplicationUser class is the one that implements the IUser interface, hence we would have to use the implementation with the generic type for the primary key in order to customize it. Documentation of the API in this class can be checked here
Open the IdentityModels.cs file, and change the definition of the ApplicationUser class to be like the following:
public class ApplicationUser : IdentityUser<int, UserLoginIntPk, UserRoleIntPk, UserClaimIntPk>
{

     public async Task GenerateUserIdentityAsync(UserManager<ApplicationUser, int> manager)
   {
       var userIdentity = await manager.CreateIdentityAsync(this, DefaultAuthenticationTypes.ApplicationCookie);
       return userIdentity;
   }
}
The signature of this class has the following type parameters:
int: The type of the key, for this case int.
UserLoginIntIntPk: The type of the login.
UserRoleIntPk: The type of the role.
UserClaimIntPk:n The type of the claim.
Due the usage of this constructor it is necessary to add the following new classes:
public class UserLoginIntPk : IdentityUserLogin<int>
{ }

public class UserRoleIntPk : IdentityUserRole<int>
{ }

public class UserClaimIntPk : IdentityUserClaim<int>
{ }
After adding these classes, comes the personalization of the IUserStore interface.
Add the following code to the IdentityModels file:
public class RoleIntPk : IdentityRole<int, UserRoleIntPk>
{
   public RoleIntPk() { }
   public RoleIntPk(string name) { Name = name; }
}

public class UserStoreIntPk : UserStore<ApplicationUser, RoleIntPk, int,
UserLoginIntPk, UserRoleIntPk, UserClaimIntPk>
{
   public UserStoreIntPk(ApplicationDbContext context)
     : base(context)
   {
   }
}

public class RoleStoreIntPk : RoleStore<RoleIntPk, int, UserRoleIntPk>
{
   public RoleStoreIntPk(ApplicationDbContext context)
      : base(context)
   {
   }
}
Lastly the IdentityDbContext class customization:
public class ApplicationDbContext : IdentityDbContext<ApplicationUser, RoleIntPk, int, UserLoginIntPk, UserRoleIntPk, UserClaimIntPk>
{
   public ApplicationDbContext()
      : base("DefaultConnection")
{
}

public static ApplicationDbContext Create()
{
   var context = new ApplicationDbContext();
   context.Database.CreateIfNotExists();
   return context;
}

protected override void OnModelCreating(DbModelBuilder modelBuilder)
{
   base.OnModelCreating(modelBuilder);

   modelBuilder.Entity<RoleIntPk>()
      .Property(c => c.Name)
      .HasMaxLength(128)
      .IsRequired();
   modelBuilder.Entity<ApplicationUser>()
      .ToTable("Custom_AspNetUsers")
      .Property(c => c.UserName)
      .HasMaxLength(128)
      .IsRequired();
   modelBuilder.Entity<UserLoginIntPk>().ToTable("Users");
   modelBuilder.Entity<RoleIntPk>().ToTable("Roles");
   modelBuilder.Entity<UserRoleIntPk>().ToTable("UserRoles");
}
}
Notice the integer type used on each of the classes definition.
Step two: Customize the IdentityConfig.cs file
Change the following “old code” to the “new code”:
Old Code:
manager.UserValidator = new UserValidator<ApplicationUser>(manager)
{
   AllowOnlyAlphanumericUserNames = false,
   RequireUniqueEmail = true
};
New Code:
manager.UserValidator = new UserValidator<ApplicationUser, int>(manager)
{
   AllowOnlyAlphanumericUserNames = false,
   RequireUniqueEmail = true
};
Old Code:
manager.RegisterTwoFactorProvider("Phone Code", new PhoneNumberTokenProvider<ApplicationUser>
  {
    MessageFormat = "Your security code is {0}"
  }
);

manager.RegisterTwoFactorProvider("Email Code", new EmailTokenProvider<ApplicationUser>
  {
    Subject = "Security Code",
    BodyFormat = "Your security code is {0}"
  }
);
New Code:
manager.RegisterTwoFactorProvider("Phone Code", new PhoneNumberTokenProvider<ApplicationUser, int>
  {
    MessageFormat = "Your security code is {0}"
  }
);

manager.RegisterTwoFactorProvider("Email Code", new EmailTokenProvider<ApplicationUser, int>
  {
    Subject = "Security Code",
    BodyFormat = "Your security code is {0}"
  }
);
Old Code:
if (dataProtectionProvider != null)
{
  manager.UserTokenProvider =
  new DataProtectorTokenProvider<ApplicationUser>(dataProtectionProvider.Create("ASP.NET Identity"));
}
New Code:
if (dataProtectionProvider != null)
{
  manager.UserTokenProvider =
  new DataProtectorTokenProvider<ApplicationUser, int>(dataProtectionProvider.Create("ASP.NET Identity"));
}
Old Code:
public class ApplicationSignInManager : SignInManager<ApplicationUser, string>
New Code:
public class ApplicationSignInManager : SignInManager<ApplicationUser, int>
Third Step: Open the Startup.Auth.cs from App_Start folder and change “old code” to the “new code”:
Old Code:
OnValidateIdentity = SecurityStampValidator.OnValidateIdentity<ApplicationUserManager, ApplicationUser>(
validateInterval: TimeSpan.FromMinutes(30),
regenerateIdentity: (manager, user) => user.GenerateUserIdentityAsync(manager))
New Code:
OnValidateIdentity = SecurityStampValidator.OnValidateIdentity<ApplicationUserManager, ApplicationUser, int>(
validateInterval: TimeSpan.FromMinutes(30),
regenerateIdentityCallback: (manager, user) => user.GenerateUserIdentityAsync(manager),
getUserIdCallback: (id) => (id.GetUserId<int>())),
OnException = context => { Exception ex = context.Exception; }
Fourth Step: Changes in the AccountController file
Old Code:
public async Task<ActionResult> ConfirmEmail(string userId, string code)
New Code:
public async Task<ActionResult> ConfirmEmail(int userId, string code)
In the internal class ChallengeResult change the UserId type to the integer type:
public string UserId { get; set; }
New Code:
public int UserId { get; set; }
Fifth Step: Web.config file changes.
The connection string should look like this in the web configuration file:
<connectionStrings>
<add name="DefaultConnection" connectionString="server=localhost;userid=<<user>>;database=<<YourDbName>>;password=<<?????>>port=<<????>>;" providerName="MySql.Data.MySqlClient" />
</connectionStrings>
Change the value to the credentials you will be using and make sure you also include the port in the connection string, if the port is not 3306, which is the default value.
The EntityFramework section also has to include the MySQL provider:
<entityFramework codeConfigurationType="MySql.Data.Entity.MySqlEFConfiguration, MySql.Data.Entity.EF6">
<providers>
<provider invariantName="MySql.Data.MySqlClient" type="MySql.Data.MySqlClient.MySqlProviderServices, MySql.Data.Entity.EF6" />
</providers>
</entityFramework>
Running the Application
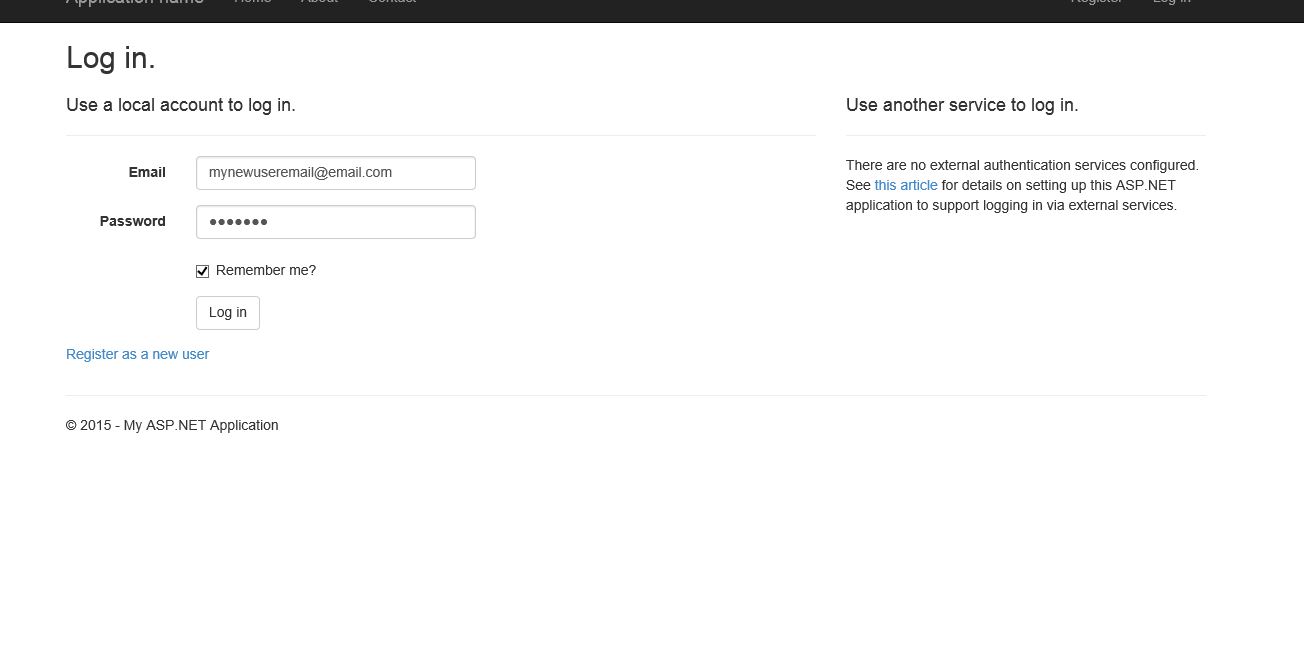
Once all the changes are done, we can run the application and create a user.

Login page:
The structure of the database created by the provider is shown in the image:

The data of the user in the user’s table:
![]()
That’s all
Conclusion:
The ASP.NET Identity provider is a very good option to manage authentication data with a good level of customization. In this example we changed the default values used to the ones that let us define a different data type for the primary key.
Quick links
Hope you find this information useful.