In all likelihood your MySQL database contains valuable and sensitive information. Within that database, MySQL protects that data using features such as encryption, access controls, auditing, views, and more. However in many cases you may need to share some of this data, but must at the same time protect that sensitive information. That is where data masking and de-identification techniques are needed.
Masking Data
Sensitive data can be any number of things. For example, your data may contain PII (personally identifiable information), PHI (Protected Health Information), PCI (Payment Card Information), financial data, intellectual property, or education related information. In many cases, handling and sharing of this sensitive data is regulated.
- PCI DSS
- HIPAA
- European Union’s General Data Protection Regulation (GDPR)
- ITAR
- EAR
Of course there are many more regulations covering data protectsion. Plus, corporations have their own internal controls defining handling of confidential information.
And there are cases where data needs to be shared outside of the production MySQL database. Users of this shared data – analysts, developers, business partners, regulators – need some form of this data for various reasons. However you as a DBA need to protect the data and provide just enough to meet their needs . These users need partial data to perform tasks such as:
- Data Analytics
- Application Development
- Testing
- Auditing
- Training
When sharing and exporting data from the MySQL database sensitive data needs to be cleansed of sensitive information, using techniques such as
- Data masking
- Data de-identification
- Obfuscation
- Randomization
- Random Formatted Data
How do you perform these tasks?
What follows shows steps towards exporting masked and de-identified data from your MySQL database.
7 Steps to Mask and Export Data
- Install or upgrade
- Load the MySQL masking plugin and functions
- Create a select statement on the columns of interest
- Determine which columns are sensitive
- Chose an appropriate mask type for each column
- Add masking functions to columns with sensitive data
- Export the data from the select in desirable format
Now lets drill down into the “how to” for each step
Step 1 – Install/Upgrade to MySQL EE
Installation and Upgrade Instructions to MySQL EE. You can install 8.0 or 5.7
Optional but recommended (and used in this blog)
Installation and Upgrade Instructions to (use the 8.0 versions of MySQL Workbench and Shell as they support both MySQL Server 8.0 and 5.7)
Note: You could use the mysql client tool as well, however your output formats are more limited as MySQL Workbench and Shell provide you many more result format options.
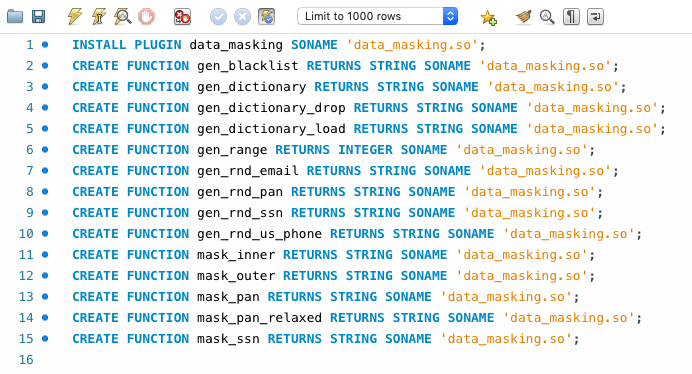
Step 2 – Load the masking plugin and functions
FYI no server restarts are needed.
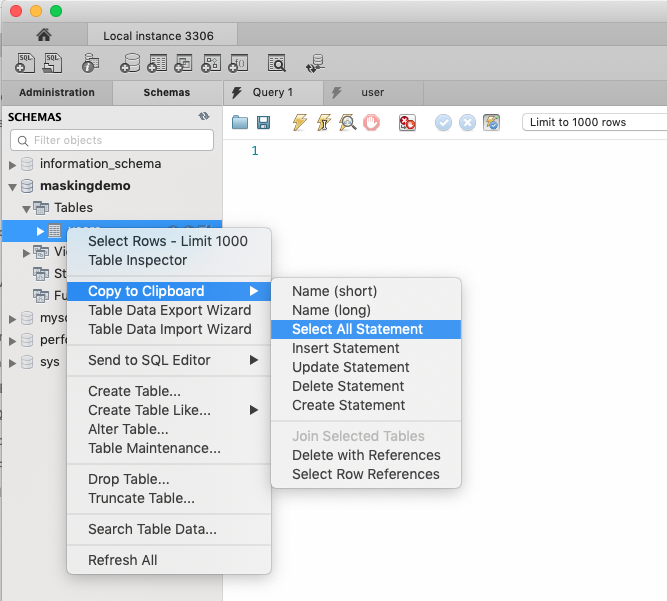
Step 3 – Create a select statement on the columns of interest
An easy way to do this is using MySQL Workbench
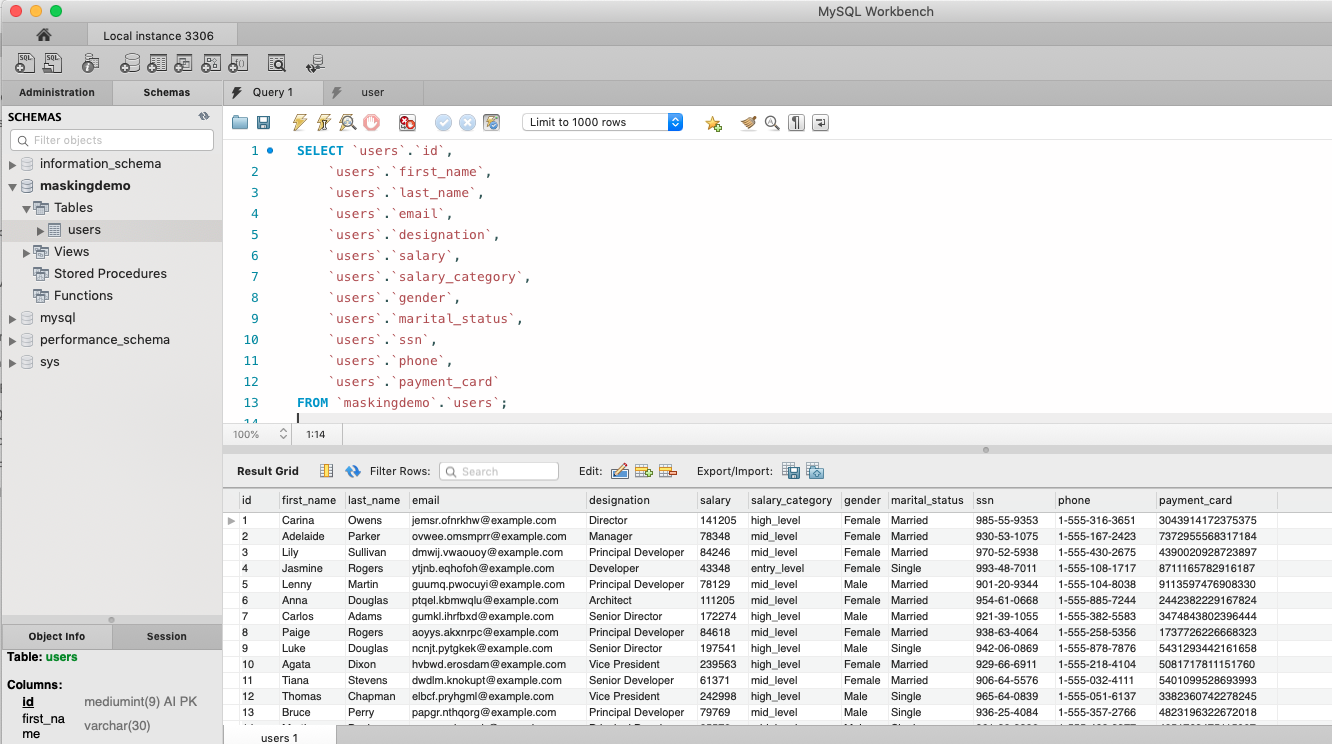
Step 4 – Run the Select and Determine which columns are sensitive
For example – here we see a select on the table “users” – with many columns of sensitive data shown. Salary, SSN, etc. – you would not want to share much of this information as-is.
Step 5 – Chose an appropriate mask type for each column
In this example selected columns are showing sensitive data. To protect this data I’ll show how to
- Partially Obfuscate names
- Obscure by planing range on salaries
- Use standard SSN masking
- Mask the Credit Card PAN data
Your tasks for step 5
- Entirely omit columns from your select statement that are unnecessary for the targeted data export
- The fewer, the better
- Determine which columns are sensitive
- For those sensitive columns determine the appropriate masking, obfuscation or random data substitution needed to meet security requirements.
Step 6 – Add masking functions to columns with sensitive data
Create the masked data using SELECT – for example
|
1
2
3
4
5
6
7
8
9
10
11
12
13
|
SELECT `users`.`id`, `users`.`first_name`, mask_inner(`users`.`last_name`, 2, 0, '*') as last_name, gen_rnd_email() as email, `users`.`designation`, `users`.`salary` + gen_range (0,20000)-20000 as approxsalary, `users`.`salary_category`, `users`.`gender`, `users`.`marital_status`, mask_ssn(ssn) as ssn, `users`.`phone`, mask_pan(`users`.`payment_card`) FROM `maskingdemo`.`users`; |
Here you can see the statement run in Workbench
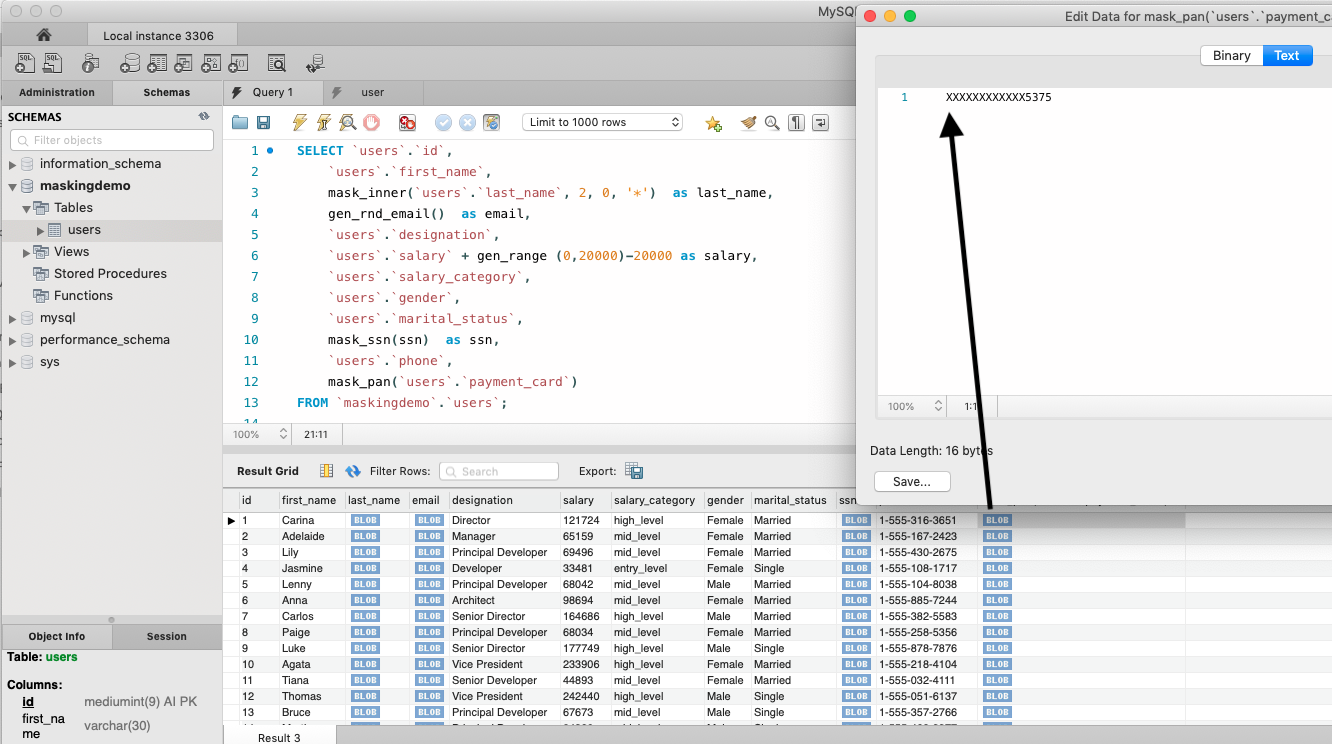
In Workbench you’ll notice the masked columns are shown as BLOBs – and if you view the BLOB and select text, you will see the text. This is because MySQL UDFs do not return the type information, thus its treated as binary data type.
So next I’ve modify the masked columns selections and add CAST. Now you can see the results data as expected.
Create the masked data using SELECT with CAST added – for example
|
1
2
3
4
5
6
7
8
9
10
11
12
13
|
SELECT `users`.`id`, `users`.`first_name`, cast( mask_inner(`users`.`last_name`, 2, 0, '*') as char) , cast(gen_rnd_email() as char) , `users`.`designation`, `users`.`salary` + gen_range (0,20000)-20000 as approxsal, `users`.`salary_category`, `users`.`gender`, `users`.`marital_status`, cast(mask_ssn(ssn) as char) as ssn, `users`.`phone`, cast(mask_pan(`users`.`payment_card`) as char) as last4 FROM `maskingdemo`.`users`; |
How you can see the masked results within the Workbench Columns

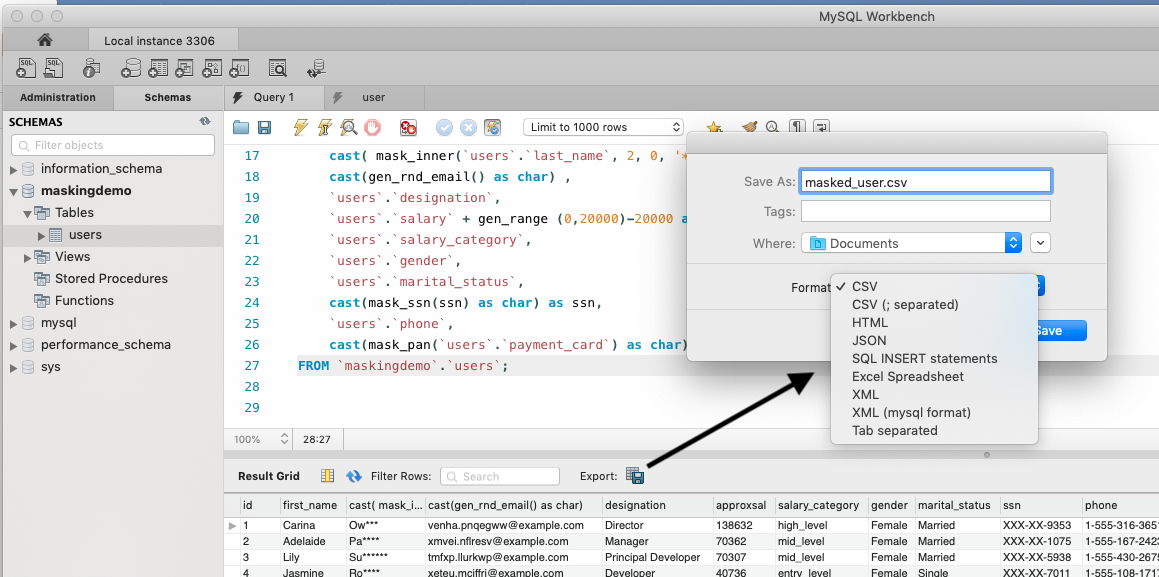
Step 7 – Export the data from the select in desirable format
If you using MySQL Workbench, with number of results in the thousands, you can easily export your masked data from the select statement.
However, for much larger results sets its likely you will want to run the export of this masked data in batch mode. For this the MySQL Shell is best.
First create a file with your masked select statement.
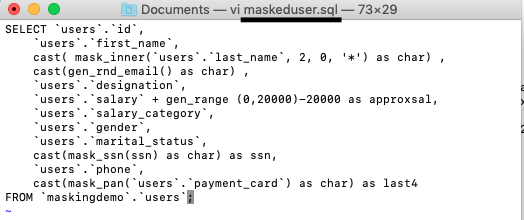
- Save this SQL to a file.
Next – determine desired results format –
Options are Tabbed, Table, Vertical, JSON (formatted – easy to read) , JSON (raw)
- Choosing the results format
- –result-format options are: tabbed, table, vertical, json or json/raw
- Choosing a protocol – Classic or X Protocol.(for 5.7 use –sqlc, 8.0 either)
- –sqlc for classic (3306)
- –sqlx for new X Protocol (33060)
Examples
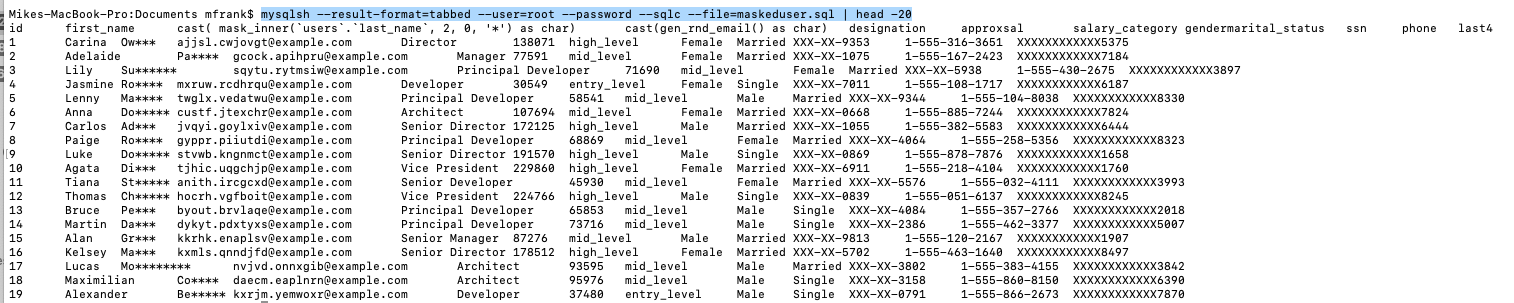
- Run the command – for tabbed
- mysqlsh –result-format=tabbed –user=root –password –sqlc –file=maskeduser.sql | head -20
- Run the command – for json
- mysqlsh –result-format=json/raw –user=root –password –sqlc –file=maskeduser.sql

- Run the command – for formatted “pretty” json
- mysqlsh –result-format=json –user=root –password –sqlc –file=maskeduser.sql

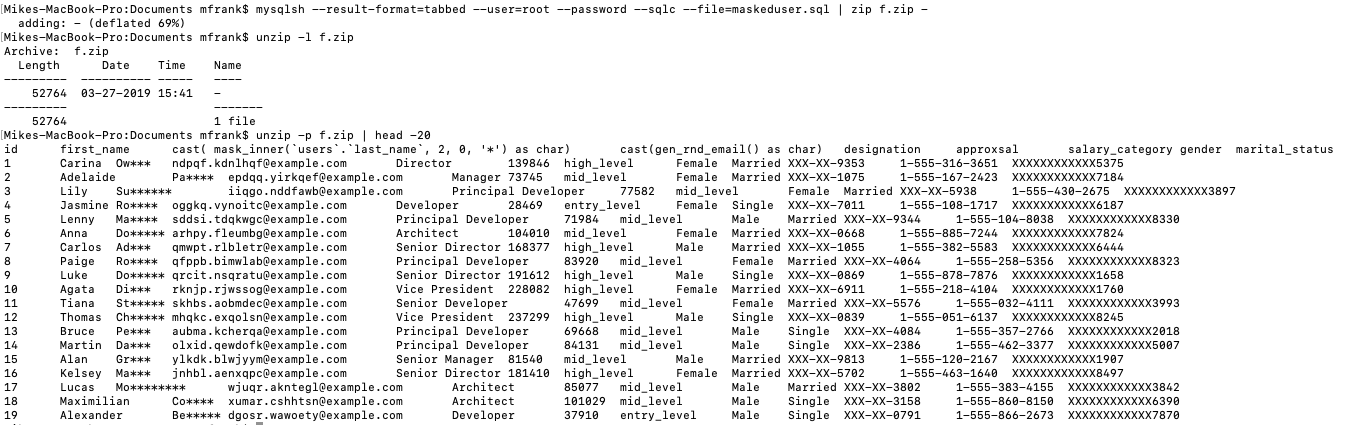
If the results are very large – then optionally compress by piping to zip.
- Run the command – for compressing to zip
- mysqlsh –result-format=tabbed –user=root –password –sqlc –file=maskeduser.sql | zip f.zip –
- Check the zip file –
- unzip -l f.zip
Conclusion
This blog has shown how easy it can be to protect data using data masking and de-identification. Its highly likely you’ll need tools such as these to obtain and maintain compliance with regulations like PCI, GDPR, HIPAA and others. It just takes a few simple steps, thanks to MySQL EE Masking, MySQL Workbench, and MySQL Shell.